1 2 3 4 5 6 7 8 9 10 #ifndef __COMPLEX__ #define __COMPLEX__ #endif
1
2
3
4
5
6
7
8
9
10
11
12
13
class complex { public : complex (); double real () const return re; } private : double re,im; }; inline double real (const complex& x) return x.real (); }
为了减少时间开销,如果在类体中定义的成员函数中不包括循环等控制结构,C++系统会自动将它们作为内置(inline)函数来处理。
C++要求对一般的内置函数要用关键字inline声明,但对类内定义的成员函数,可以省略inline,因为这些成员函数已被隐含地指定为内置函数。
如果成员函数不在类体内定义,而在类体外定义,系统并不把它默认为内置(inline)函数,调用这些成员函数的过程和调用一般函数的过程是相同的。如果想将这些成员函数指定为内置函数,应当用inline作显式声明。
如果函数太复杂,编译器没有办法把他看成 inline 函数!! 所以我们在类内实现只是为了建议编译器将其看成 inline 函数来提高效率,但是实际上是不是 inline 函数要看编译器,我们也不知道!
例子:
1 2 3 4 5 6 7 8 9 10 11 12 13 14 15 16 17 18 19 20 21 22 23 24 25 26 27 #ifndef __STU__ #define __STU__ #include <string> using namespace std;class Stu { public : static Stu &getInstance () void setup () private : Stu (); Stu (int id, string name); int _ID; string _name; }; Stu &Stu::getInstance () static Stu stu; return stu; } #endif
1 2 3 4 5 6 7 8 9 10 11 12 #include <iostream> #include "Stu.h" int main () auto stu = Stu::getInstance (); return 0 ; }
1 2 3 4 5 6 7 8 9 10 11 12 class complex { public : complex (double r = 0 , double i = 0 ) : re (r), im (i) {} double real () const return re; } double imag () const return im; } private : double re, im; };
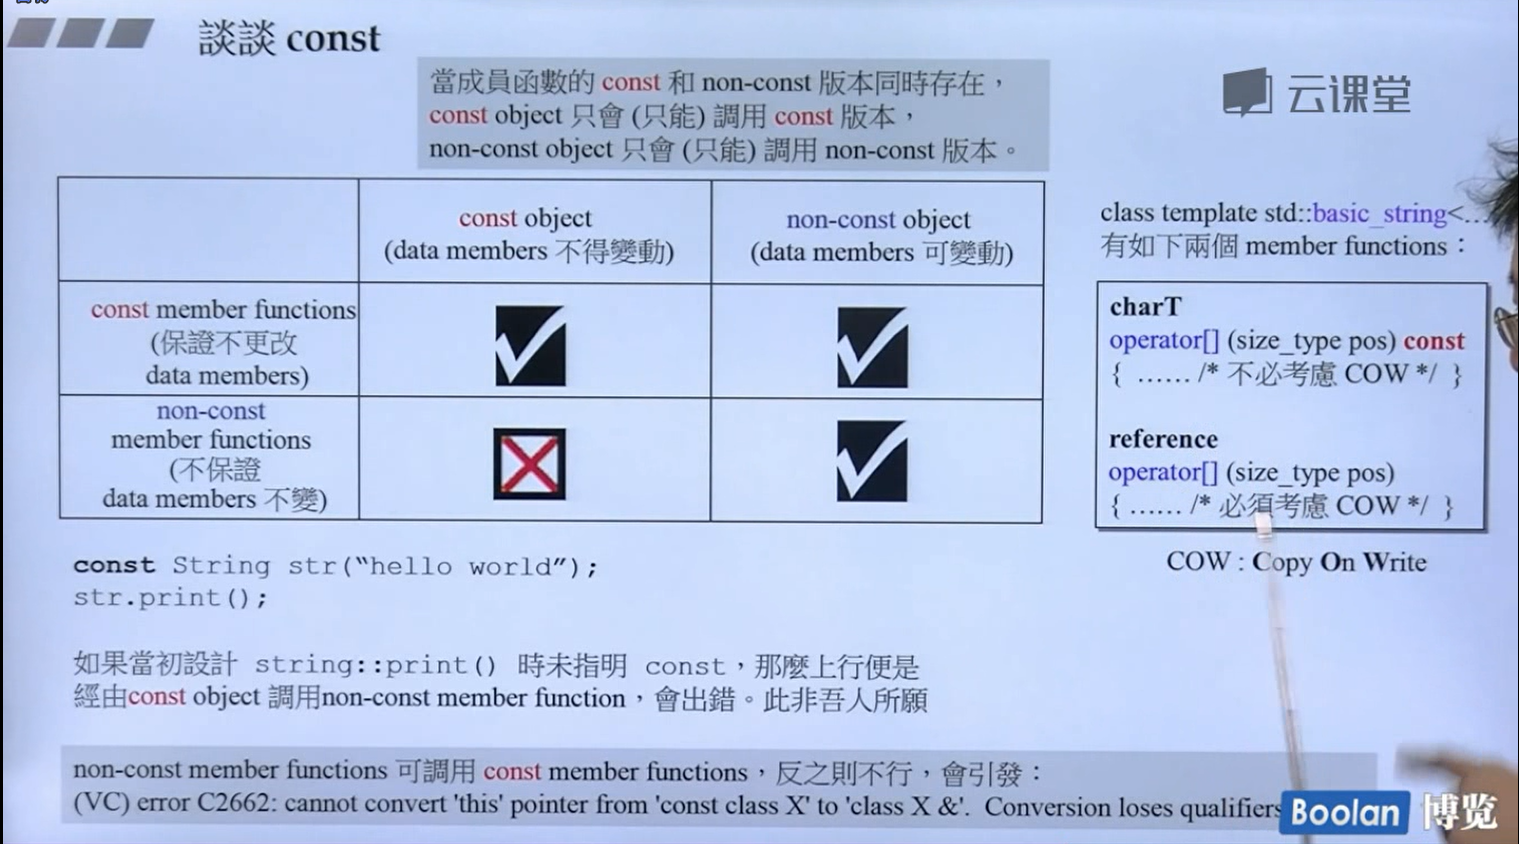
成员函数不改变类成员属性的值建议加上const修饰,换句话说就是拿数据.例如上面的real()和imag()都不改变成员属性的值,所以加上了const修饰。
在上面的例子当中,如果那两个成员函数不加上const,会出现什么情况呢?
1 2 3 const complex c (1 ,2 ) std::cout<<c.real ();
这是未加const的成员函数
1
2
double real () return re; }double imag () return im; }
打印real()会出问题,因为使用者不想要改变c里面元素的值,但是这个成员函数在访问的时候不加const,编译器认为有可能会改变成员函数的值,这两者是相互矛盾的,所以会报错,所以需要加上const来保证是不会改变值的。
引用的本质: 是一个指针常量
为什么选择引用: 传递非常快,并且可以解决形参修改不改变实参的问题
1
2
3
4
int a=10 ;int & ref = a; ref = 20 ;
引用是不可修改的,因为引用本质是指针常量,该指针的值是不可修改的,也就是指向的地址区域(a)是不可以变动的,但是解引用修改指向区域的值是完全没有问题的。
所以考虑到这两个问题,在实际操作过程中尽量传入引用。
1 2 3 4 5 6 7 8 9 10 11 12 13 14 15 16 17 18 19 20 21 22 23 class complex { public : complex (double r = 0 , double i = 0 ) : re (r), im (i) {} double real () const return re; } double imag () const return im; } private : double re, im; friend complex &__doapl(complex*, const complex& ); }; inline complex &__doapl(complex *ths, const complex &r) { ths->re += r.re; ths->im += r.im; return *ths; }
相同class的各个objects互为friends 友元
还是上面的例子
1 2 3 4 5 int func (const complex& param) return param.re + param.im;}c2.f unc(c1);
两种理解:
1.相同class的各个objects互为友元,所以可以访问私有属性
2.私有成员属性可以类内访问,类外不可以访问,需要访问需要成员函数接口
传送着无需知道接收者是以reference接受
1
2
3
4
inline complex&complex::operator += (const complex &r){ return __doapl(this ,r); }
实现 += 号的重载(复数)
为什么要返回 & :因为不能创建新对象,我们的目的是修改原对象!!!
这样做可以实现连加操作 c1 += c2 + =c3
关于运算符重载返回reference还有一个例子
1 2 3 4 5 6 7 8 9 10 11 12 13 14 15 16 17 18 19 20 21 22 23 24 25 26 27 28 29 30 31 32 33 34 35 36 #include <iostream> using namespace std;#include <string> #include <ostream> class Stu { public : Stu (); Stu (int id, string name) : _ID(id), _name(name) {} int getID () return this ->_ID; } string getName () { return this ->_name; } private : int _ID; string _name; }; inline ostream & operator <<(ostream &os, Stu &s){ os << s.getID () << ' ' << s.getName () << endl; return cout; } int main () Stu s (1 , "张三" ) ; cout << s; return 0 ; }
什么时候只能return by value?我们应该优先考虑return by reference,但是在这个函数返回值的时候需要创建一个新的对象的时候只能return by value
1
2
3
4
5
6
inline complexoperator +(const complex &x,const complex &y){ return complex (real (x)+real (y),imag (x)+imag (y)); } c2=c1+c2;
比较经典的类就是string字符串类,必须有拷贝构造 copy ctor和拷贝赋值 copy op=
1
2
3
4
5
6
7
8
9
10
11
12
13
14
15
16
17
class String { public : String (const char *cstr = 0 ); String (const String &str); String &operator =(const String &str); ~String (); char *get_c_str () const return this ->_data; } private : char *_data; };
当然这里的拷贝指的是深拷贝!!!
Big Three:拷贝构造,拷贝赋值,析构函数!!!!!!
1
2
3
4
5
6
7
8
9
10
11
12
13
inline String &String::operator =(const String &str){ if (this == &str) return *this ; delete [] this ->_data; this ->_data = new char [strlen (str) + 1 ]; strcpy (this ->_data, str._data); return *this ; }
这里为什么要检测自我赋值:因为不检测自我赋值的话,如果使用者调用自我赋值的时候,第一步就会把唯一的自身这个_data杀掉,后续就没有办法进行了,会出现安全隐患!!!这也是为了安全和严谨性考虑的
1
2
3
4
5
6
7
8
9
10
11
12
13
class complex { };complex c3 (1 ,2 ) ;int main () complex c1 (1 ,2 ) ; static complex c2 (1 ,2 ) complex *c4=new complex (1 ,2 ); delete c4; return 0 ; }
C++程序在执行时,将内存大方向划分为4个区域
c1 :存放在栈当中,当作用域(这里是main函数)结束的时候就会被自动清理
c2 :静态变量,存放于全局静态区,当整个程序结束之后才会被释放
c3: 全局变量,存放于全局区,当整个程序结束之后才会被释放
c4: new出来的,动态分配内存,存放于堆区,注意new了之后记得在作用域结束之前将其delete掉
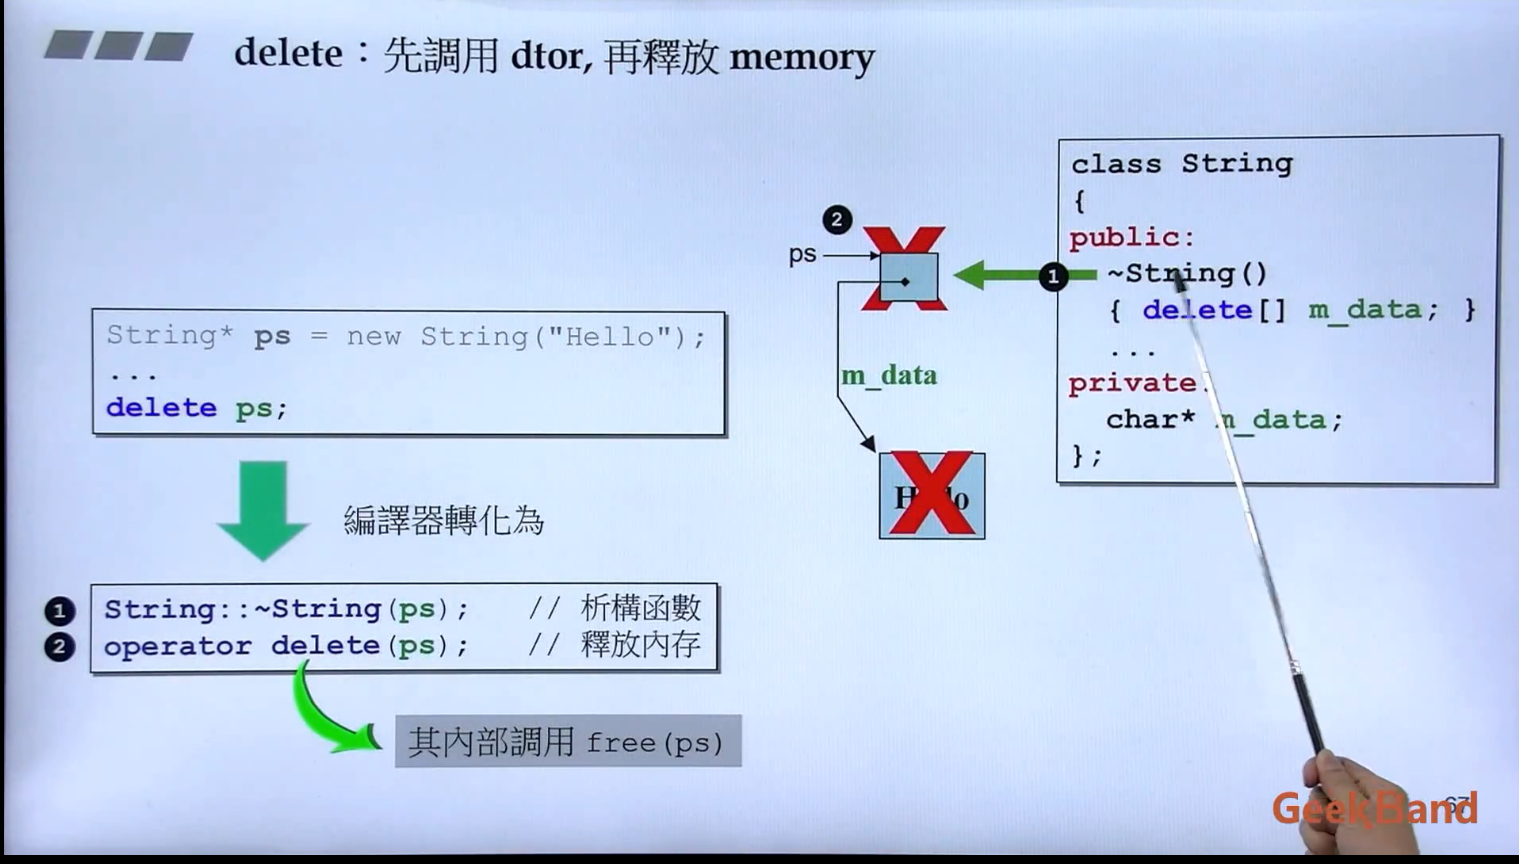
否则会出现内存泄露的问题,当作用域结束之后c4指针会被释放掉,但是他所指向的内存没有被释放!!!一般写析构函数解决这个问题
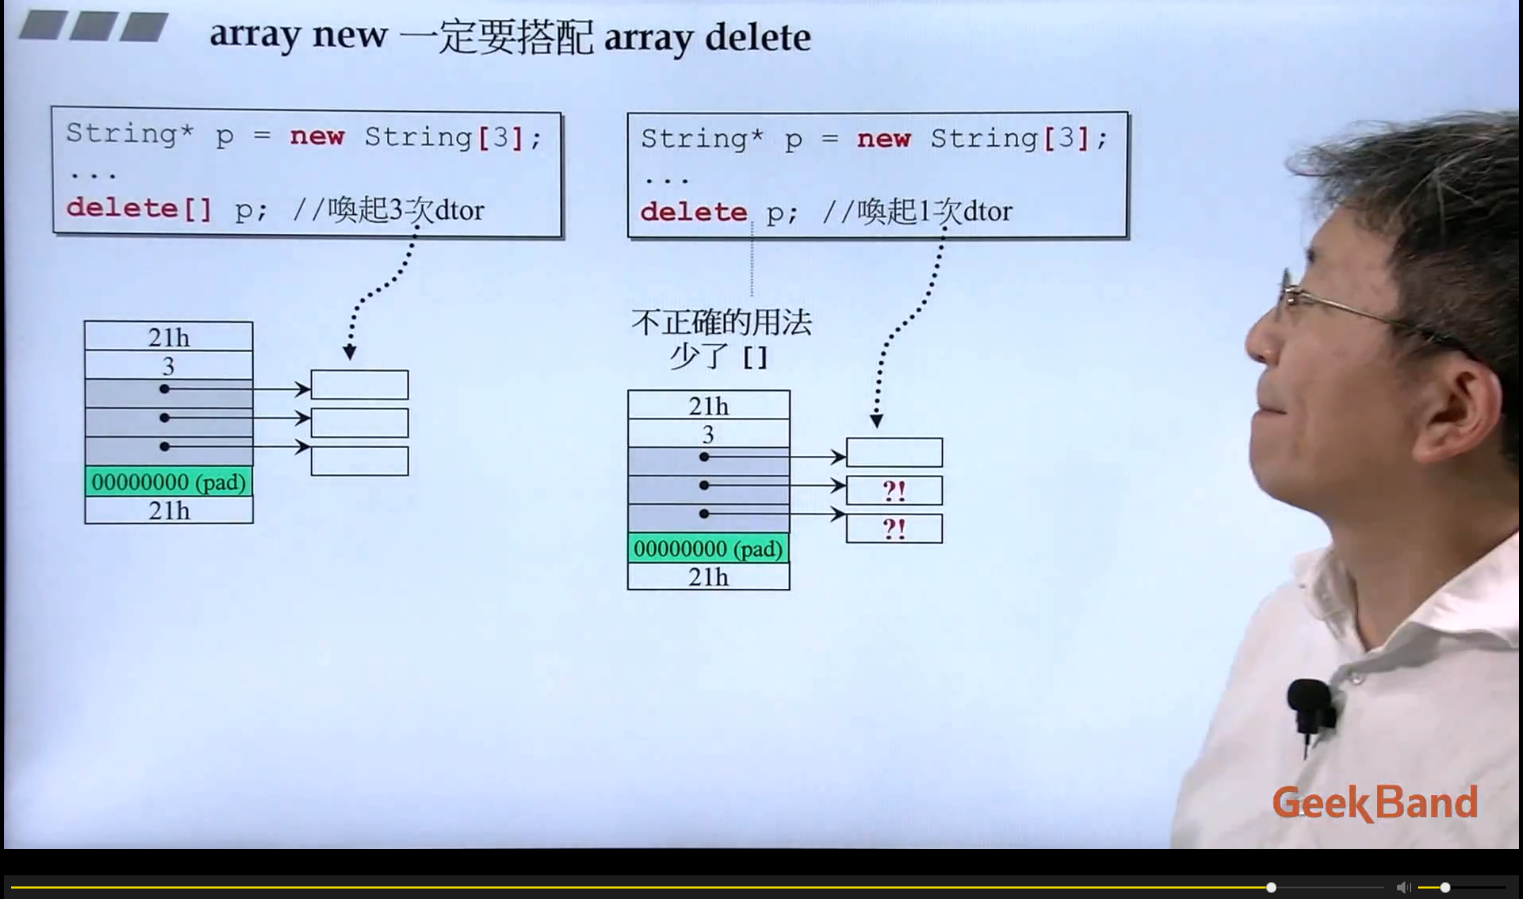
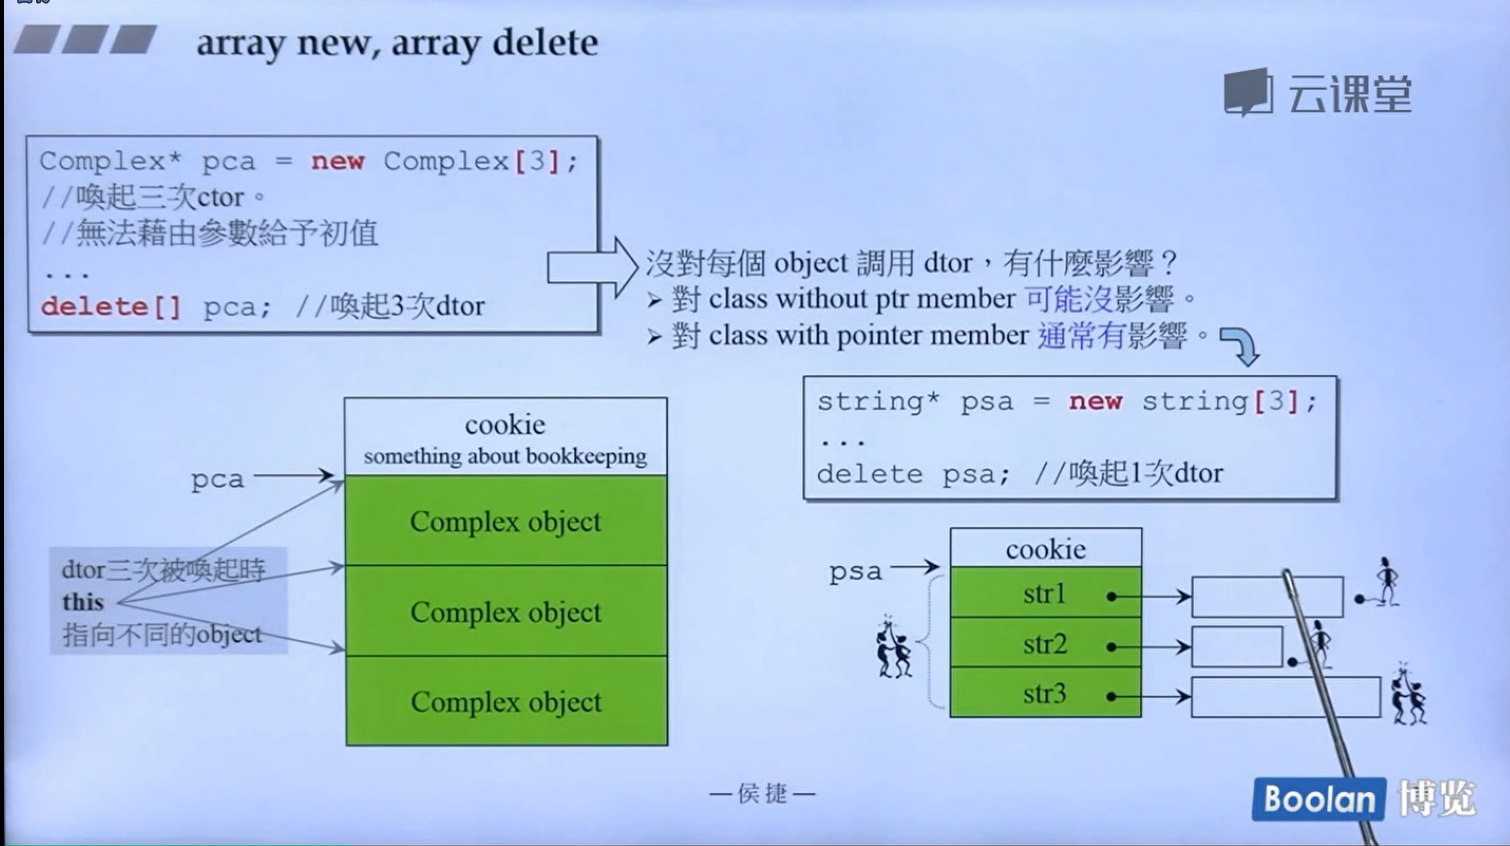
写了 [] 的话编译器才会知道你不仅要删除p这个类对象指针,还要把这个p对象指针指向的数组元素给全部删除掉,因为 String* p既可以表示单个的类对象指针也可以表示类对象数组的首元素地址指针!!! 所以必须要要写 [] ,否则只会删除掉p[0]所对应的元素!!!
静态变量和静态函数很特殊,具体看下面代码:
静态函数由于没有this指针,所以只能处理静态变量!!!
1 2 3 4 5 6 7 8 9 10 11 12 13 14 15 16 17 18 19 20 21 22 23 24 #include <iostream> using namespace std;class Account { public : static double _rate; static void set_rate (const double &rate) }; double Account::_rate = 8.0 ;void Account::set_rate (const double &rate) Account::_rate = rate; } int main () cout << Account::_rate << endl; Account::set_rate (7.0 ); cout << Account::_rate << endl; return 0 ; }
1
2
3
4
5
6
7
8
9
10
11
12
13
14
15
16
17
class Stu { public : static Stu &getInstance () return s; } void setup () { ; } private : Stu (); Stu (int id, string name); int _ID; string _name; static Stu s; };
这里的就是把构造函数放在 private 当中,对外界的接口就是这个 getInstance(),这个函数返回静态变量 s ,只有一份,通过 setup() 接口进行对这个类内成员的访问和修改!!!
1 Stu::getInstance ().setup ();
优化的写法:
由于这里在构建类的时候就引入了静态成员变量,在没有调用的时候可能会导致资源浪费,所以我们将这个静态成员变量在静态函数中创建就好了,在调用的时候创建,然后生命周期一直持续到程序结束
1
2
3
4
static Stu& getInstance () static Stu s; return s; }
用的时候必须要明确指出里面参数的类型
1
2
3
4
5
6
7
8
9
10
11
12
13
14
template <typename T>class complex { public : complex (); private : T real; T imag; }; int main () complex<int >c1 (); complex<double >c2 (); }
用的时候不需要指明函数参数的类型,因为编译器会进行实参的推导
1
2
3
4
5
6
7
8
9
10
11
12
13
14
15
16
17
18
19
20
21
22
23
24
25
26
27
class stone { public : stone (); stone (int w, int h, int weight) : _w(w), _h(h), _weight(weight) {} bool operator <=(const stone &sto) { return this ->_weight <= sto._weight; } private : int _w, _h, _weight; }; template <typename T>inline T &min (T &a, T &b) return a <= b ? a : b ? } int main (){ int a = 1 , b = 2 , c; stone a1 (1 , 2 , 3 ) , a2 (4 , 5 , 2 ) , a3 ; c = min (a, b); a3 = min (a1, a2); }
将自己写的东西封装在一个命名空间当中,可以防止与其他人名称一样功能不同的问题
简单来理解就是 一个类包含另一个类对象,本类可以调用另一个类的底层函数
1 2 3 4 5 6 7 8 9 10 template <class T >class queue { protected : deque<T> c; public : bool empty () const return c.empty ();} };
这里其实包含另一种设计模式: Adapter
deque是双端队列,queue是单端队列,显然deque的功能要比queue功能强大,他完全可以适配(Adapter)queue的功能,所以可以采用复合的方式,queue的成员函数调用deque中的部分成员函数来实现自己的功能!!!
用图可以这样表示:
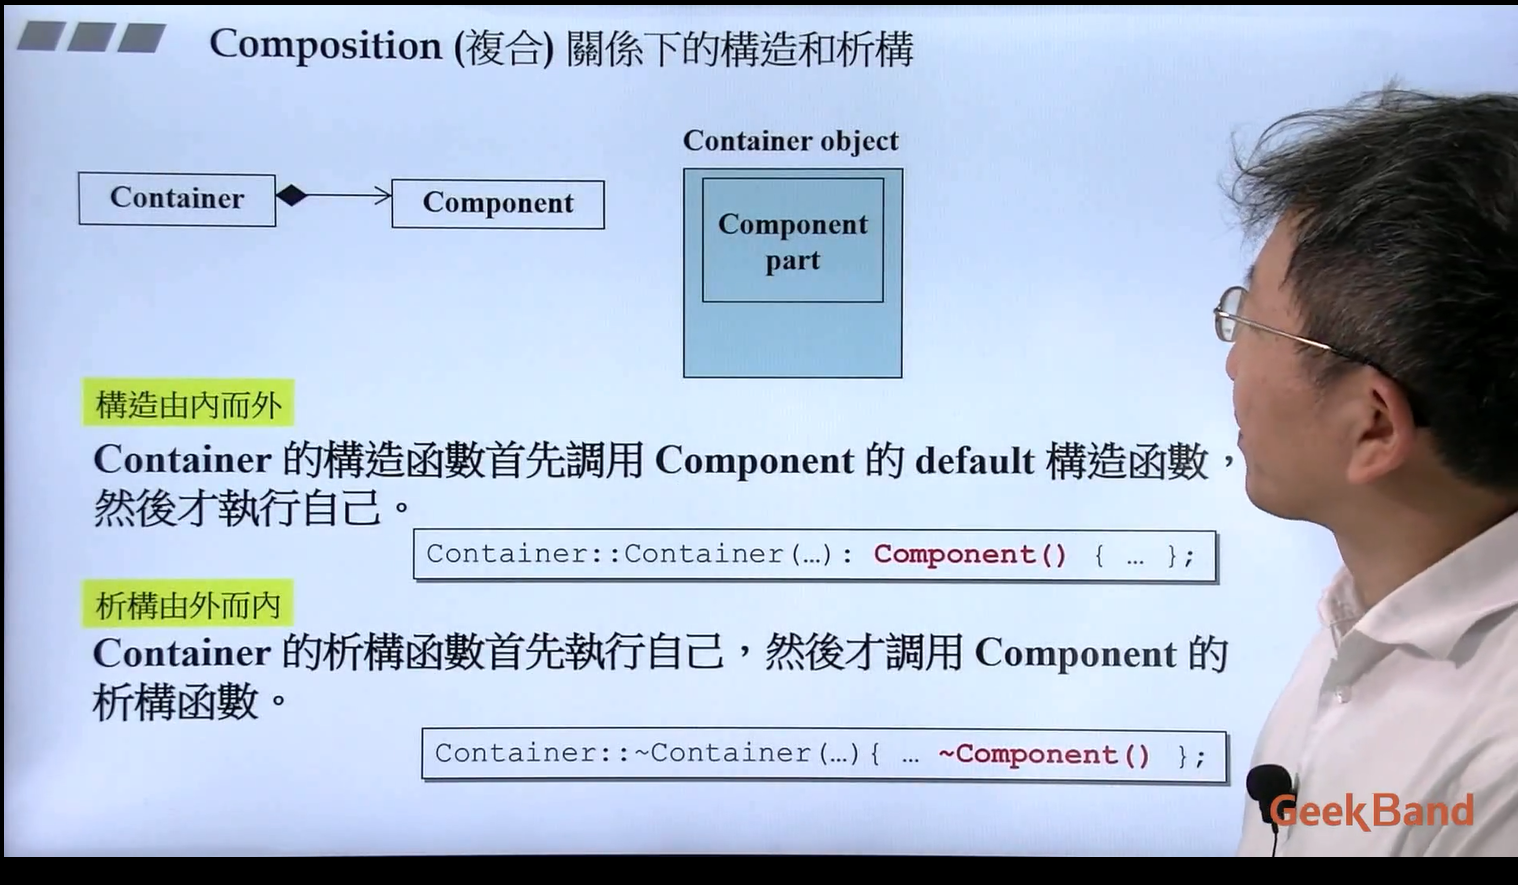
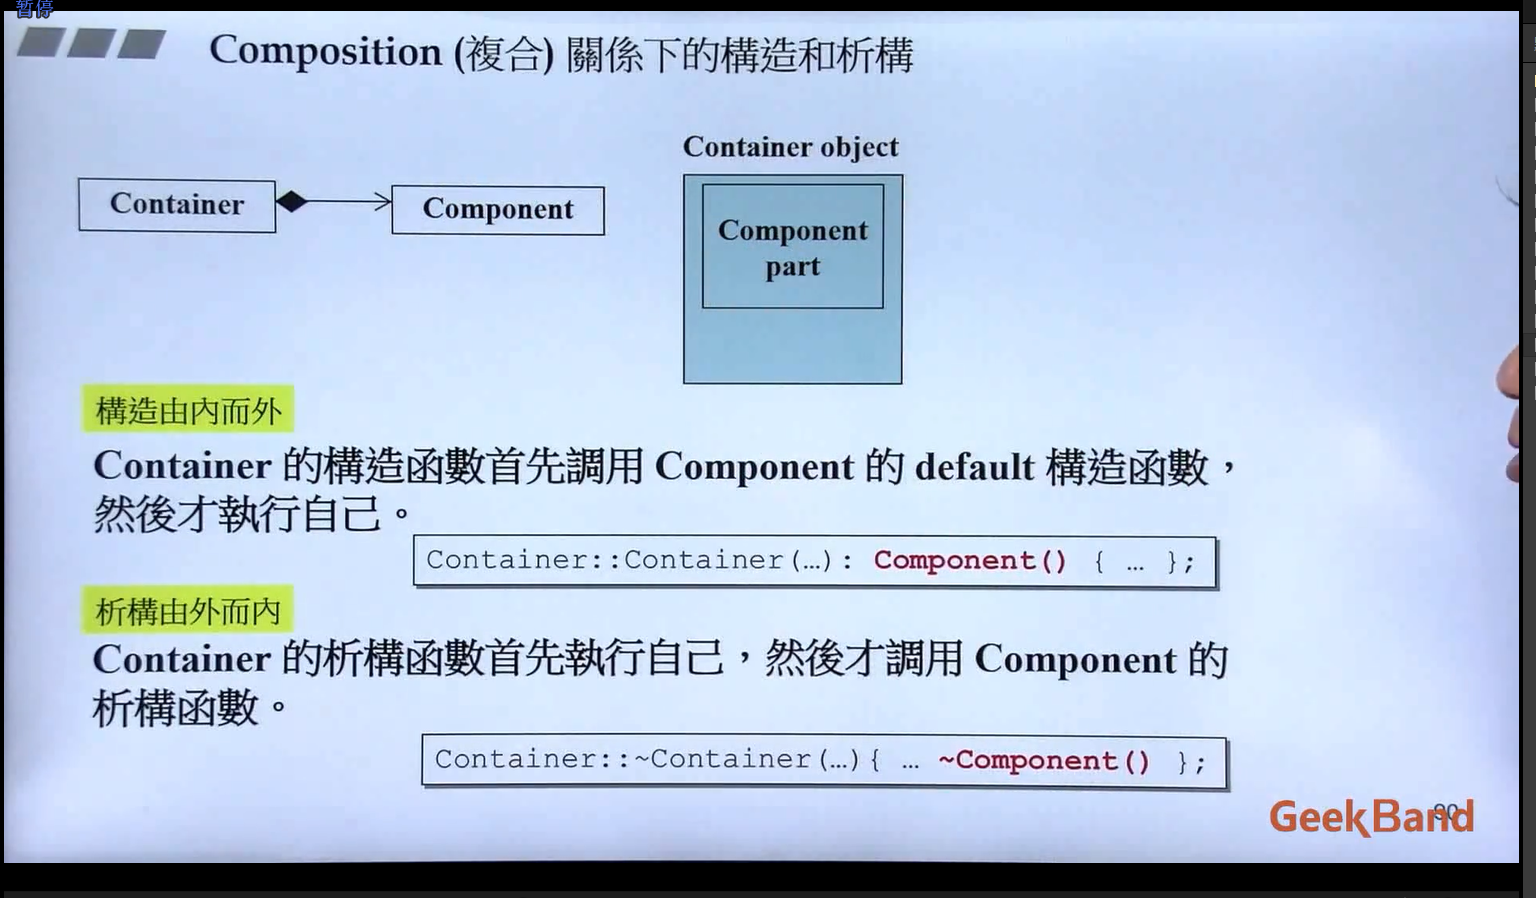
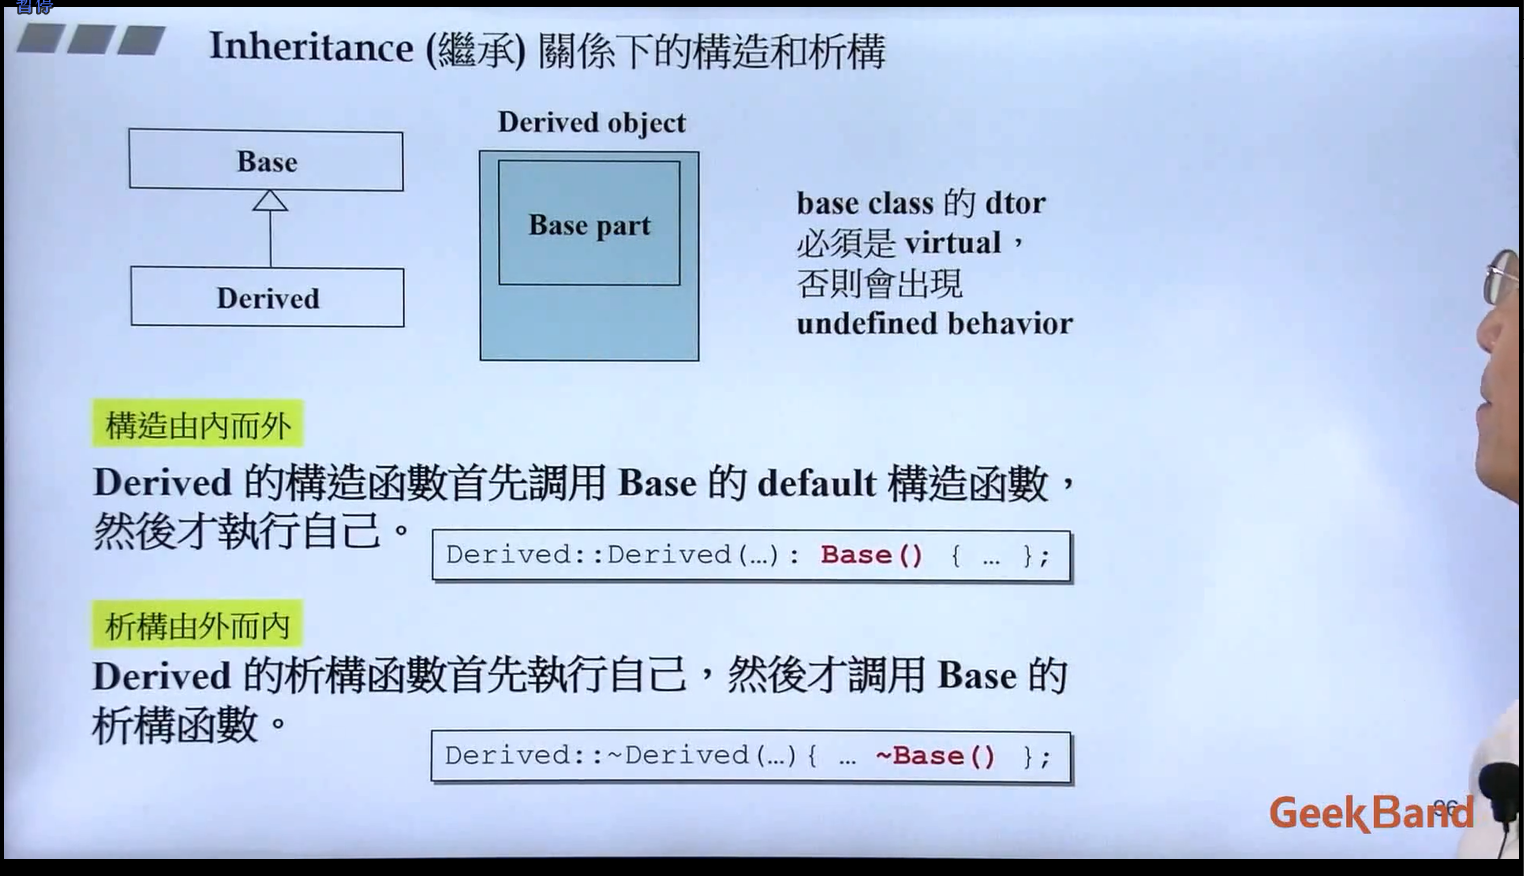
构造: 构造由内而外 注意先调用的是内部的默认 构造,编译器指定的,也符合我们的预期!
析构: 析构由外而内
这些是编译器帮我安排好的,上面是我们希望的设计
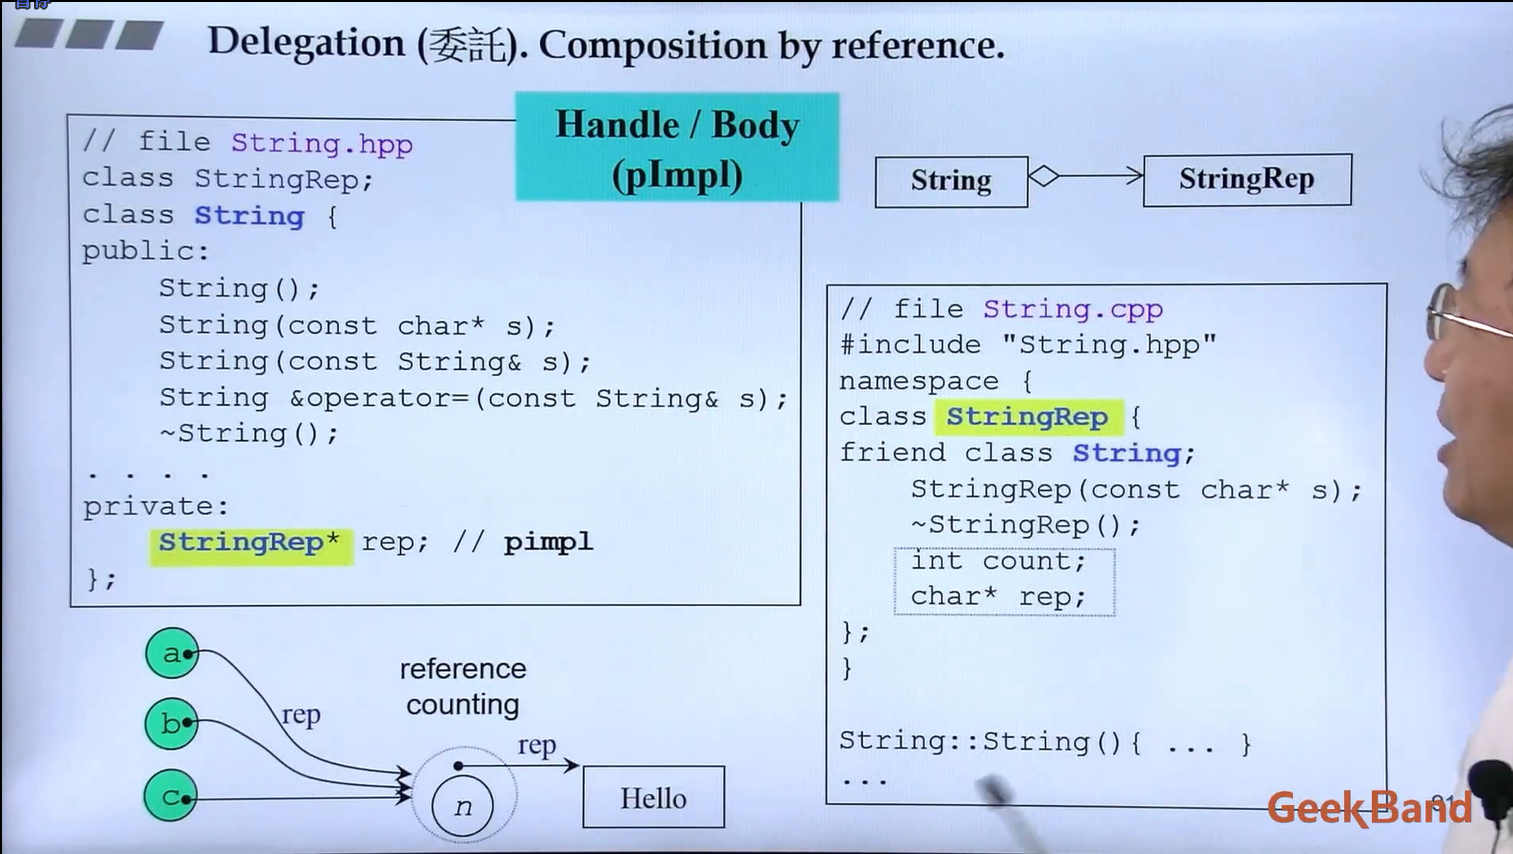
把复合下面传入的参数类型改为指针!!!
图示的这种写法很有名,左边是用户看到的类,里面有调用的接口这些,右边是真正字符串的类,用来封装字符串的类型这些。
reference counting: 这种写法在这个特殊例子当中可以实现,用户创建了三个String对象,但是每个对象下面对应的 rep 指针指向的对象其实是一块内存,因为他们的字符串是一样的,这样就可以减少内存的开销。
构造:由内而外 调用父类的默认 构造函数,编译器指定的,也符合我们的预期!
析构:由外而内
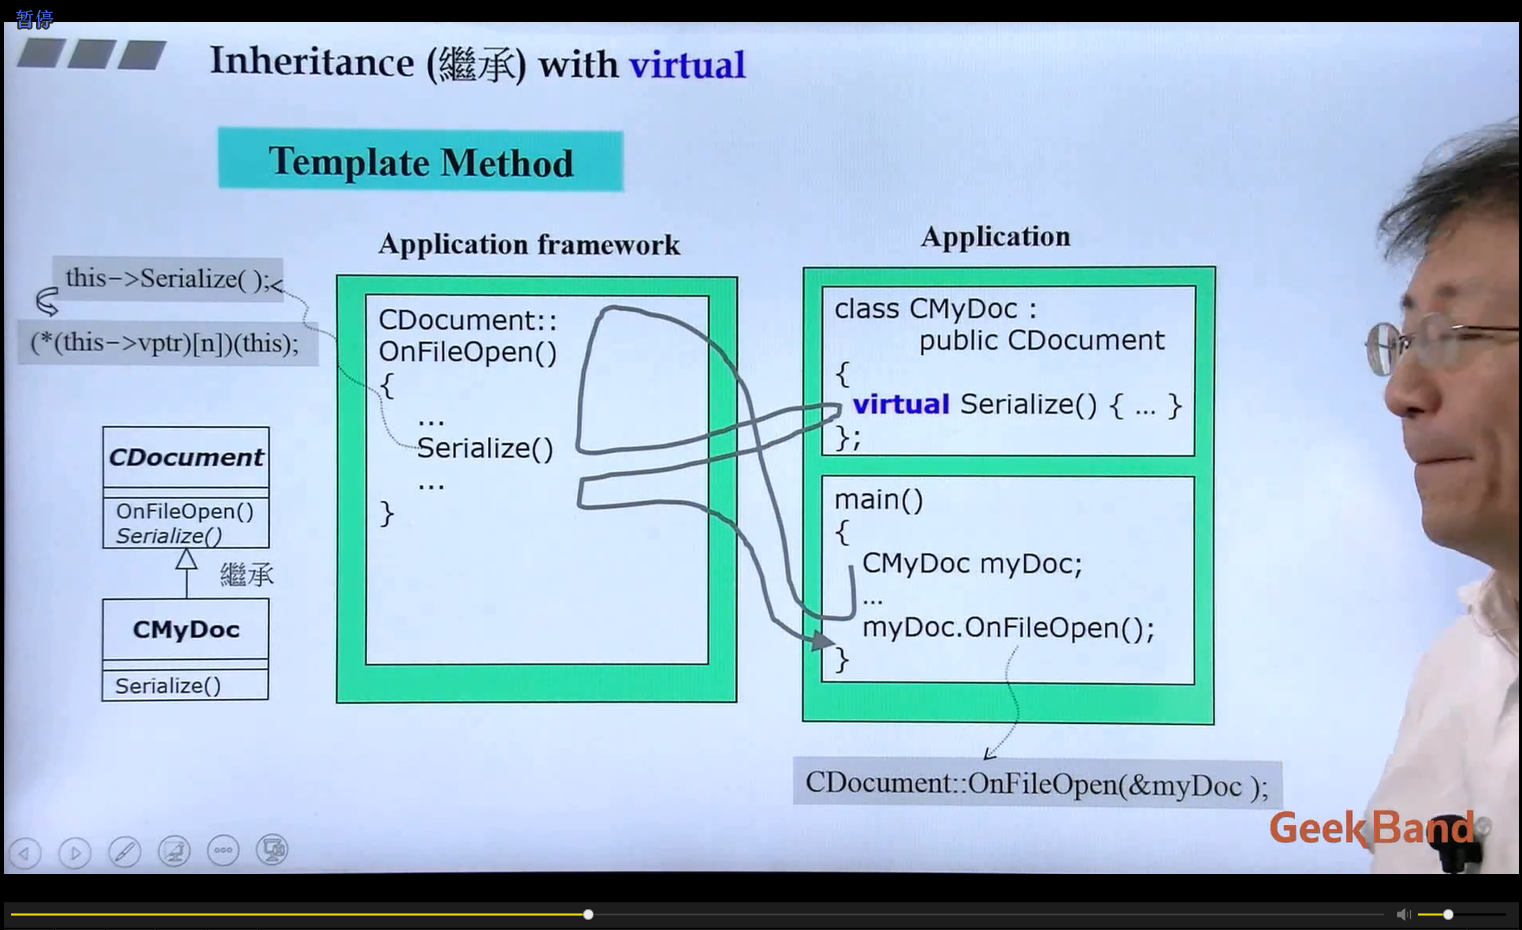
override 覆写:注意只能用在虚函数这里
non-virtual 函数: 父类不希望子类重写(override)它
virtual 函数:父类希望子类重写(override)它,父类对它一般已经有默认定义
pure virtual 函数(纯虚函数):父类希望子类一定要重写(override)它,父类对它没有默认定义,例子:父类是个抽象类
注意:子类调用父类的函数,如果子类当中对父类的函数进行了override,那么在调用到这个虚函数的时候就会调用子函数覆写的版本,从而实现我们的需求!!!
下面还有个例子:
1 2 3 4 5 6 7 8 9 10 11 12 13 14 15 16 17 18 19 20 21 22 23 24 25 26 27 28 29 30 31 32 #include <iostream> using namespace std;class Animal { public : virtual void speak () 0 ; }; class Cat : public Animal{ public : virtual void speak () "喵喵喵" << endl; } }; class Dog : public Animal{ public : virtual void speak () "汪汪汪" << endl; } }; int main () Animal *cat = new Cat (); cat->speak (); Animal *dog = new Dog (); dog->speak (); return 0 ; }
用父类对象指针来接受子类对象 来达到子类调用父类对象成员函数的目的,这样也可以实现多态.
作用:可以用于类型的转换
重载 () 运算符 在括号的前面加上返回的类型,括号内不传参数,返回值由于在括号前面已经指定了,所以省略不写,编译器指定的
1 2 3 operator double () return (double )this ->_numerator / (double )this ->_denominator; }
整体的例子:
1 2 3 4 5 6 7 8 9 10 11 12 13 14 15 16 17 18 19 20 21 22 23 24 25 26 27 28 29 30 31 #include <iostream> using namespace std;class Fraction { public : Fraction (int num, int den = 1 ) : _numerator(num), _denominator(den) {} operator double () const { return (double )this ->_numerator / (double )this ->_denominator; } private : int _numerator; int _denominator; }; int main () Fraction f (3 , 5 ) ; double d = 4 + f; cout << d << endl; return 0 ; }
注意main函数里面的细节!!!
谓词:
1.函数指针作谓词
2.函数对象(仿函数)作谓词
1 2 3 4 5 6 7 8 9 10 11 12 13 14 15 16 17 18 19 20 21 22 23 24 25 26 27 28 29 30 31 32 #include <iostream> using namespace std;#include <vector> #include <algorithm> bool Cmp (int val1, int val2) return val1 <= val2; } class Fuck { public : bool operator () (int val1, int val2) { return val1 <= val2; } }; int main () vector<int > nums{5 , 3 , 4 , 2 , 1 }; sort (nums.begin (), nums.end (), Fuck ()); for_each(nums.begin (), nums.end (), [&](int val) { cout << val << ' ' ; }); cout << endl; return 0 ; }
仿函数(函数对象): function like classes
在类里面重载 () 运算符
1 2 3 4 5 template <class T >class identity {public : const T& operator () (const T& x) return x;} }
调用的时候 identity() 这样就是一个函数对象
标准库里面有很多仿函数,这些仿函数都继承了一些标准库里面的父类,这些父类大小为0,没有成员函数。(标准库)
到目前为止,三种模板: 类模板 函数模板 成员模板
注意看注释进行理解!!!
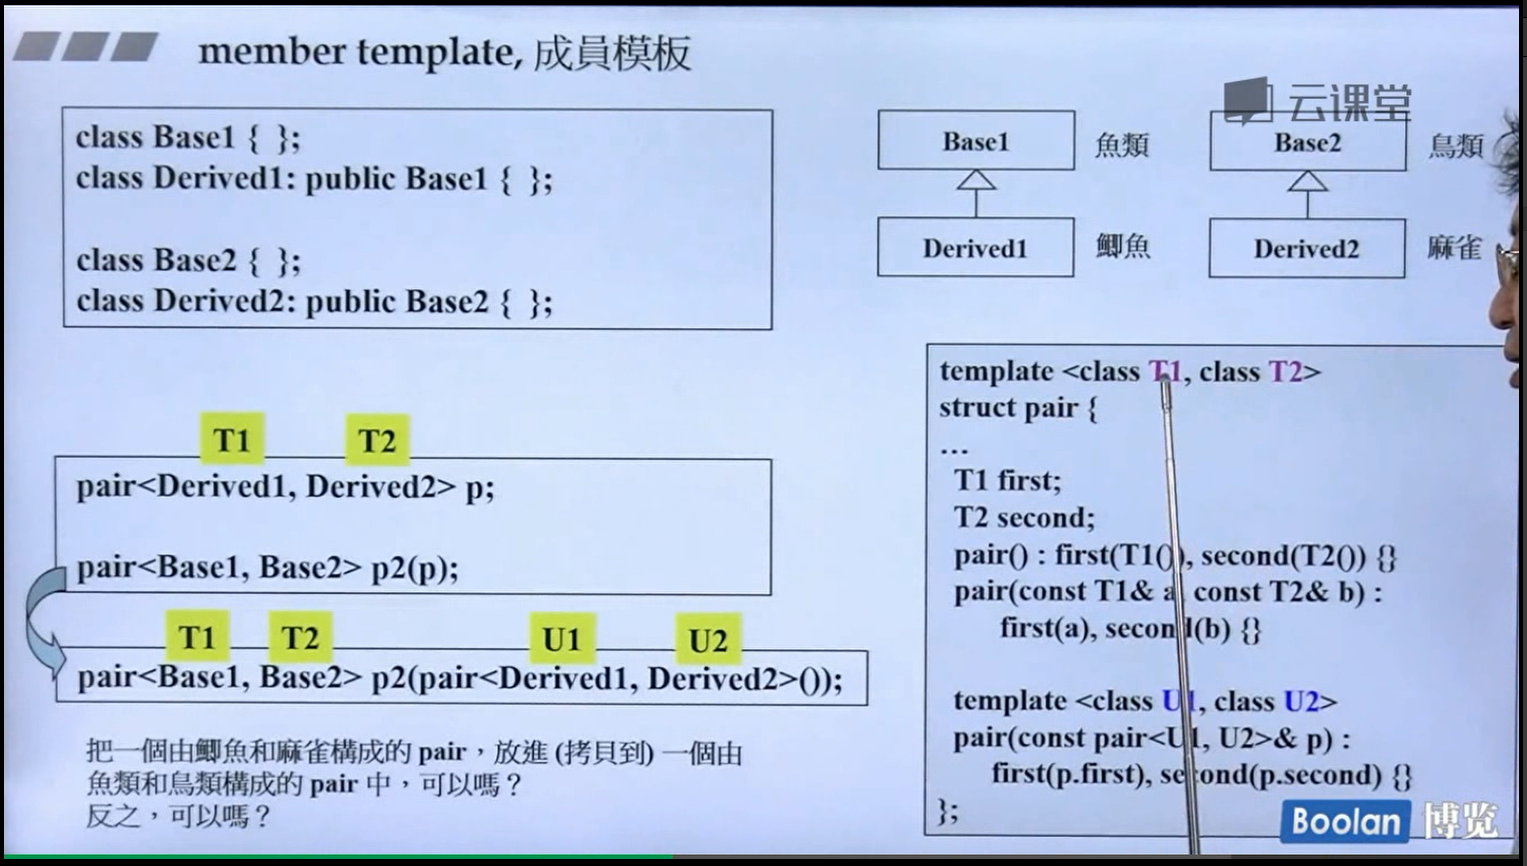
1 2 3 4 5 6 7 8 9 10 11 12 13 14 15 16 17 18 19 20 21 22 23 24 25 26 27 28 29 30 31 32 33 34 35 36 37 38 39 40 #include <iostream> using namespace std;class Base1 { }; class Derived1 : public Base1{ }; class Base2 { }; class Derived2 : public Base2{ }; template <class T1 , class T2 >struct Pair { T1 _first; T2 _second; Pair (); Pair (const T1 &a, const T2 &b) : _first(a), _second(b) {} template <class U1 , class U2 > Pair (const Pair<U1, U2> &p) : _first(p._first), _second(p._second) {} }; int main () return 0 ; }
这里其实就有考虑指针指向的问题
1 2 class Derived1 : public Base1 { };Base1 *ptr=new Derived1;
还是考虑 Base1 是鱼类,Derived1 是 鲫鱼,然后我们用鱼类的指针去指向鲫鱼对象,这显然是可以的,因为鲫鱼很明显是鱼,所以这么写是完全ok的。
并且恰好这么写可以使得子类调用父类的虚函数来实现不同的虚函数功能。
1 2 3 4 5 6 7 8 9 10 11 12 13 14 15 16 17 18 19 20 21 22 23 24 25 26 #include <iostream> using namespace std;namespace my1{ static void test () { cout << "I am in namespace my1" << endl; } } namespace my2{ static void test () { cout << "I am in namespace my2" << endl; } } int main () my1::test (); my2::test (); return 0 ; }
两个命名空间,即使里面的函数名称一样,传入参数等等方面完全一样,甚至还是静态的,虽然静态的存放于全局静态区只有一份,但是这里用了两个不同的命名空间将他们分割开来,这样就导致两个函数本质上是不同的,从下面的使用就可以看出来了。
non-explicit-one-argument ctor(构造函数)
1 2 3 4 5 6 7 8 9 10 11 12 13 14 15 16 class Fraction { public : Fraction (int num, int den = 1 ) : _numerator(num), _denominator(den) {} operator double () const { return (double )this ->_numerator / (double )this ->_denominator; } private : int _numerator; int _denominator; };
我们先将转换函数去掉,重载加号运算符
1 2 3 4 5 6 7 8 9 10 11 12 13 14 15 16 17 18 19 20 class Fraction { public : Fraction (int num, int den = 1 ) : _numerator(num), _denominator(den) {} Fraction operator +(const Fraction& f){ ; } private : int _numerator; int _denominator; }; int main () Fraction f (3 ,5 ) ; Fraction d=f+4 ; }
如果两个同时存在
1 2 3 4 5 6 7 8 9 10 11 12 13 14 15 16 17 18 19 20 21 22 23 24 25 26 class Fraction { public : Fraction (int num, int den = 1 ) : _numerator(num), _denominator(den) {} operator double () const { return (double )this ->_numerator / (double )this ->_denominator; } Fraction operator +(const Fraction& f){ ; } private : int _numerator; int _denominator; }; int main () Fraction f (3 ,5 ) ; Fraction d=f+4 ; }
现在如果加上关键字 explicit 呢?
1 2 3 4 5 6 7 8 9 10 11 12 13 14 15 16 17 18 19 20 21 22 23 24 25 26 27 class Fraction { public : explicit Fraction (int num, int den = 1 ) : _numerator(num), _denominator(den) { operator double () const { return (double )this ->_numerator / (double )this ->_denominator; } Fraction operator +(const Fraction& f){ ; } private : int _numerator; int _denominator; }; int main () Fraction f (3 ,5 ) ; Fraction d=f+4 ; double e=f+4 ; }
这个关键字 explicit 绝大部分都是用在构造函数前面来防止其他类型的隐式转换!!!!
1 2 3 4 5 6 7 8 9 10 11 12 13 14 15 16 17 18 19 20 21 22 23 24 25 26 27 28 29 30 31 32 33 34 35 36 37 #include <iostream> using namespace std;struct Foo { void method (void ) }; template <class T >class shared_ptr { public : shared_ptr (T *p) : _px(p) {} T &operator *() const { return *(this ->_px); } T *operator ->() const { return this ->_px; } private : T *_px; }; int main () shared_ptr<Foo> sp (new Foo) ; Foo f (*sp) ; sp->method (); return 0 ; }
1 2 3 4 5 6 7 8 9 10 11 12 13 14 15 16 17 18 19 20 21 22 23 24 25 #include <iostream> using namespace std;#include <list> #include <algorithm> void test () list<int > l{5 , 2 , 4 , 3 , 1 }; for (list<int >::iterator iter = l.begin (); iter != l.end (); ++iter) cout << *iter << ' ' ; cout << endl; for_each(l.begin (), l.end (), [&](int val) { cout << val << ' ' ; }); cout << endl; } int main () test (); return 0 ; }
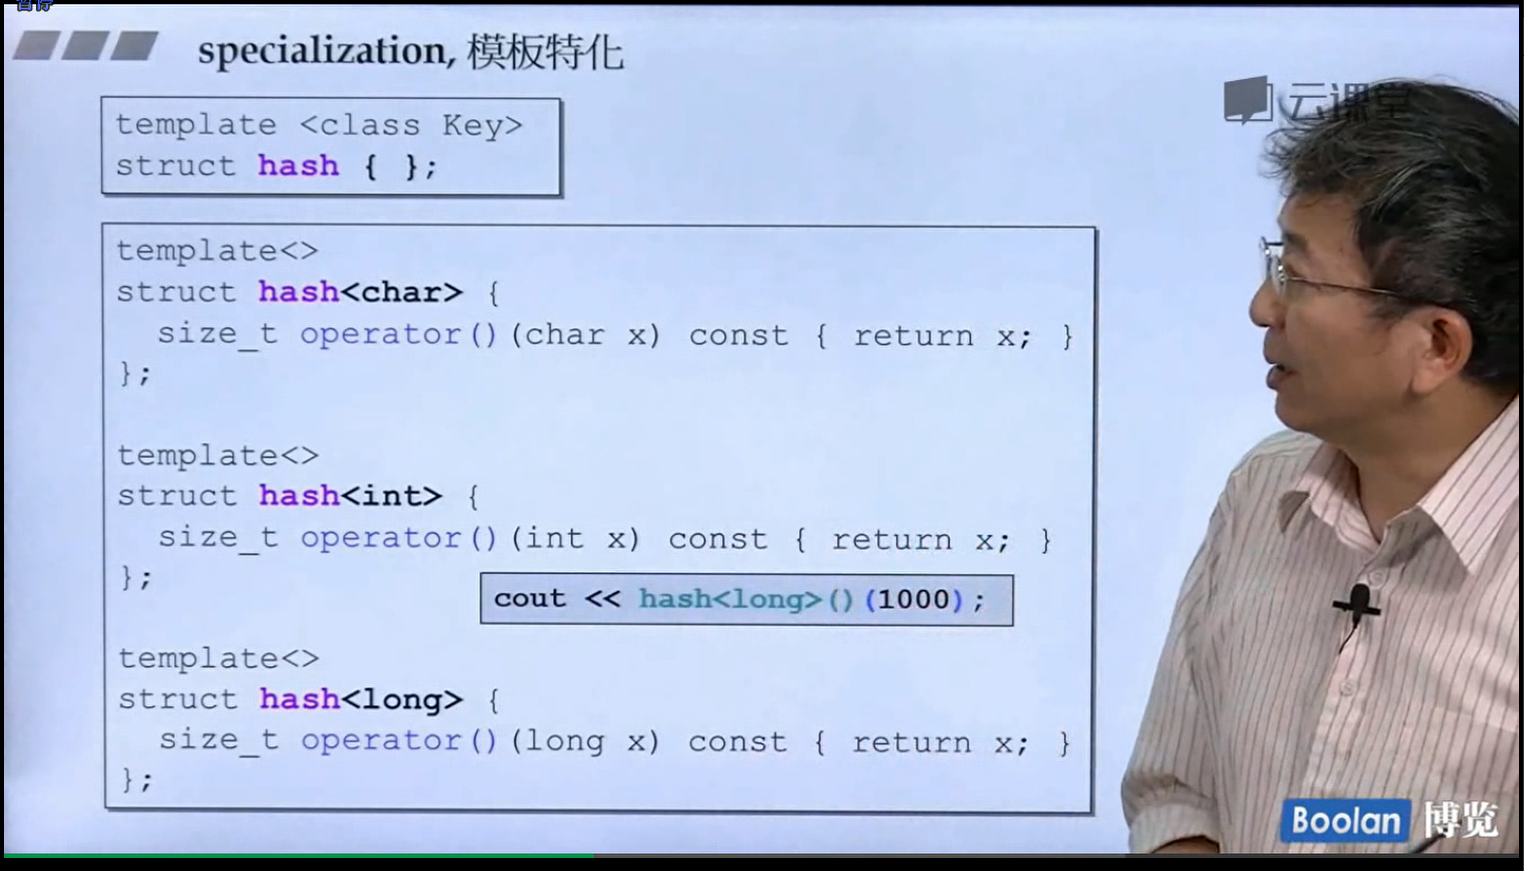
对于一个泛型模板,我们调用的时候里面的接口都是一样的。但是如果我们发现有的特殊的类型在某个函数下有更加好的实现方法,这个时候就可以用模板特化来操作了。可以类比子类继承父类(抽象类)的虚函数,特殊化实现,本质是一样的。
1 2 3 4 5 6 7 8 9 10 11 12 13 14 15 16 17 18 19 20 21 22 23 24 25 26 27 28 29 30 31 32 33 34 35 36 37 #include <iostream> using namespace std;template <class Type >struct Fuck { }; template <>struct Fuck <int >{ int operator () (int val) const return val; } }; template <>struct Fuck <string>{ string operator () (string ch) const { return ch; } }; template <>struct Fuck <double >{ double operator () (double val) const return val; } }; int main () cout << Fuck <int >()(1 ) << endl; cout << Fuck <string>()("fuck" ) << endl; cout << Fuck <double >()(3.14 ) << endl; return 0 ; }
模板特化语法第一行要加上,第二行就是具体类型类的具体操作
1 2 3 4 template <>class Fuck <type>{ ; };
个数的偏
1 2 3 4 5 6 7 8 9 10 template <typename T,typename Alloc= ...>class Vector{ ... }; template <typename Alloc= ...>class Vector<bool ,Alloc>{ ... };
范围的偏
1 2 3 4 5 6 7 8 9 10 11 12 13 14 15 16 17 18 19 20 21 22 23 24 25 26 27 28 29 30 31 32 33 34 35 36 37 38 39 40 41 42 43 44 45 46 47 48 49 50 51 52 53 54 55 56 57 58 59 60 61 62 63 64 65 66 67 68 69 70 71 72 73 74 75 76 77 78 79 80 81 #include <iostream> using namespace std;template <typename T>struct TC { void functest () { cout << "泛化版本" << endl; } }; template <typename T>struct TC <const T> { void functest () { cout << "偏特化const版本" << endl; } }; template <typename T>struct TC <T *> { void functest () { cout << "const T*特化版本" << endl; } }; template <typename T>struct TC <T &> { void functest () { cout << "T &左值引用特化版本" << endl; } }; template <typename T>struct TC <T &&> { void functest () { cout << "T &&右值引用特化版本" << endl; } }; void test () TC<double > td; td.functest (); TC<const double > td2; td2.f unctest(); TC<double *> tpd; tpd.functest (); TC<const double *> tpd2; tpd2.f unctest(); TC<int &> tcyi; tcyi.functest (); TC<int &&> tcyi2; tcyi2.f unctest(); } int main () test (); return 0 ; }
六大部件: 容器 分配器 算法 迭代器 适配器 仿函数
容器:各种数据结构
算法:algorithm
迭代器:泛型指针,重载了 * -> ++ –操作的类
仿函数:从实现的角度看是重载了 operator() 的类
适配器:一种修饰容器,仿函数或者迭代器接口的东西
分配器:负责空间的配置和管理
以下有一个程序的例子几乎包含了所有的元素:
1 2 3 4 5 6 7 8 9 10 11 12 13 14 #include <iostream> #include <vector> #include <algorithm> #include <functional> using namespace std;int main () int ia[6 ] = {27 , 210 , 12 , 47 , 109 , 83 }; vector<int , allocator<int >> vi (ia, ia + 6 ); cout << count_if (vi.begin (), vi.end (), not1 (bind2nd (less <int >(), 40 ))) << endl; return 0 ; }
下面来解释这里面所用到的东西:
vector是容器,这里的用法和一般的使用方法不同,这里给出了分配器模板的指定参数
count_if第三个参数,本意是想比较迭代器 * iter 和40 的大小,然后使用的仿函数,但是less()这个系统自带的仿函数的实现是这样的
1 2 3 4 5 6 7 8 9 template <typename _Tp> struct less : public binary_function<_Tp, _Tp, bool > { _GLIBCXX14_CONSTEXPR bool operator ()(const _Tp& __x, const _Tp& __y) const { return __x < __y; } };
一般仿函数的用法:
1 2 vector<int >v{5 ,3 ,4 ,6 ,8 }; sort (v.begin (),v.end (),less <int >());
所以这里用 bind2nd 将迭代器和40绑定在一起,也叫 function adapter(binder)。
然后最外面 not1 一样的,将条件取反,所以求的就是大于等于40的元素个数了,function adapter(negator)
个人感觉有点像python里面的 for i in range()
1 2 3 4 5 6 7 8 9 10 11 12 13 14 15 16 17 18 19 20 21 22 23 24 25 26 27 28 #include <iostream> using namespace std;#include <vector> template <typename Type>void print (vector<Type> container) for (auto elem : container) cout << elem << ' ' ; cout << endl; } int main () print (vector<int >{1 , 5 , 6 , 9 , 7 , 5 , 3 , 10 }); vector<double > nums{1.1 , 2.5 , 6.33 , 15.66 , 1.44 , 2.52 }; print (nums); for (auto &elem : nums) elem -= 1 ; print (nums); return 0 ; }
总体来讲分为两类:
序列容器 Sequence Containers
关联式容器 Associate Containers 关联式容器采用键值对的方式存储数据,因此这一种容器查找元素的效率最高,最方便
无序容器 Unordered Containers 是关联式容器的一种,c++11新出的
相比于关联式容器的特点:
无序容器内部存储的键值对是无序 的,各键值对的存储位置取决于该键值对中的键 和关联式容器相比,无序容器擅长通过指定键查找对应的值 (平均时间复杂度为 O(1)); 但对于使用迭代器遍历容器中存储的元素,无序容器的执行效率则不如关联式容器。
array是STL自带的数组类,其本质就是一个固定大小的数组,里面存放的元素类型由用户指定
1 2 3 4 5 6 7 8 9 10 11 12 13 14 15 16 17 void test () { srand (time (NULL )); const size_t _size = 100 ; array<int , _size> arr; for (int i = 0 ; i < _size; ++i) arr[i] = rand () % 101 ; cout << "arr.size()= " << arr.size () << endl; cout << "arr.front()= " << arr.front () << endl; cout << "arr.back()= " << arr.back () << endl; cout << "arr.data()= " << arr.data () << endl; cout<< " &arr[0]= " << &arr[0 ] << endl; }
array封装了固定长度数组的一些函数接口,其中data()函数是得到这个数组的首元素地址,也就是第五行,所以四五行结果相同
1 2 3 4 5 6 7 8 9 10 11 12 13 14 15 16 void test (int length) { srand (time (NULL )); vector<int > v; for (int i = 0 ; i < length; ++i) v.push_back (rand () % 101 ); cout << "v.size()= " << v.size () << endl; cout << "v.max_size()= " << v.max_size () << endl; cout << "v.front()= " << v.front () << endl; cout << "v.back()= " << v.back () << endl; cout << "v.data()= " << v.data () << endl; cout << "&v[0]=" << &v[0 ] << endl; cout << "v.capacity()= " << v.capacity () << endl; }
这里得到我指定size是10000的时候,capacity是16384,恰好是2的14次方,那么为什么是这样呢?
vector当空间不够的时候如何开辟空间:2倍开辟 !!!
比如现在有2个元素,想要放入第三个,空间不够会新开辟,那么新开辟之后vector的空间大小是4
即:
所以当 size==10000的时候,capacity为16384也不奇怪了
并且内存开辟成长机制 :
当空间不够的时候,vector容器会去内存中找另一块空间是现在2倍的空间,重新开辟内存,并且把现在的内存释放掉,把现在的数据迁移到新的2倍内存当中去!!!!
list是个双端循环链表,注意不仅是双向链表,还是循环的!!!!
1 2 3 4 5 6 7 8 9 10 11 12 13 14 15 16 17 18 19 void test (int length) srand (time (NULL )); list<int > l; for (int i = 0 ; i < length; ++i) l.push_back (rand () % 101 ); cout << "l.size()= " << l.size () << endl; cout << "l.max_size()= " << l.max_size () << endl; cout << "l.front()= " << l.front () << endl; cout << "l.front()= " << *l.begin () << endl; cout << "l.front()= " << *(++l.end ()) << endl; cout << "l.back()= " << l.back () << endl; cout << "l.back()= " << *(--l.end ()) << endl; auto iter = --l.begin (); cout << "l.back()= " << *(--iter) << endl; }
得到首部和尾部的方式:
1.内置函数 front()和back()
2.使用迭代器 begin() 和 end()
注意这里的迭代器是首闭尾开的形式,就是begin() 指向的第一个元素,end() 指向的最后一个元素的下一个没有值的内存空间,所以上一个区域就是最后一个元素的值 –end()
由于这个双端链表在内存中最后一个元素的末尾还多了一块未分配值的空间,考虑到是循环的,所以++end()就代表第一块元素的空间
但是,由于**大部分的迭代器没有重载 + 和 - 运算符(vector容器有)**,那么在求的时候不能直接用这两个符号,而得使用重载的++ 和 – 运算符!!!!!!!
本质就是一个单向链表,非循环链表
1 2 3 4 5 6 7 8 9 10 11 12 13 14 void test (int length) srand (time (NULL )); forward_list<int > fl; for (int i = 0 ; i < length; ++i) fl.push_front (rand () % 101 ); cout << "fl.max_size()= " << fl.max_size () << endl; cout << "fl.front()= " << fl.front () << endl; cout << "fl.front()= " << *(fl.begin ()) << endl; }
注意这个单向链表只有头插法,原因是尾插法每次都要遍历到最后,太慢了,头插法效率更高,所以这个容器也不存在back()函数接口
这个单向链表begin()和end()迭代器都存在,但是大部分的时候遍历是使用begin()迭代器,因为只重载了 ++ 运算符,未重载 – 运算符!!!
还有一点与list不同,这个容器没有 size() 接口 !!!我也不知道为什么,标准库没有提供这个接口
这个容器的实现和 forward_list 相同,只不过这个容器是c++之前就有了,而 forward_list 是c++11新提出的
双端开口队列
但是在实现的时候采用的是分段连续 的机制:
它真实的结构如下:
到99的时候,迭代器进行++的操作,需要进行判断走到了这一块内存的末尾,需要移步到下一个buffer的起始位置,也就是0,这就需要对++和–操作符进行重载!!!
1 2 3 4 5 6 7 8 9 10 11 void test (int length) srand (time (NULL )); deque<int > d; for (int i = 0 ; i < length; ++i) d.push_back (rand () % 101 ); cout << "d.size()= " << d.size () << endl; cout << "d.max_size()= " << d.max_size () << endl; cout << "d.front()= " << d.front () << endl; cout << "d.back()= " << d.back () << endl; }
和前面的使用没有大区别,只是deque不是循环的,而是两端延升的
deque的功能可以实现stack的所有功能,可以用复合composition的方式来实现stack类
同stack,略
关联式容器每个元素都存在 key 和 value,这样才能使得查询效率大大提高
这种容器的 key 和 value 值相同! !!!!
这两个容器的底层都是用二叉树 (红黑树)实现的,元素在插入的时候都会被**进行自动排序(从小到大)**,唯一的不同点是,Multiset允许插入重复的元素,而set不允许出现重复的元素
1 2 3 4 5 6 7 8 9 10 11 void test (int length) srand (time (NULL )); set<int > s; for (int i = 0 ; i < length; ++i) s.insert (rand ()); cout << "s.size()= " << s.size () << endl; cout << "s.max_size()= " << s.max_size () << endl; }
注意:Multiset 和 set 不能使用 [ ] 来做下标访问!!!!!
第一,底层是红黑树,第二,标准库未重载 [ ] 符号!!!
这种容器就有分别的 key 和 value 了,两者不一定相同,每个元素都是有两个元素!!!底层是用红黑树 实现的!!!!!
插入元素的时候会按照key进行排序(从小到大)
1 2 3 4 5 6 7 8 9 10 11 void test (int length) srand (time (NULL )); map<int , int > m; for (int i = 0 ; i < length; ++i) m.insert (pair <int , int >(i, rand ())); cout << "m.size()= " << m.size () << endl; cout << "m.max_size()= " << m.max_size () << endl; }
同set一样,由于底层是用红黑树实现的,所以查询的时候也有迭代器接口,并且效率很高
map不能有重复的,这里的重复判断是看 key !!!!!! 两个value相同但是key不同是合法的!!! Multimap 就可以有相同的key!!!
注意:Multimap不能使用 [ ] 来做下标访问!!!! Map可以,类似于python字典的用法!!!
原因类似见上
key和value值相同 ,与上面不同的是这个本质是用哈希表 实现的!
1 2 3 4 5 6 7 8 9 10 11 12 13 14 void test (int length) { srand (time (NULL )); unordered_set<int > us; for (int i = 0 ; i < length; ++i) us.insert (rand ()); cout << "us.size()= " << us.size () << endl; cout << "us.max_size()= " << us.max_size () << endl; cout << "us.bucket_count()= " << us.bucket_count () << endl; cout << "us.load_factor()= " << us.load_factor () << endl; cout << "us.max_load_factor()= " << us.max_load_factor () << endl; cout << "us.max_bucket_count()= " << us.max_bucket_count () << endl; }
unordered_set 通过一个哈希函数 ,将对象的值映射到一个数组下标,这个数组下标对应的是unordered_set中的一个“桶”,表示所有可以映射到这个下标的元素的集合,通常用链表表示。
这个vector数组我一般形象的称其为篮子 。
篮子扩充机制:当元素个数size()不断增加,达到篮子个数bucket_count()的时候,vector容器进行近似2倍的扩充 ,具体略
所以,篮子个数一定大于元素个数 !!!!
与上面的大概相同,不同的是,传入的数据类型是一个键值对 pair<keyType,valueType>
其他略,具体实现后面再谈
这部分先了解怎么使用分配器,后面会有专题来讲解分配器的原理
虽然分配器有申请内存空间并且归还内存空间的接口,但是不建议直接使用分配器,因为这样分配器的负担太重了。而应该去使用容器,让分配器给容器分配空间,这样的效率会高很多!!!
OOP将 data 和 methods 结合在一起,GP却将他们两个分开来
采用GP:
1.容器Containers和算法Algorithms可以各自闭门造车,通过迭代器Iterator连接起来即可
2.算法ALgorithms通过迭代器Iterator确定操作范围,并通过Iterator取用Container元素
随机访问迭代器 RandomAccessIterator:能够随机访问容器中的任一元素,例如vector单端数组
这样的迭代器可以进行+ -号的运算,例如:
1 auto mid=(v.begin ()+v.end ())/2
提到这里,就不得不提一下算法库里的全局函数 sort() 了
sort()函数内部实现的机制调用了随机访问迭代器,进行了+-的运算,所以能调用的前提只能是随机访问迭代器,比如vector,deque
所以由于list不满足这个迭代器,所以他不能调用全局sort函数,只能用自己类实现的sort函数,即 l.sort()
1 2 3 4 5 6 7 8 9 10 11 12 13 14 15 16 17 18 19 20 21 22 23 24 25 #include <iostream> using namespace std;#include <list> #include <algorithm> template <typename Type>void print (list<Type> &l) for_each(l.begin (), l.end (), [&](auto val) { cout << val << ' ' ; }); cout << endl; } int main () list<int > l; for (int i = 0 ; i < 10 ; ++i) l.push_back (9 - i); print (l); l.sort (less_equal <int >()); print (l); return 0 ; }
1 2 3 4 5 6 7 8 9 10 11 12 13 14 15 16 17 18 19 20 21 22 23 24 25 26 27 28 29 30 31 32 33 34 #include <iostream> using namespace std;namespace fuck{ template <typename Type> inline const Type &max (const Type &a, const Type &b) { return a < b ? b : a; } template <typename Type, class functor > inline const Type &max (const Type &a, const Type &b, functor &cmp) { return cmp (a, b) ? b : a; } } bool strCmp (const string &s1, const string &s2) return s1. size () < s2. size (); } void test () cout << "max of zoo and hello: " << fuck::max (string ("zoo" ), string ("hello" )) << endl; cout << "max of zoo and hello: " << fuck::max (string ("zoo" ), string ("hello" ), strCmp) << endl; } int main () test (); return 0 ; }
这个例子很简单,就不多做解释了
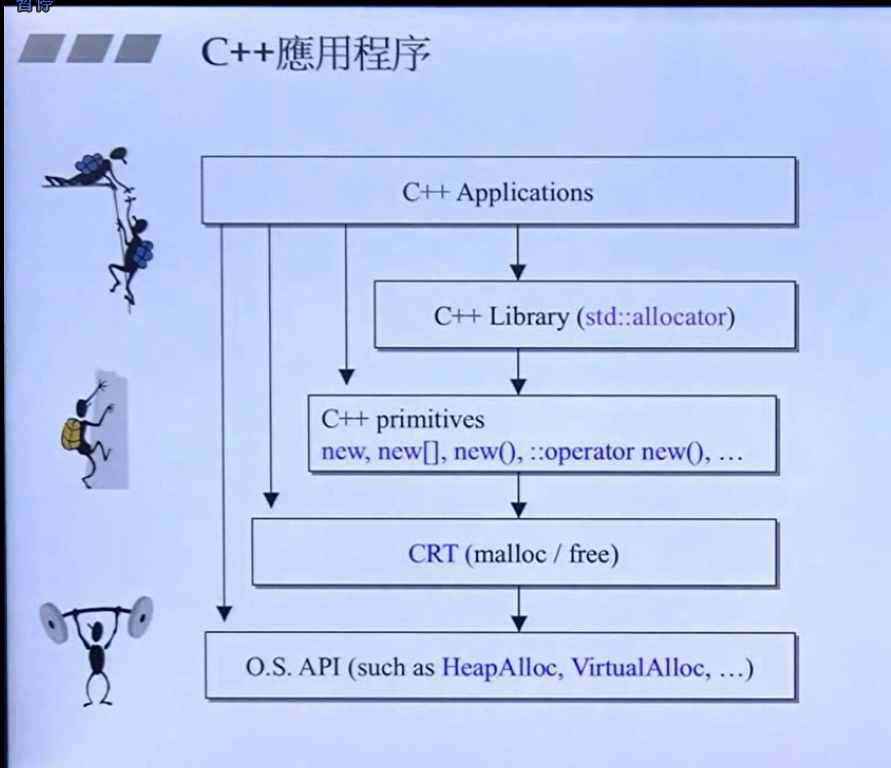
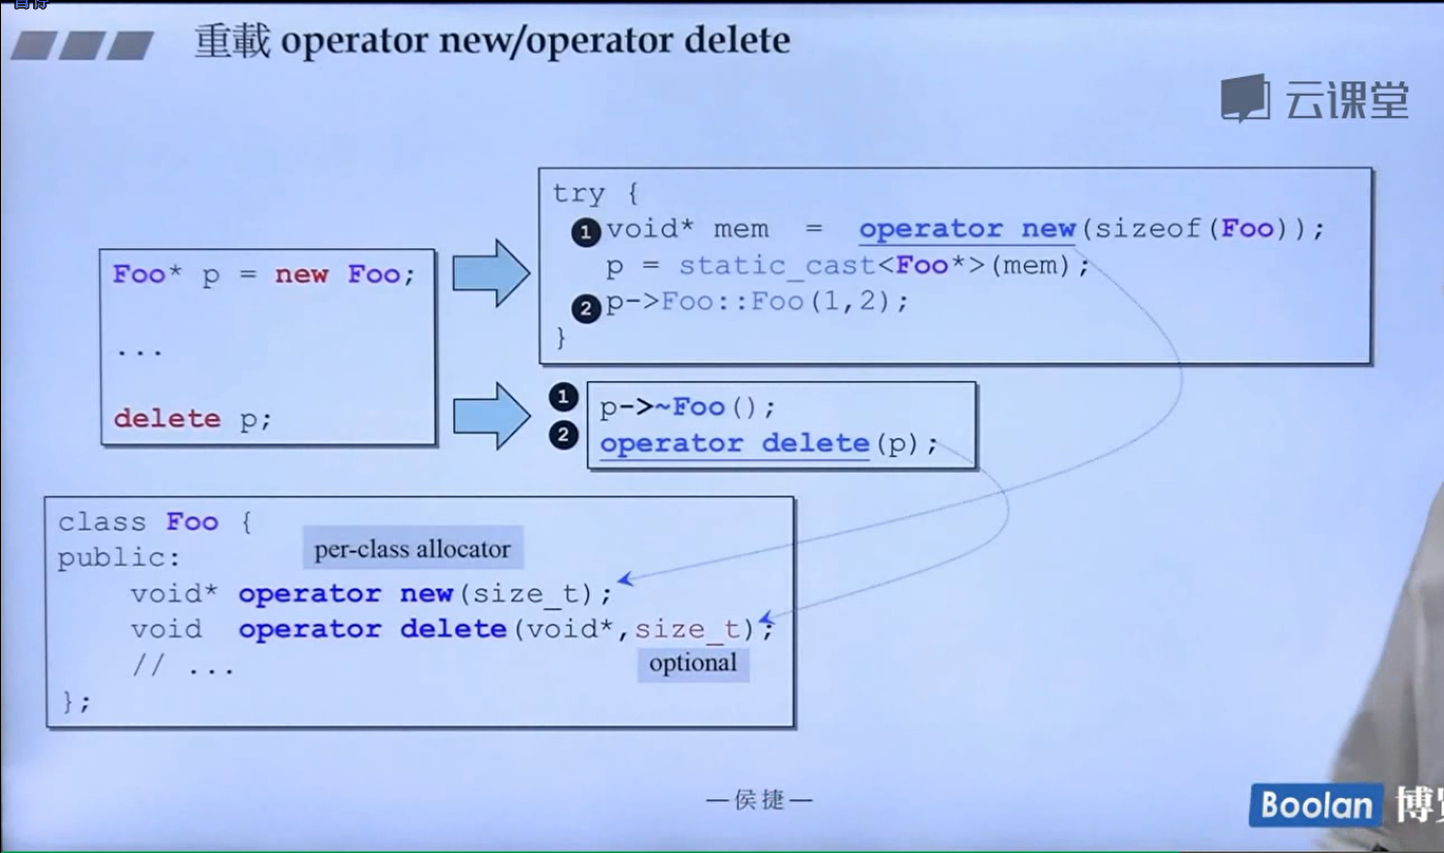
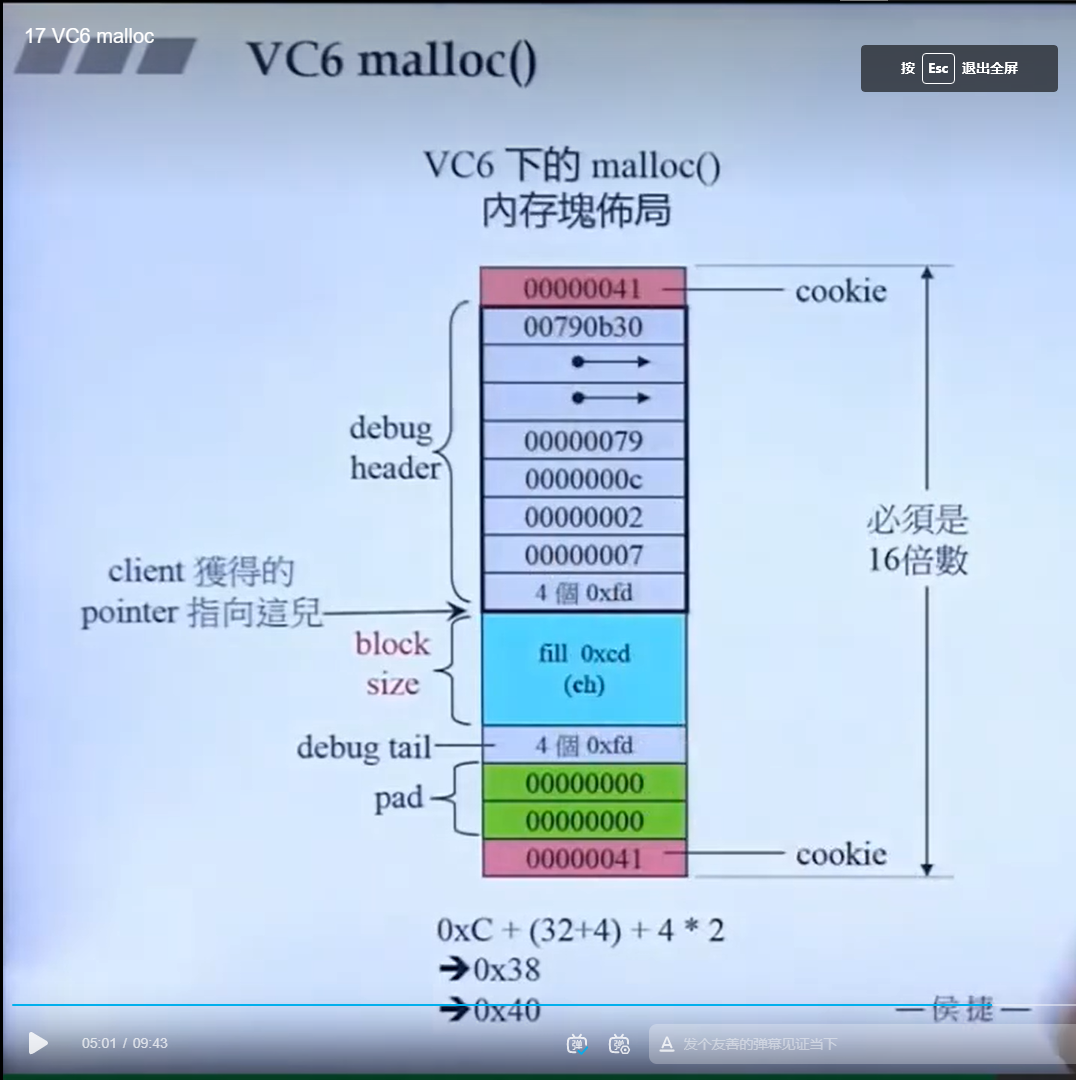
可以看到,在c++当中,new关键字在调用之后都会走到c语言的malloc函数来分配内存,然后malloc函数分配内存的机制就是上面那个内存块所示
size所包含的内容才是我想要的存放数据的内容部分,但是malloc会给我们开辟比size更大的空间,这些在另一门课里面会具体谈到。
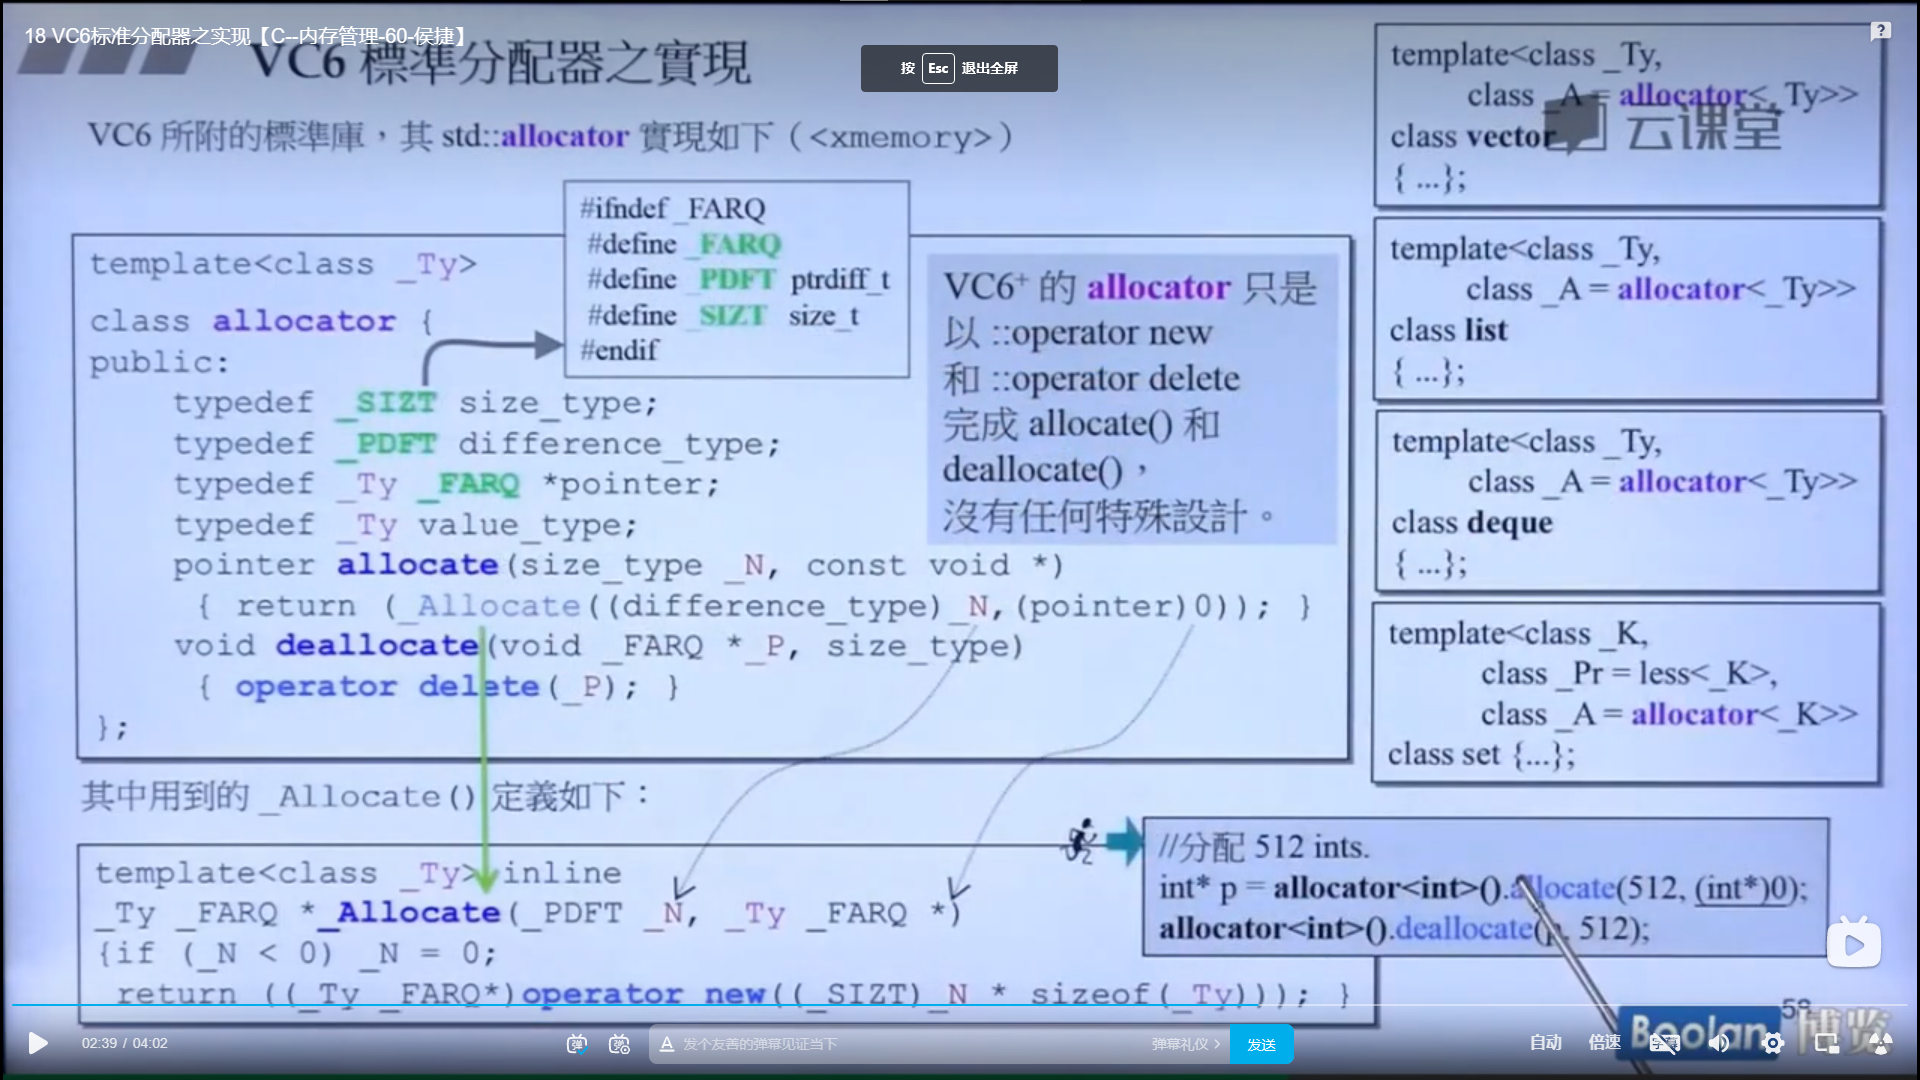
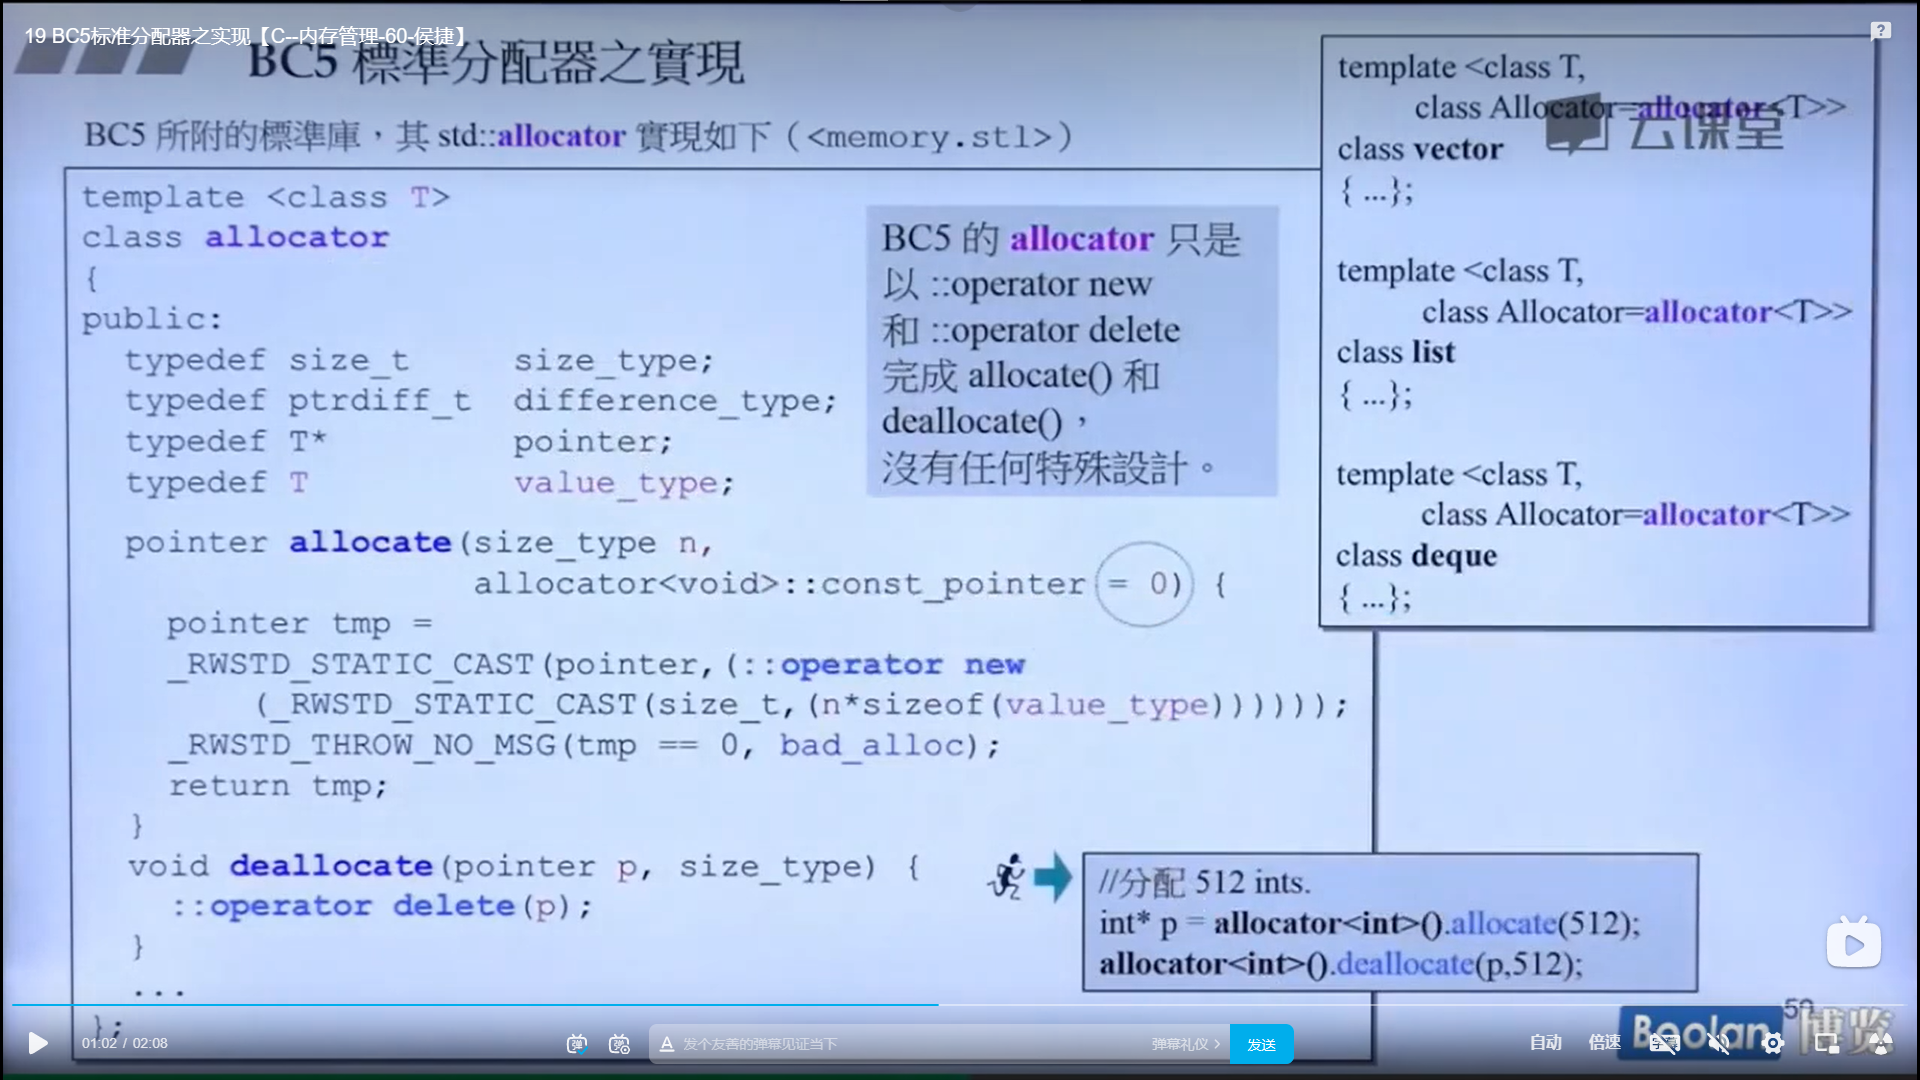
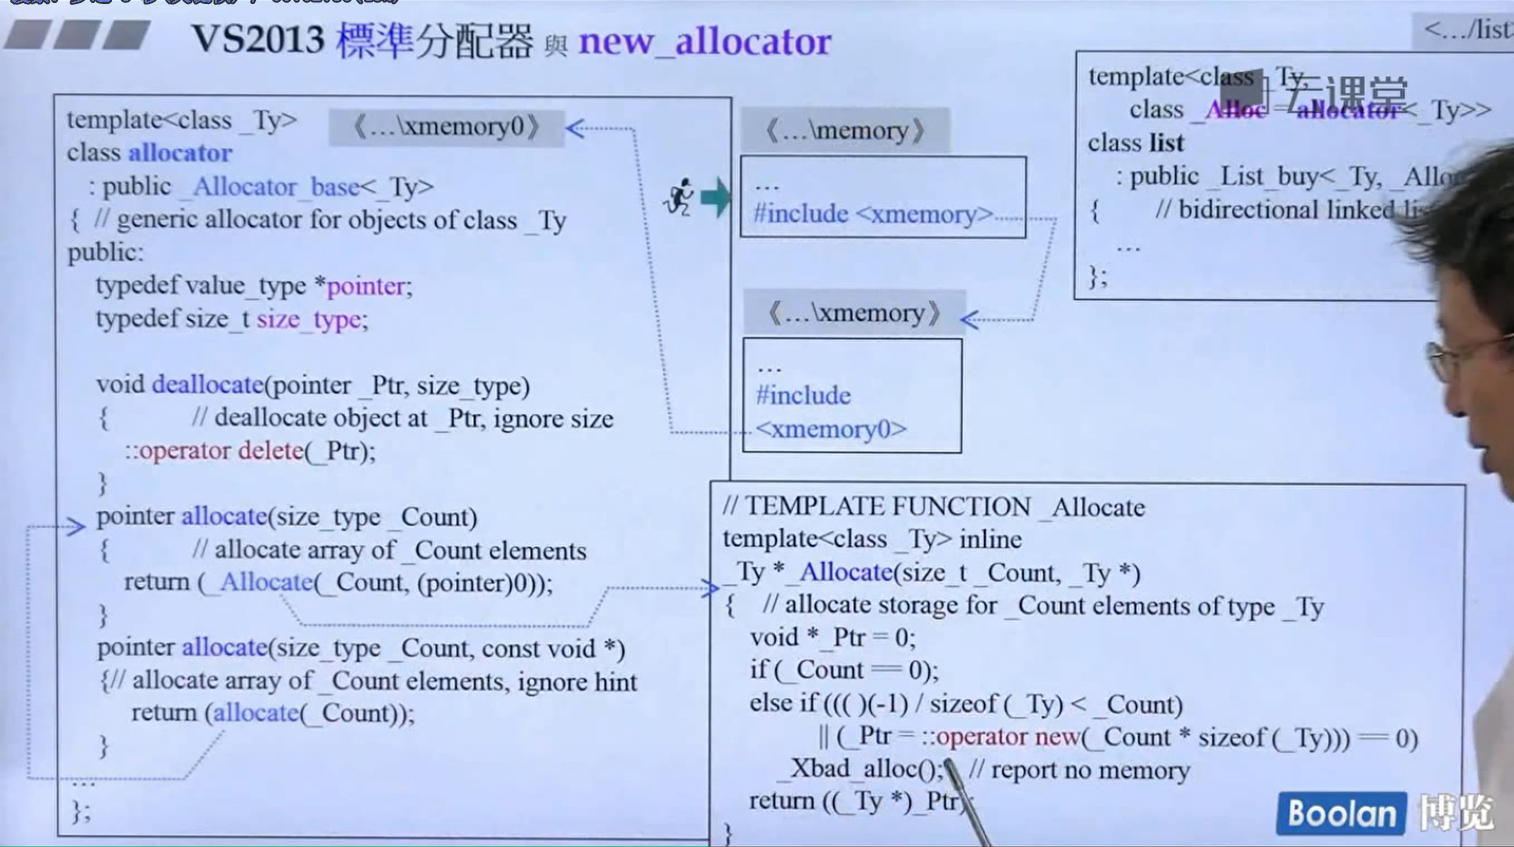
VC6里面的分配器具体实现如下图:
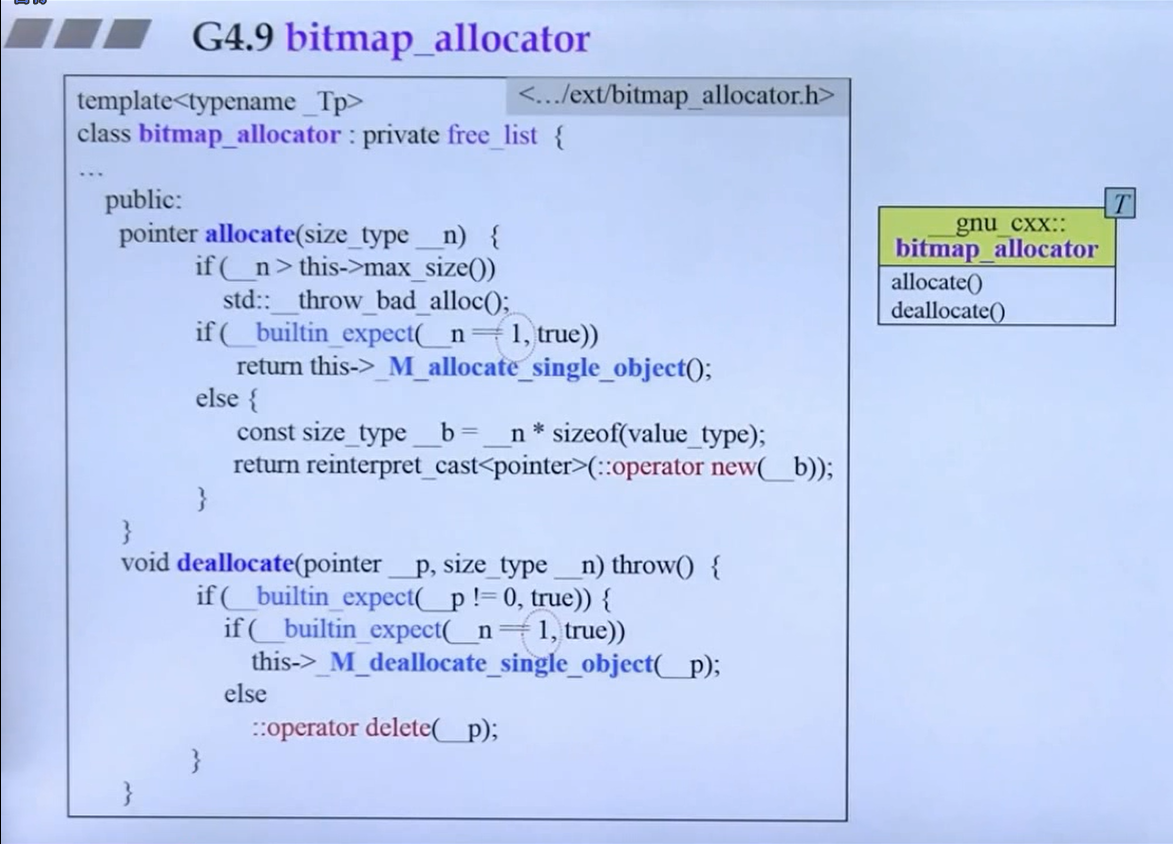
分配器当中最重要的就是 allocate 函数 和 deallocate 函数
从上图中可以看出,VC提供的分配器在分配的时候,allocate函数在调用的时候会调用 new 关键字,也就是会调用 malloc 函数
在释放内存的时候调用deallocate 函数,也就是调用delete关键字,最终就是调用free 函数
结论:
对于这个allocator,如果硬要用的话可以这么使用
1 2 3 4 int *p = allocator <int >().allocate (512 , (int *)0 );allocator <int >().deallocate (p, 512 );
BC5 STL中对分配器的设计和VC6一样,没有特殊设计
操作略
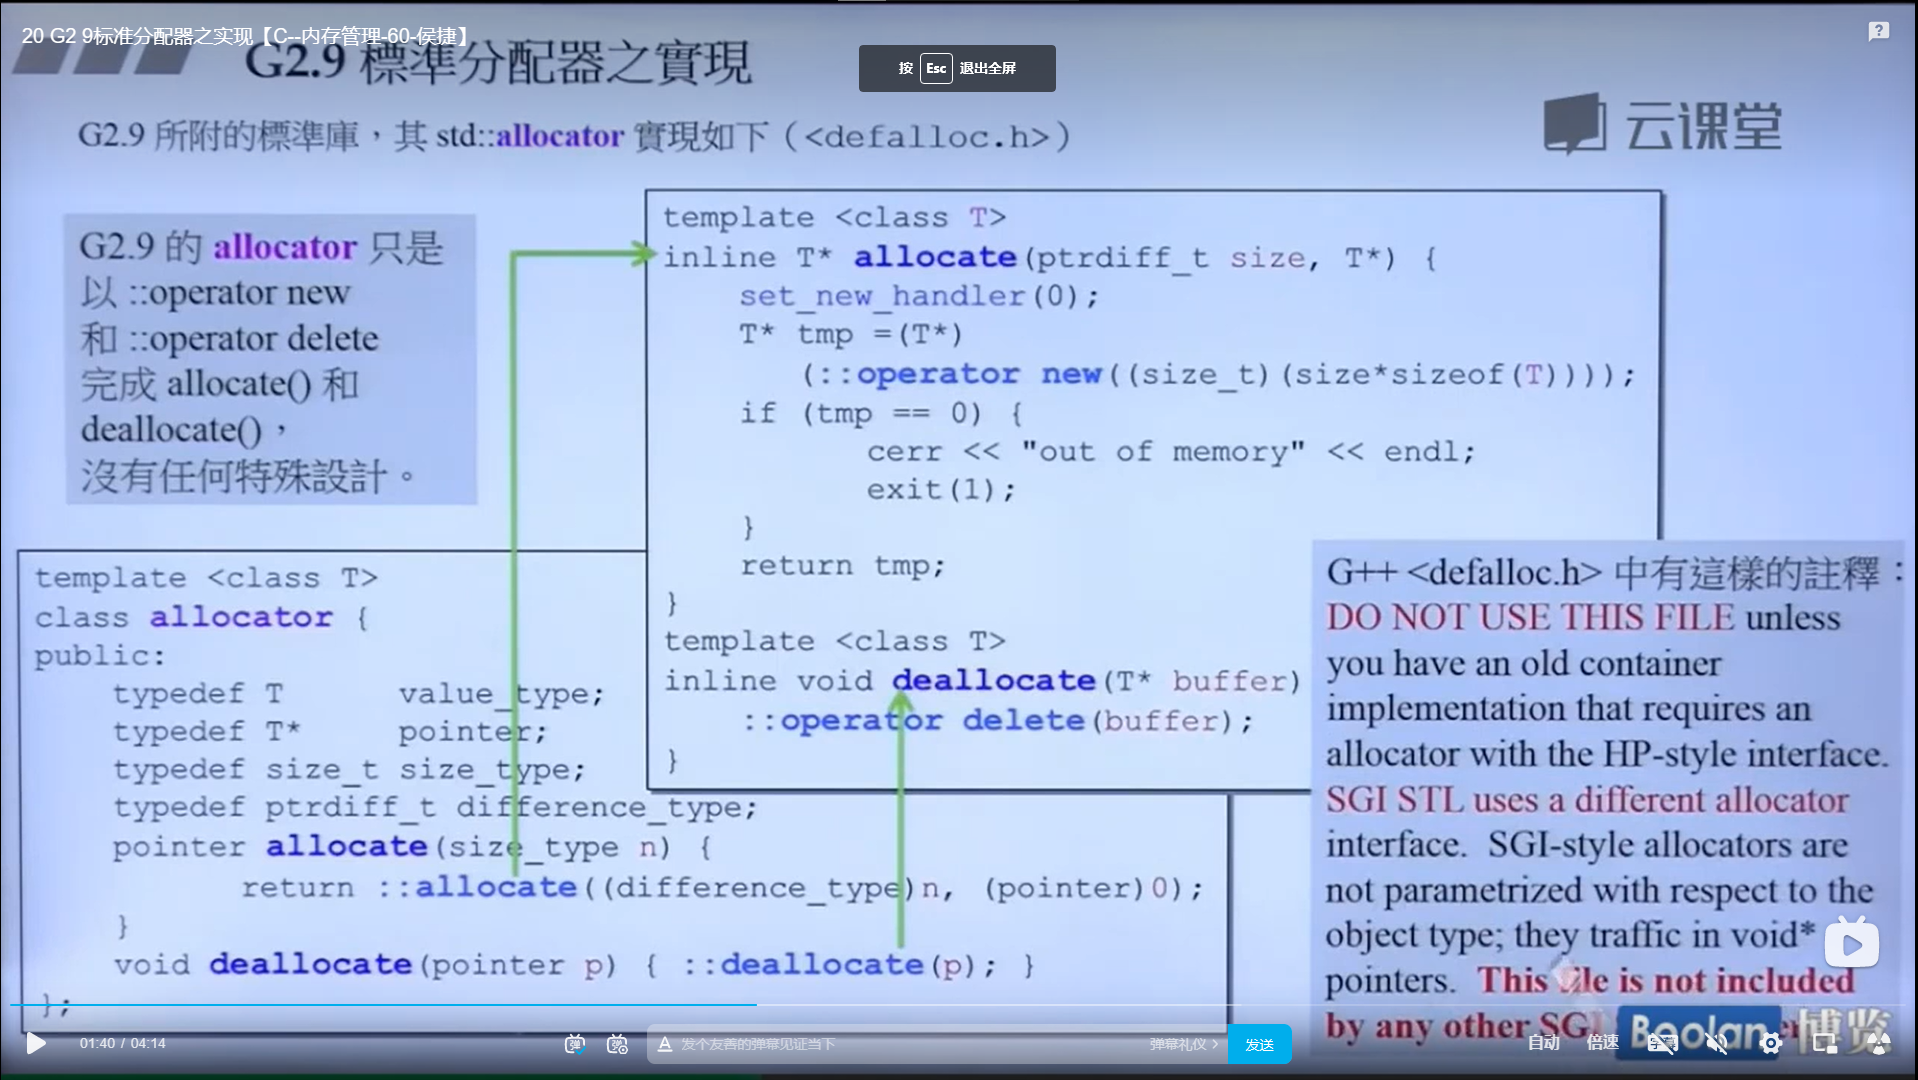
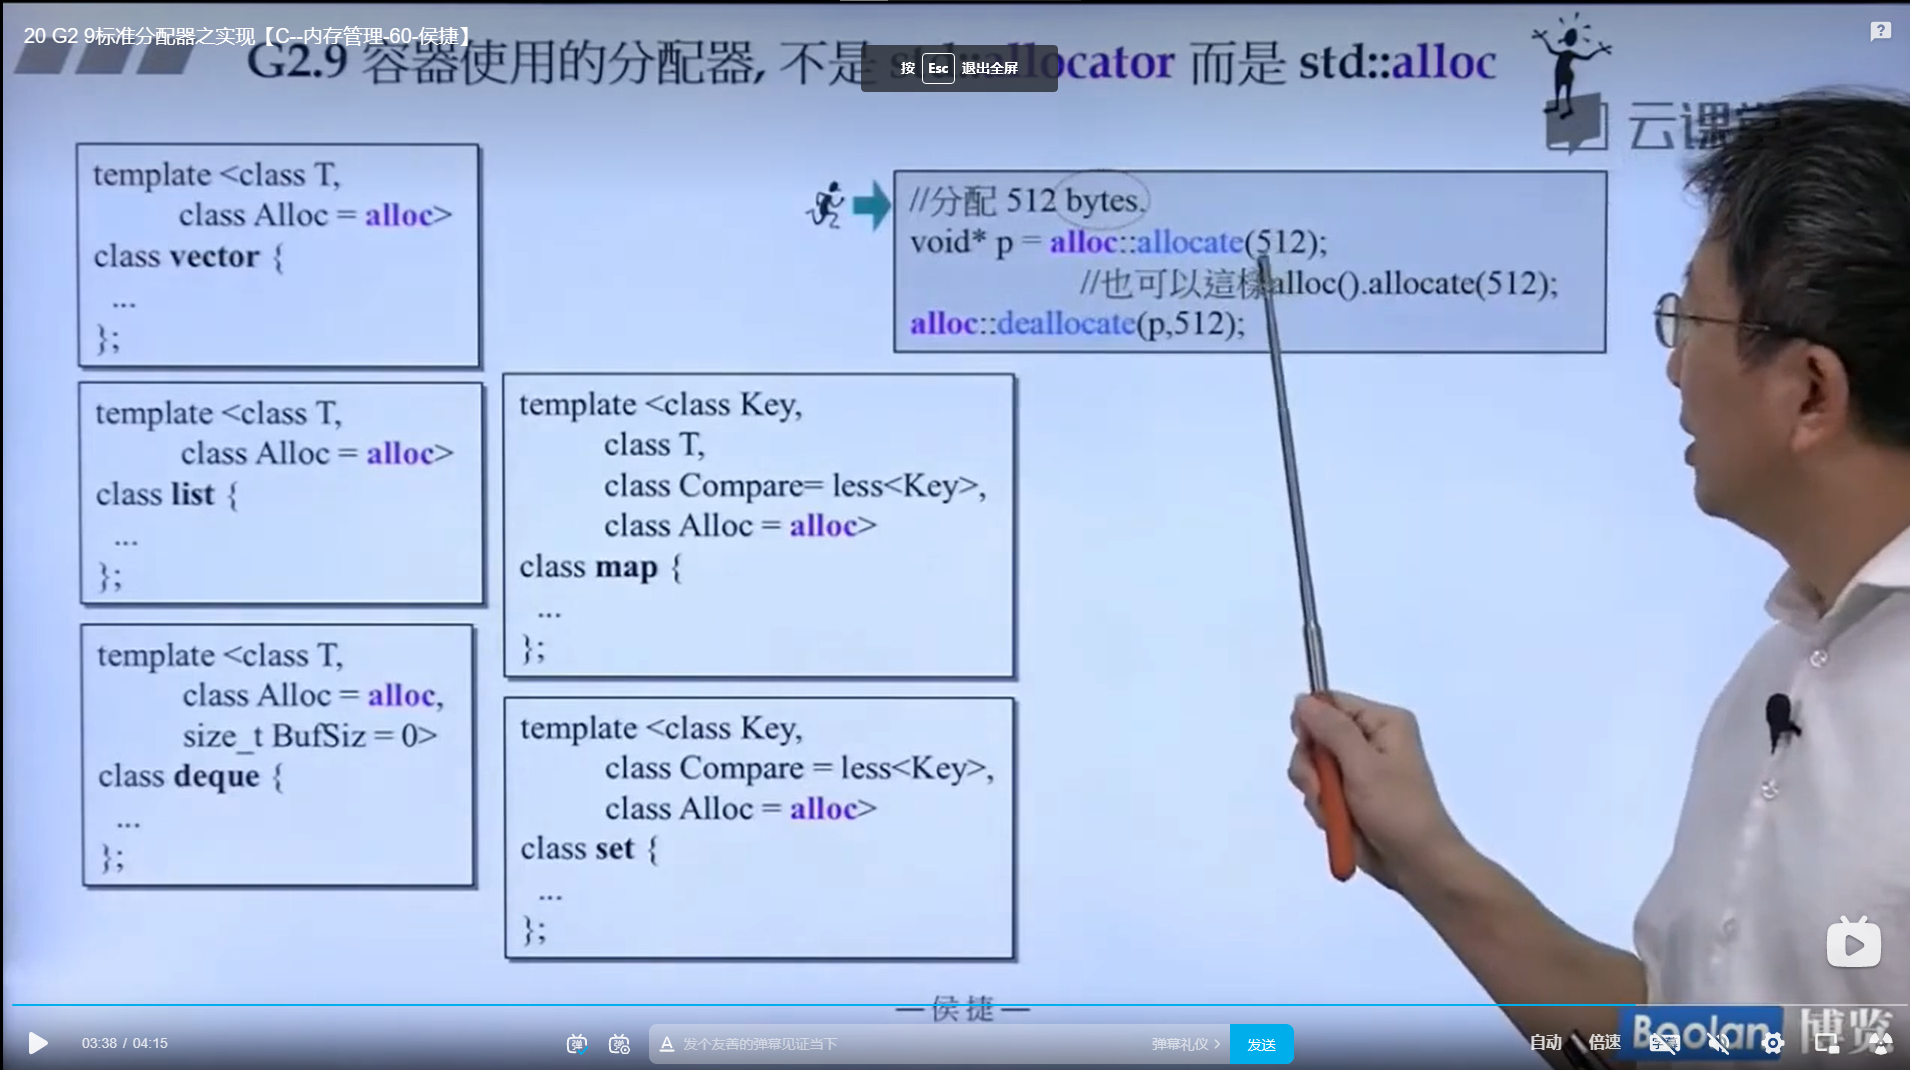
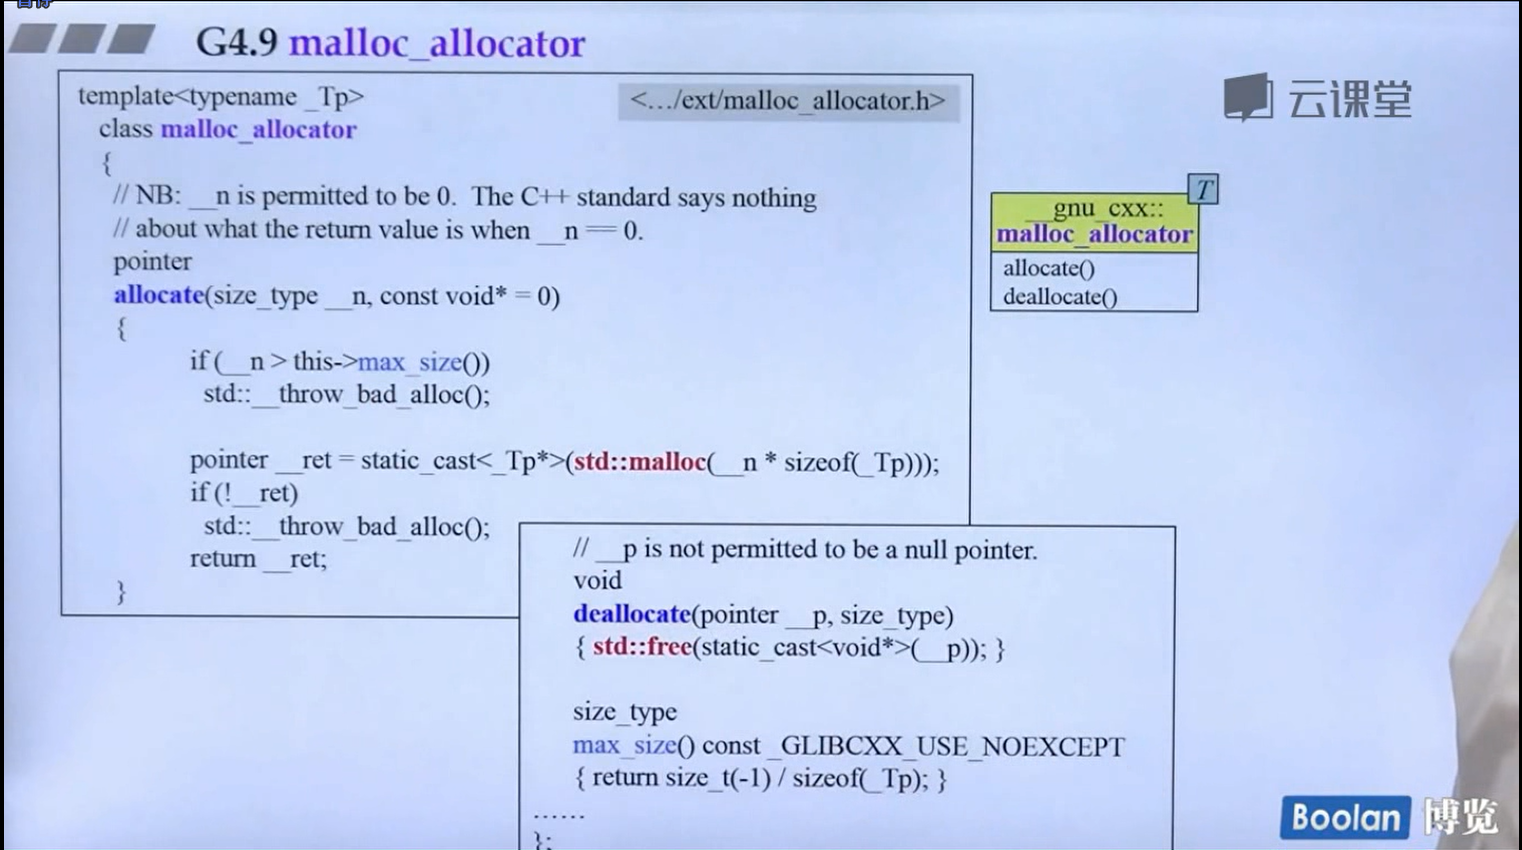
和前面两个一样,也没有特殊设计,就是简单的调用malloc 和 free分配和释放内存
右边这一段注释的意思就是虽然这里实现了符合标准的allocator,但是他自己的容器从来不去用这些分配器,这些分配器都有一个致命的缺点,就是因为本质是在调用mallloc和free函数,根据前面的内存分配机制很容易看出会产生很多的其他空间,从而被浪费,所以开销相对比较大,一般不用
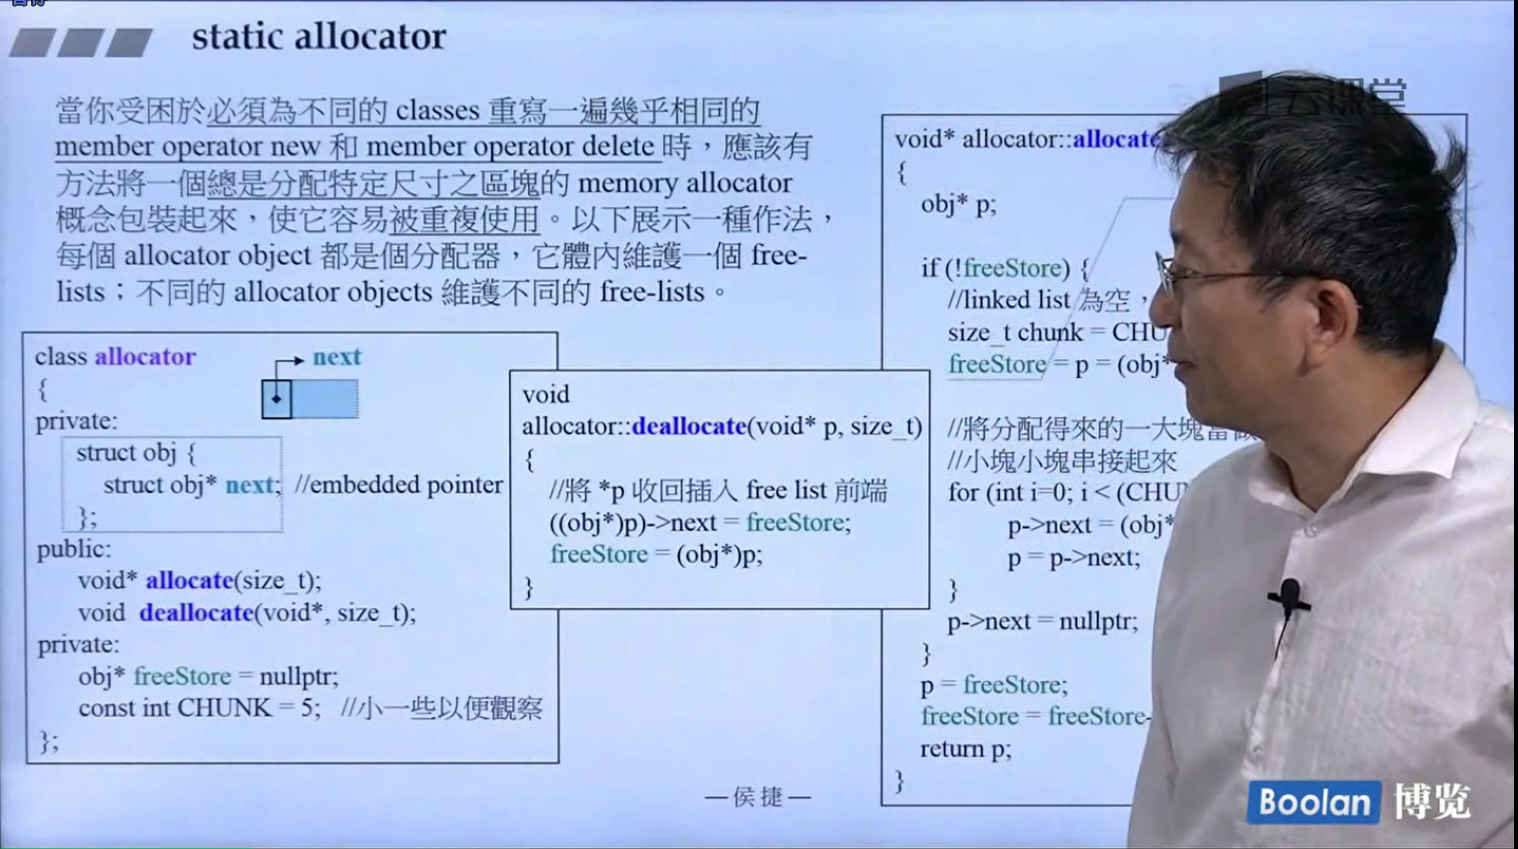
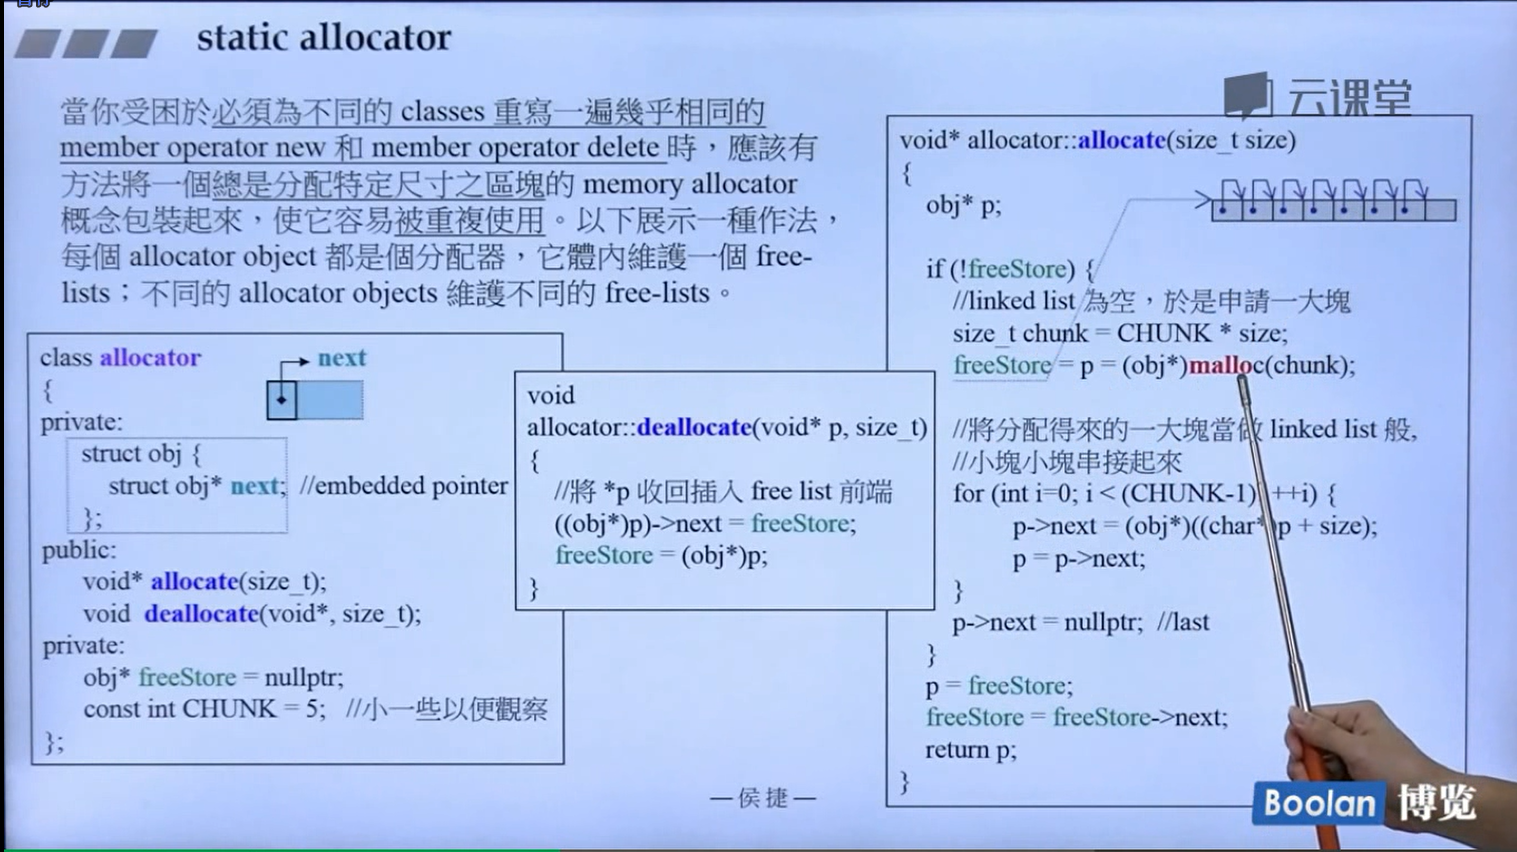
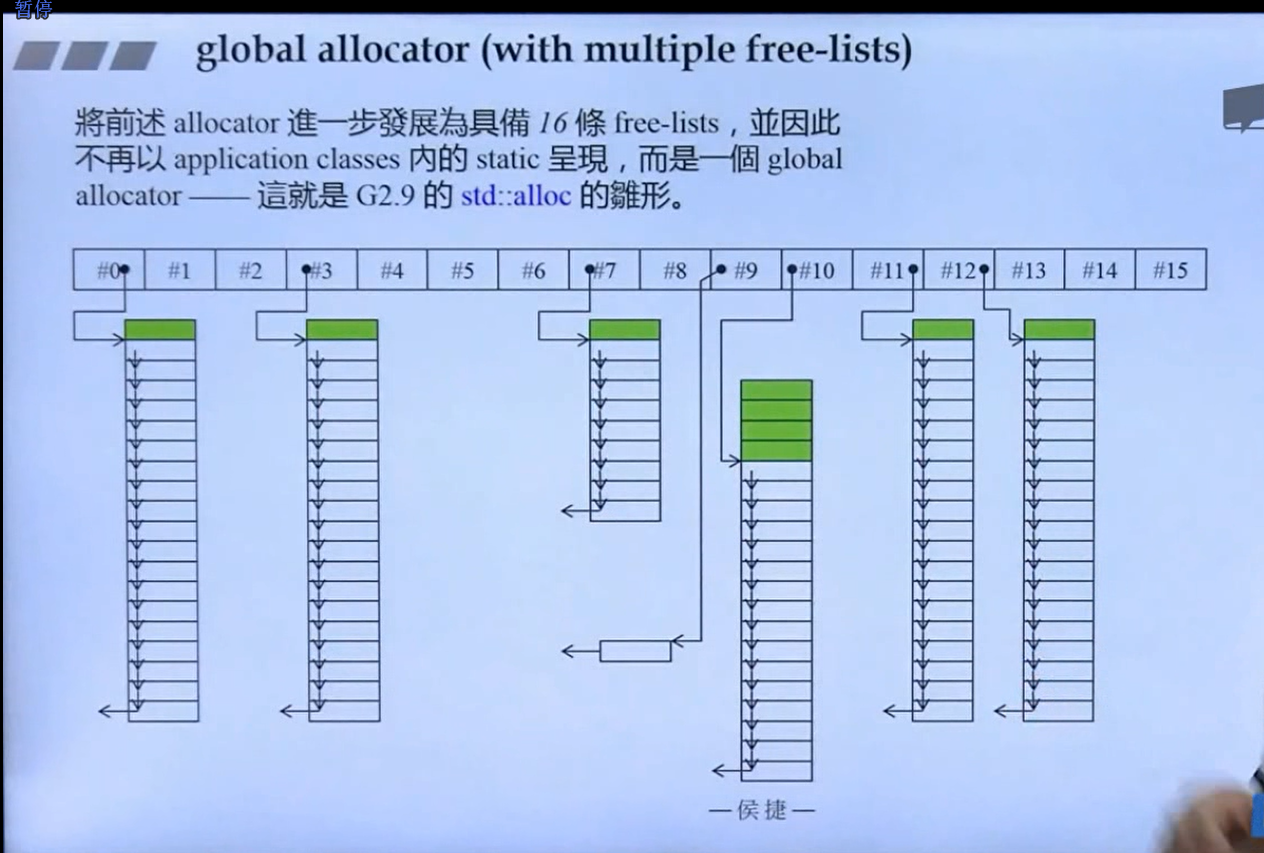
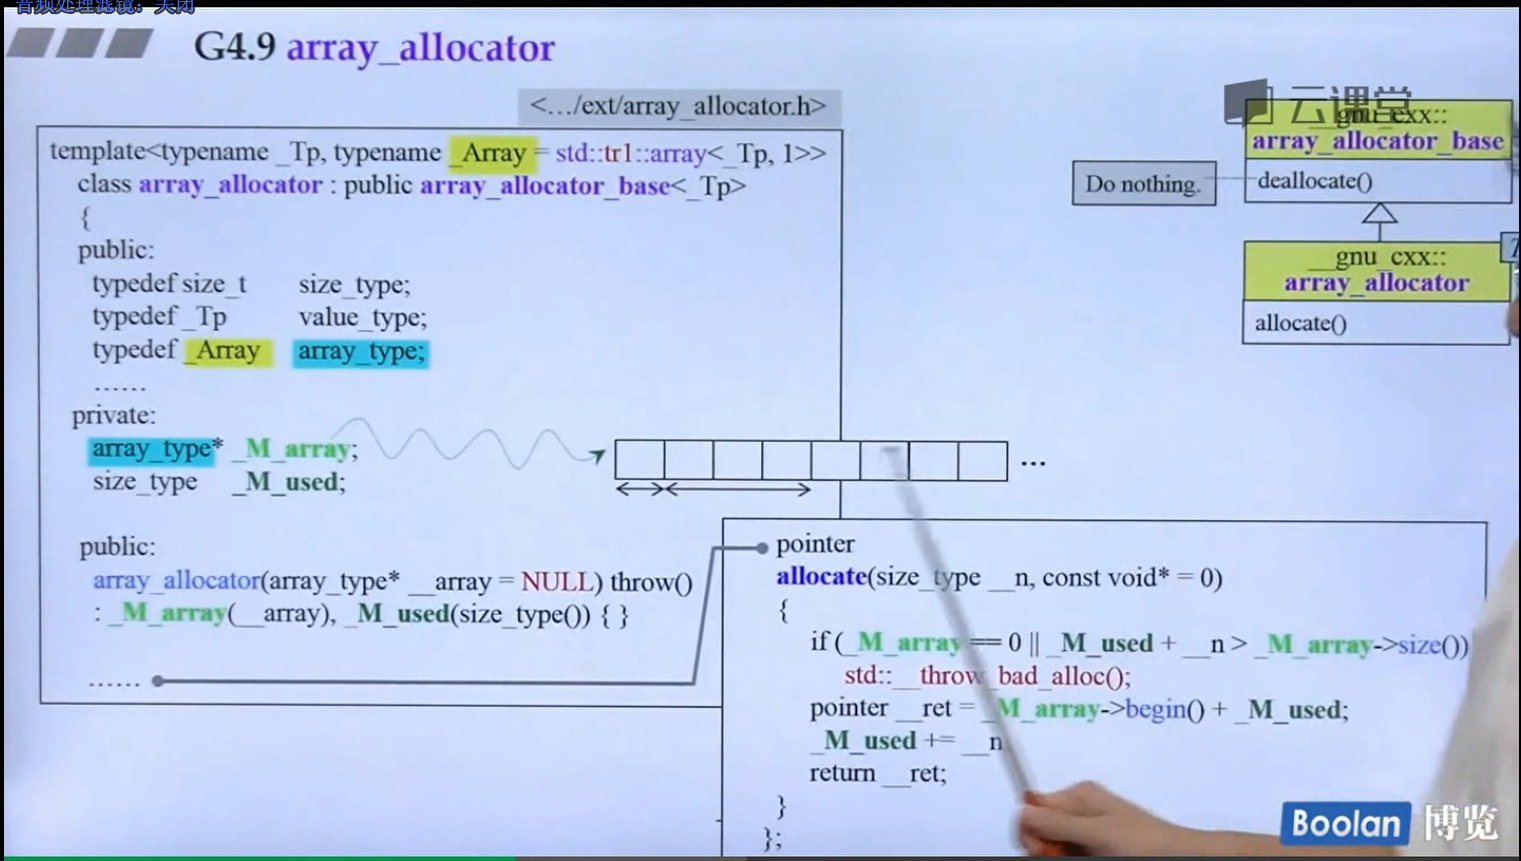
这个分配器想必比allocator要好用的多
其具体实现如下:
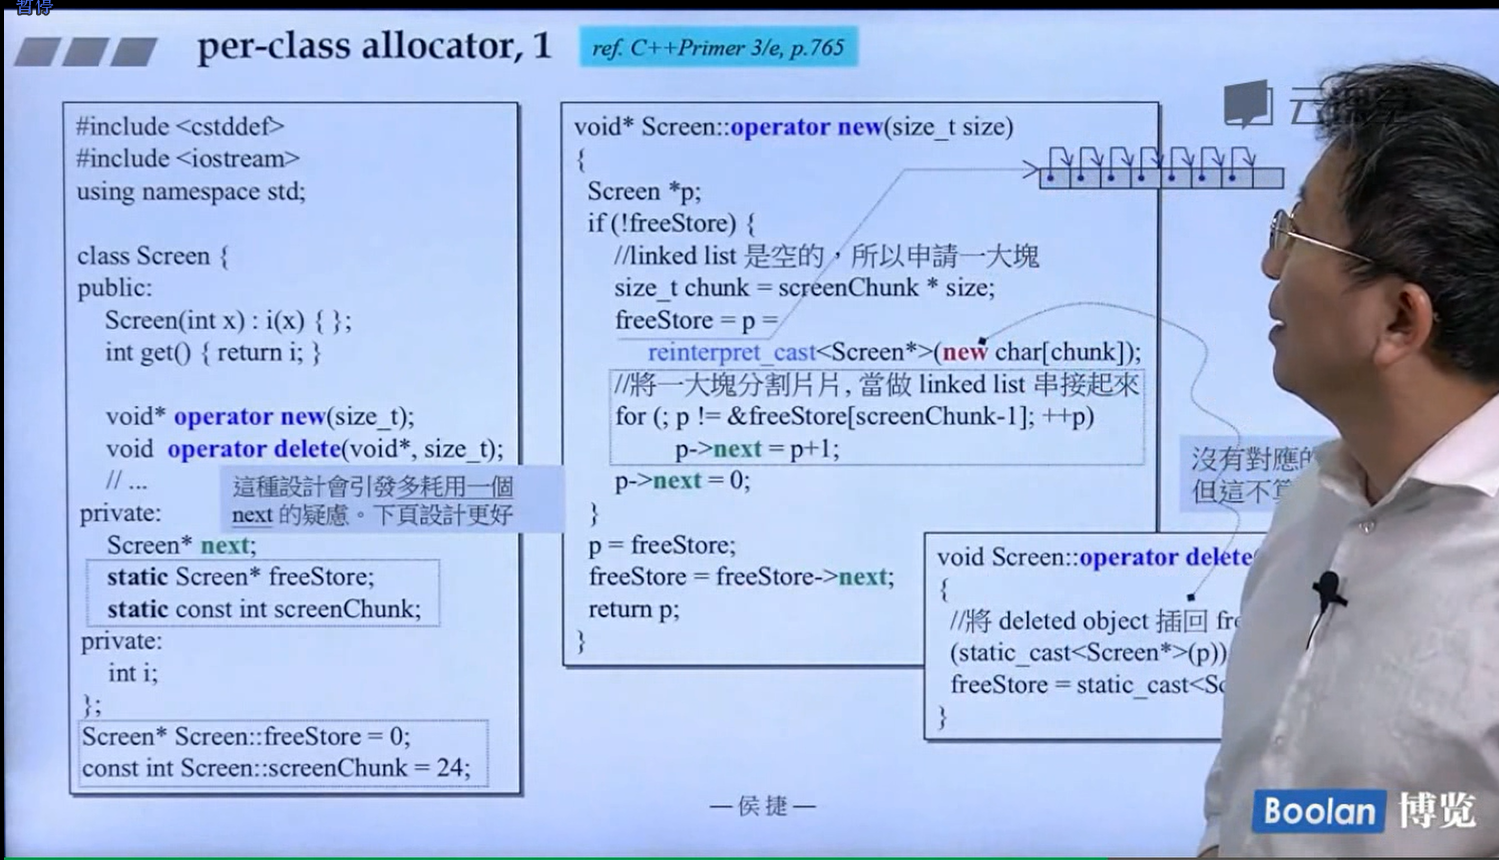
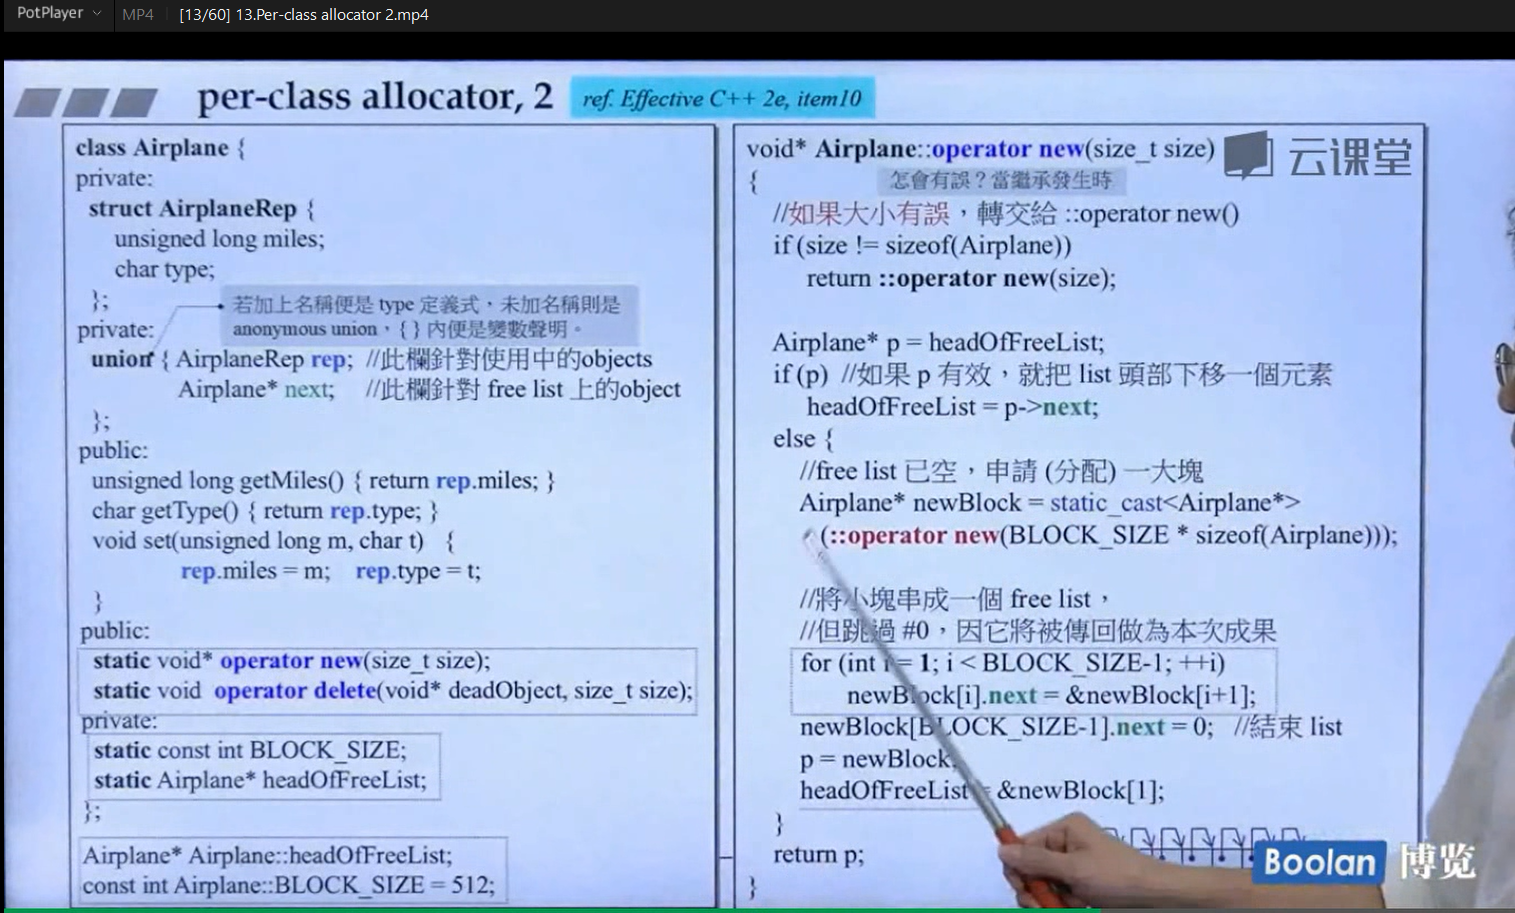
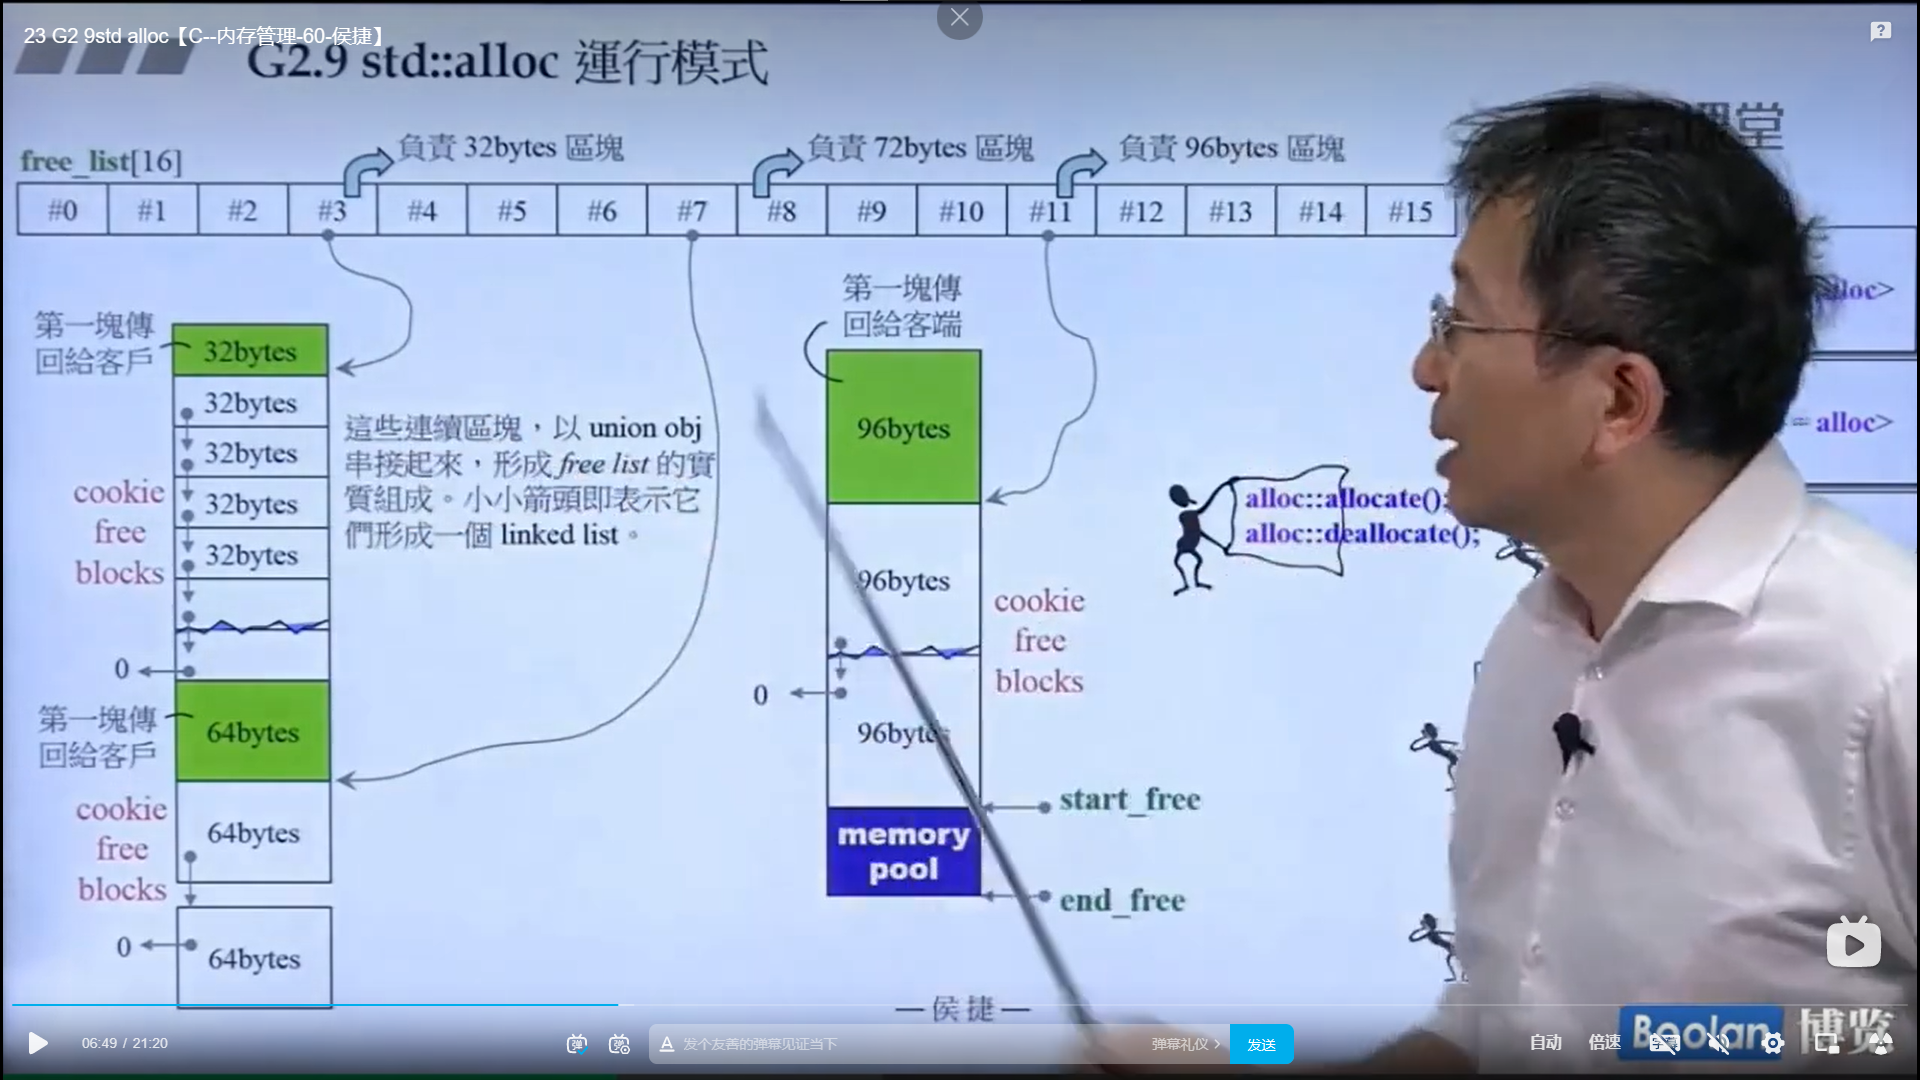
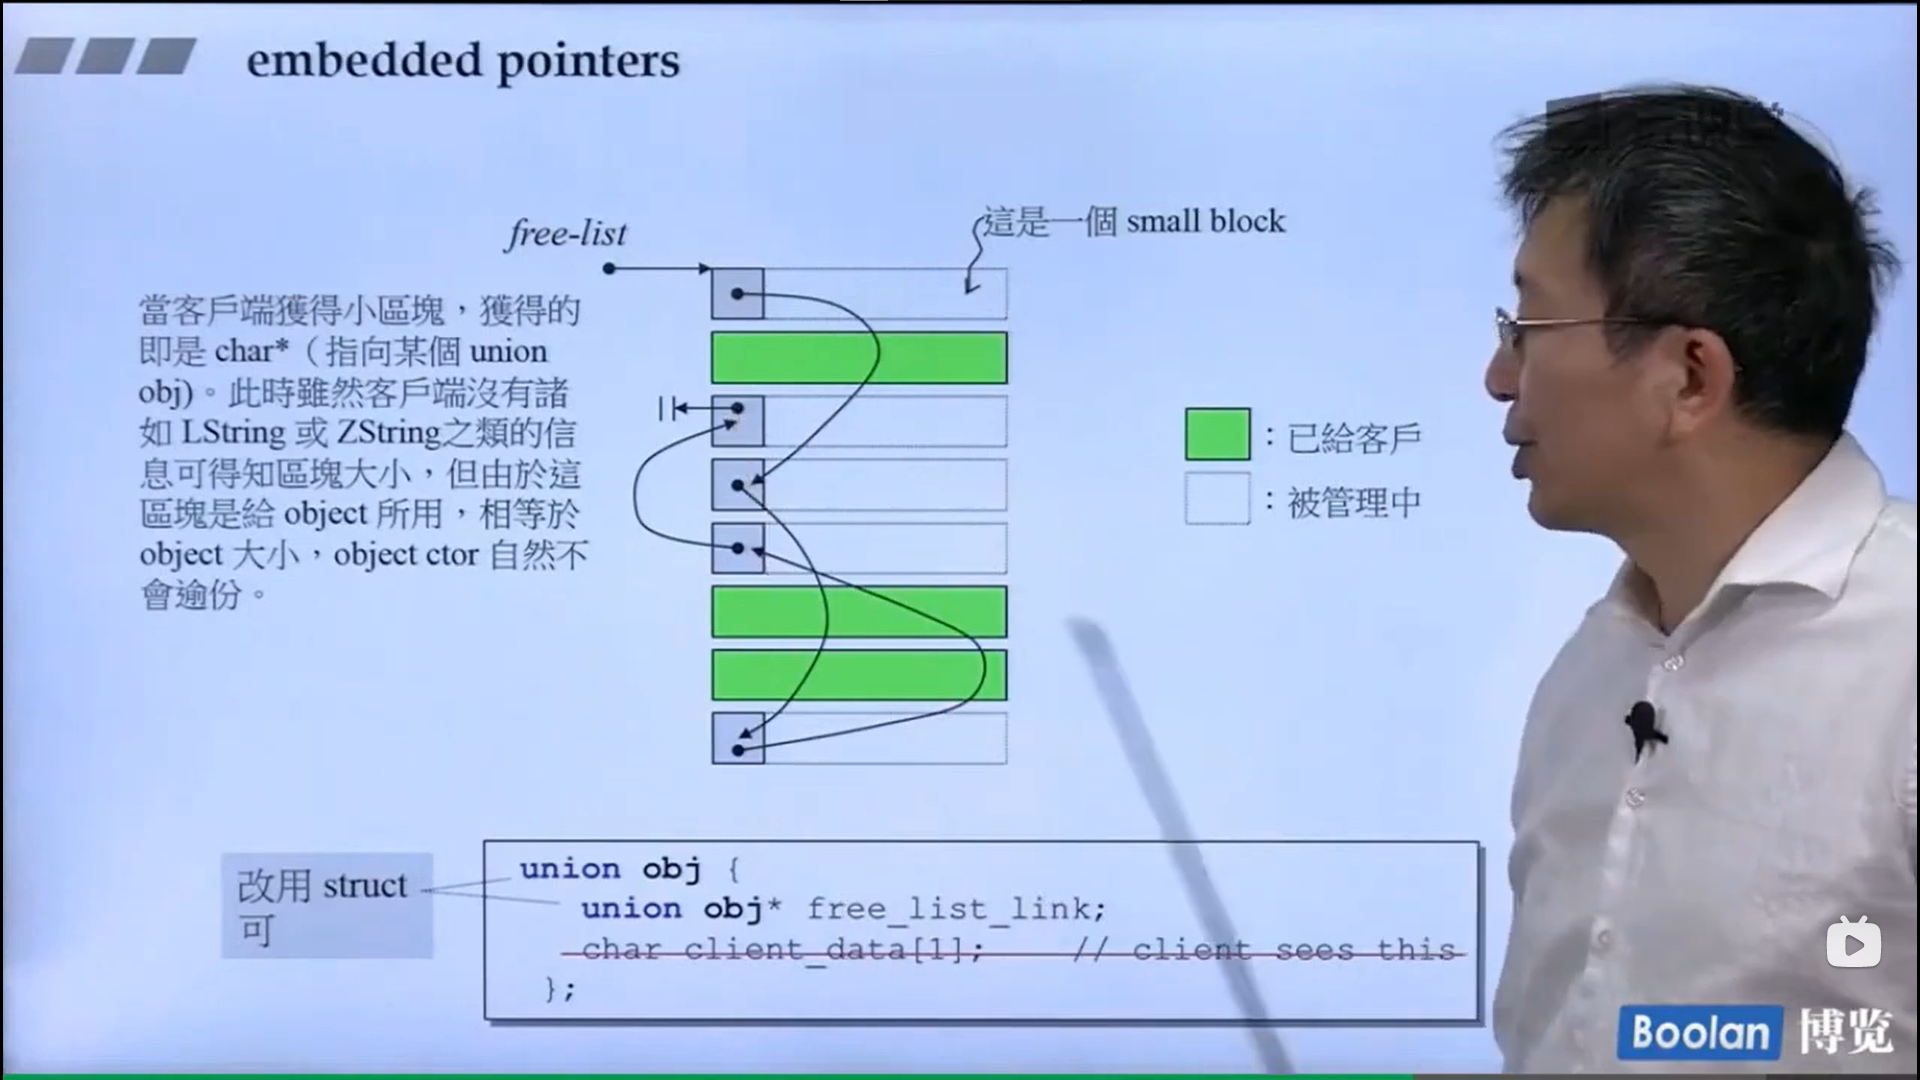
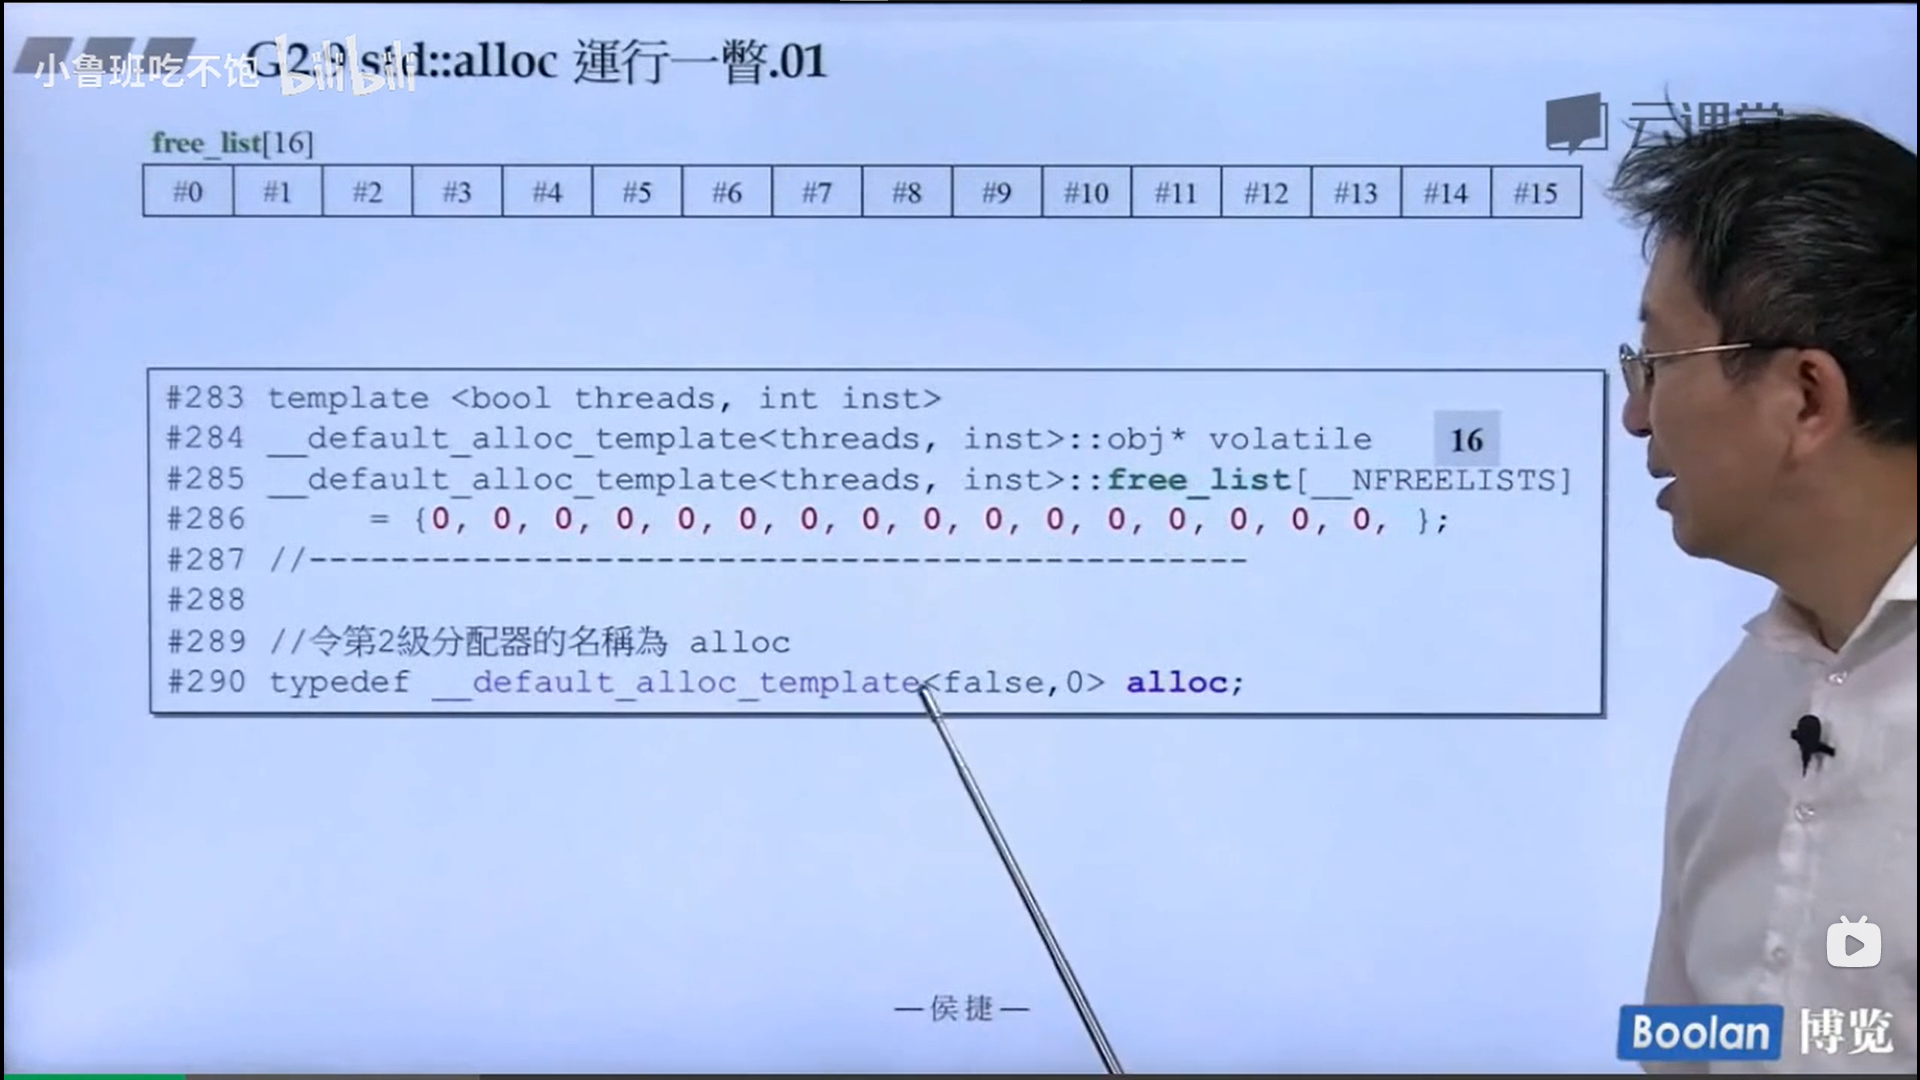
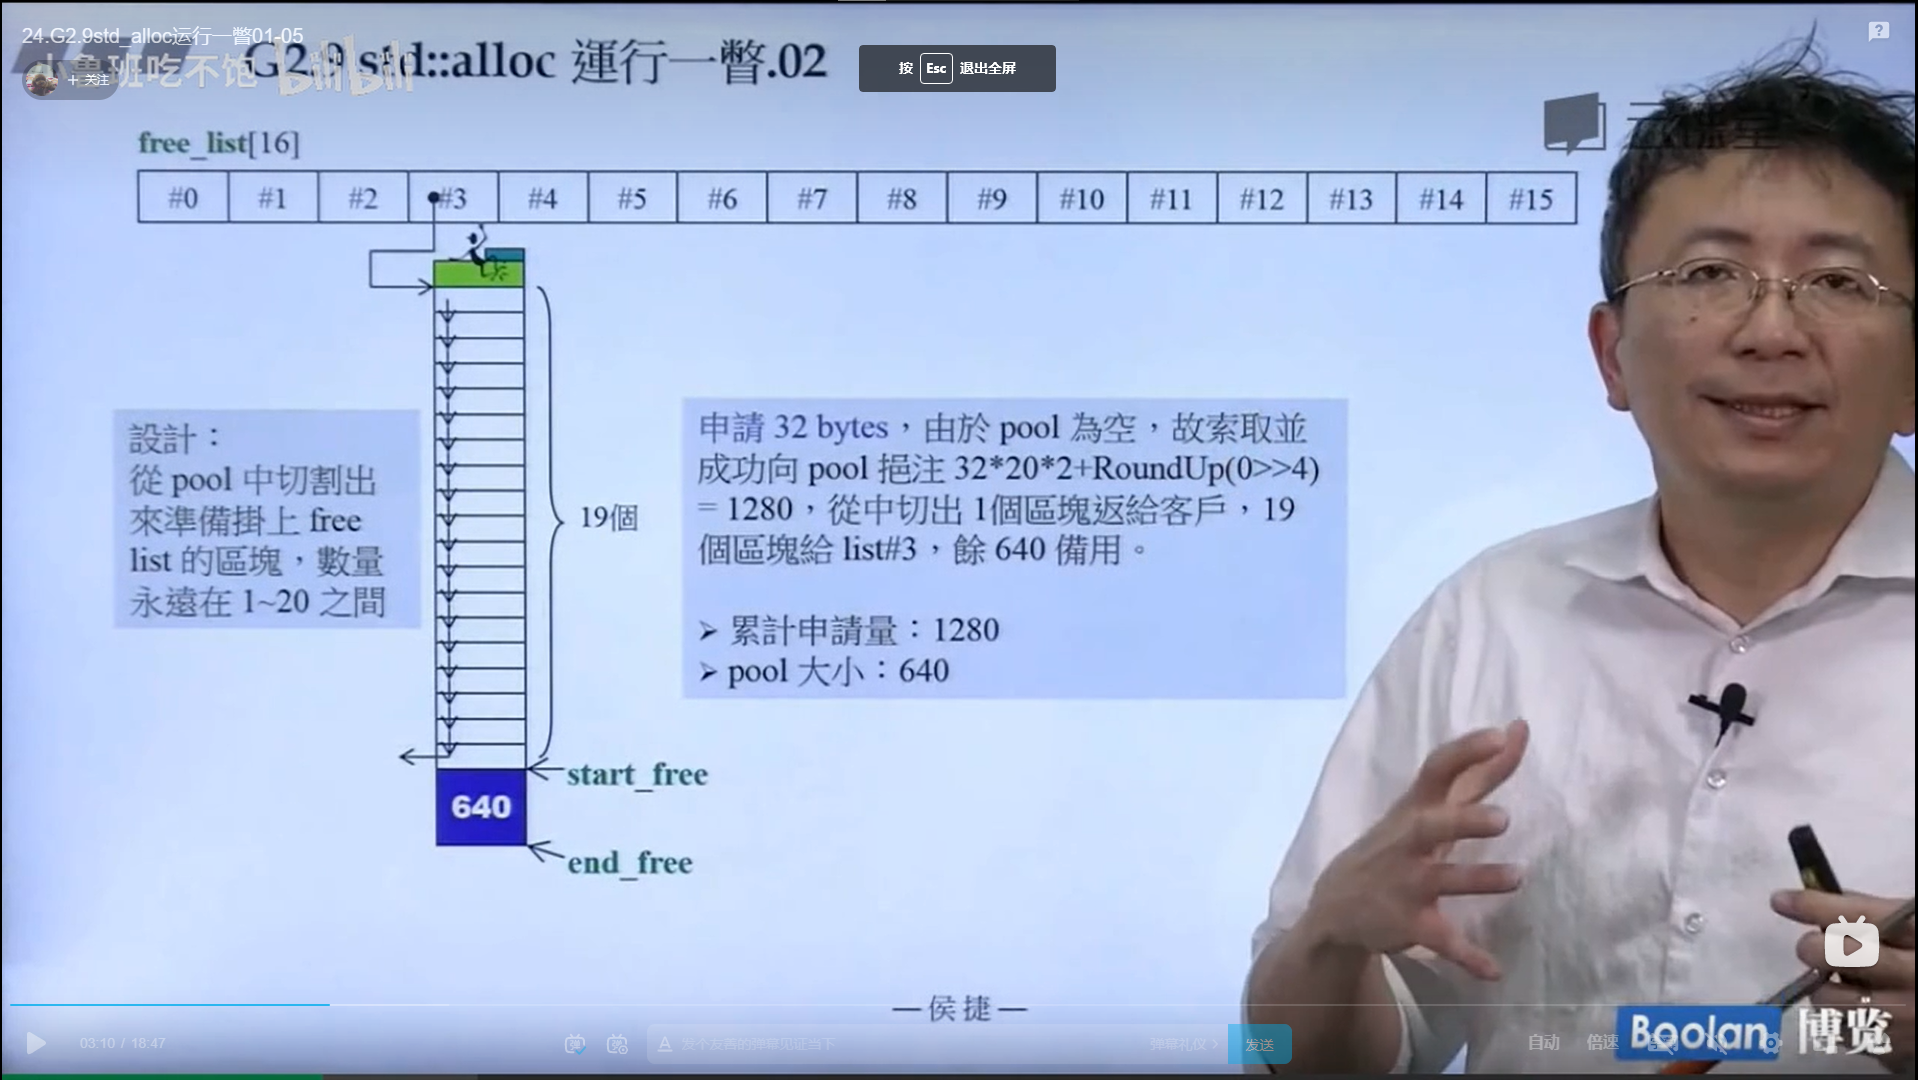
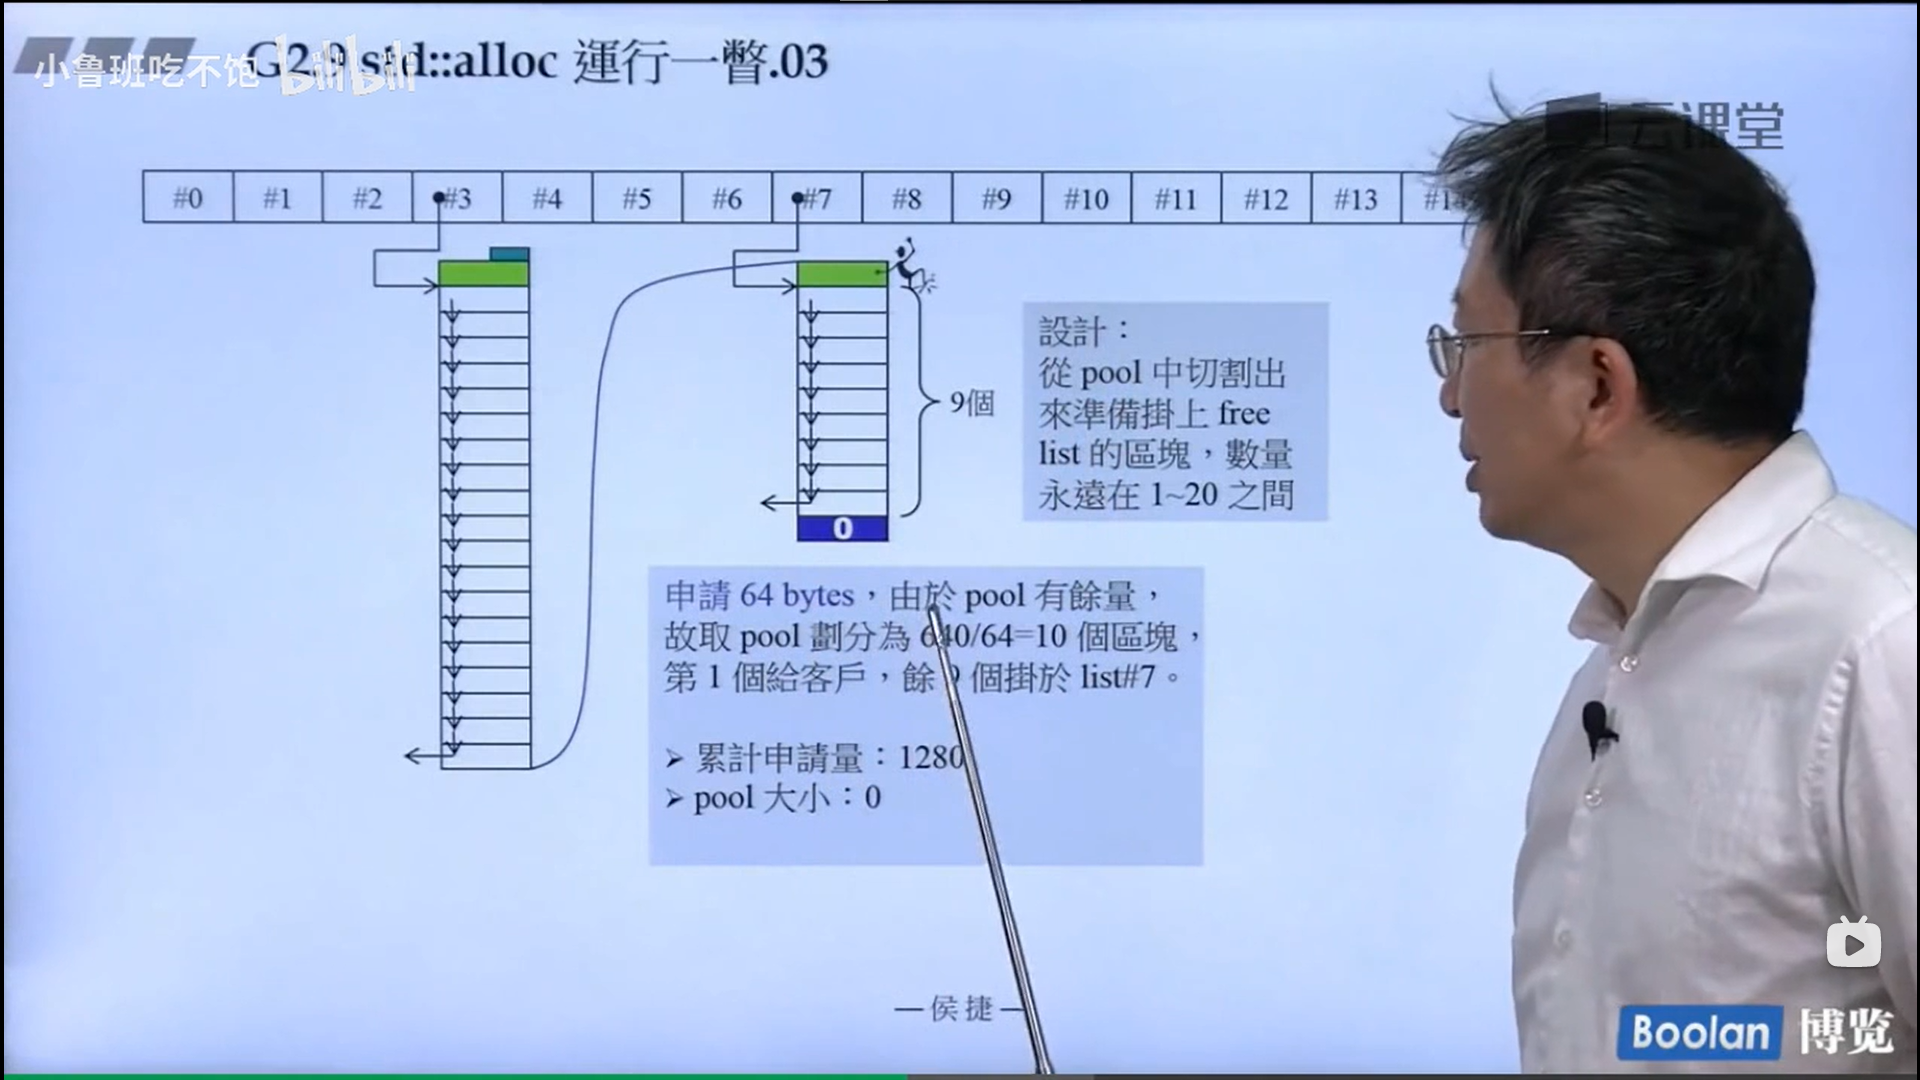
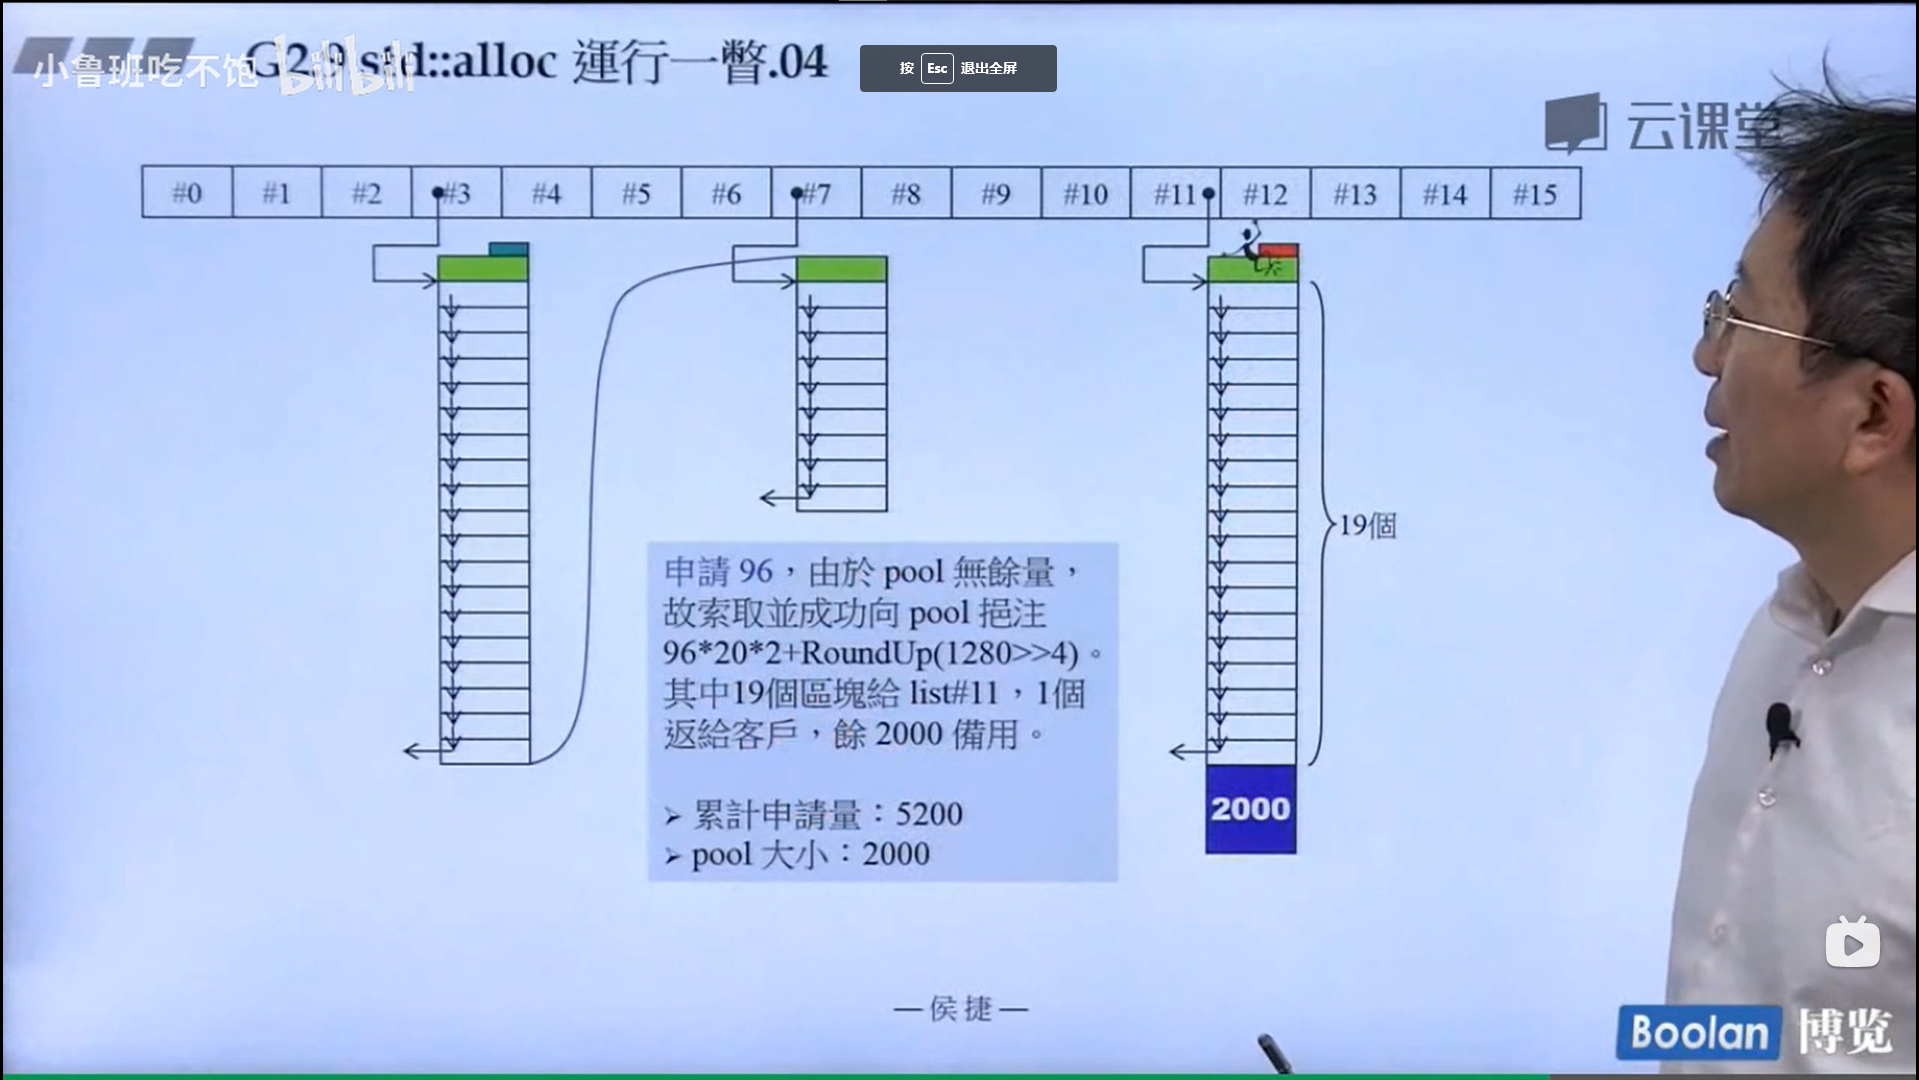
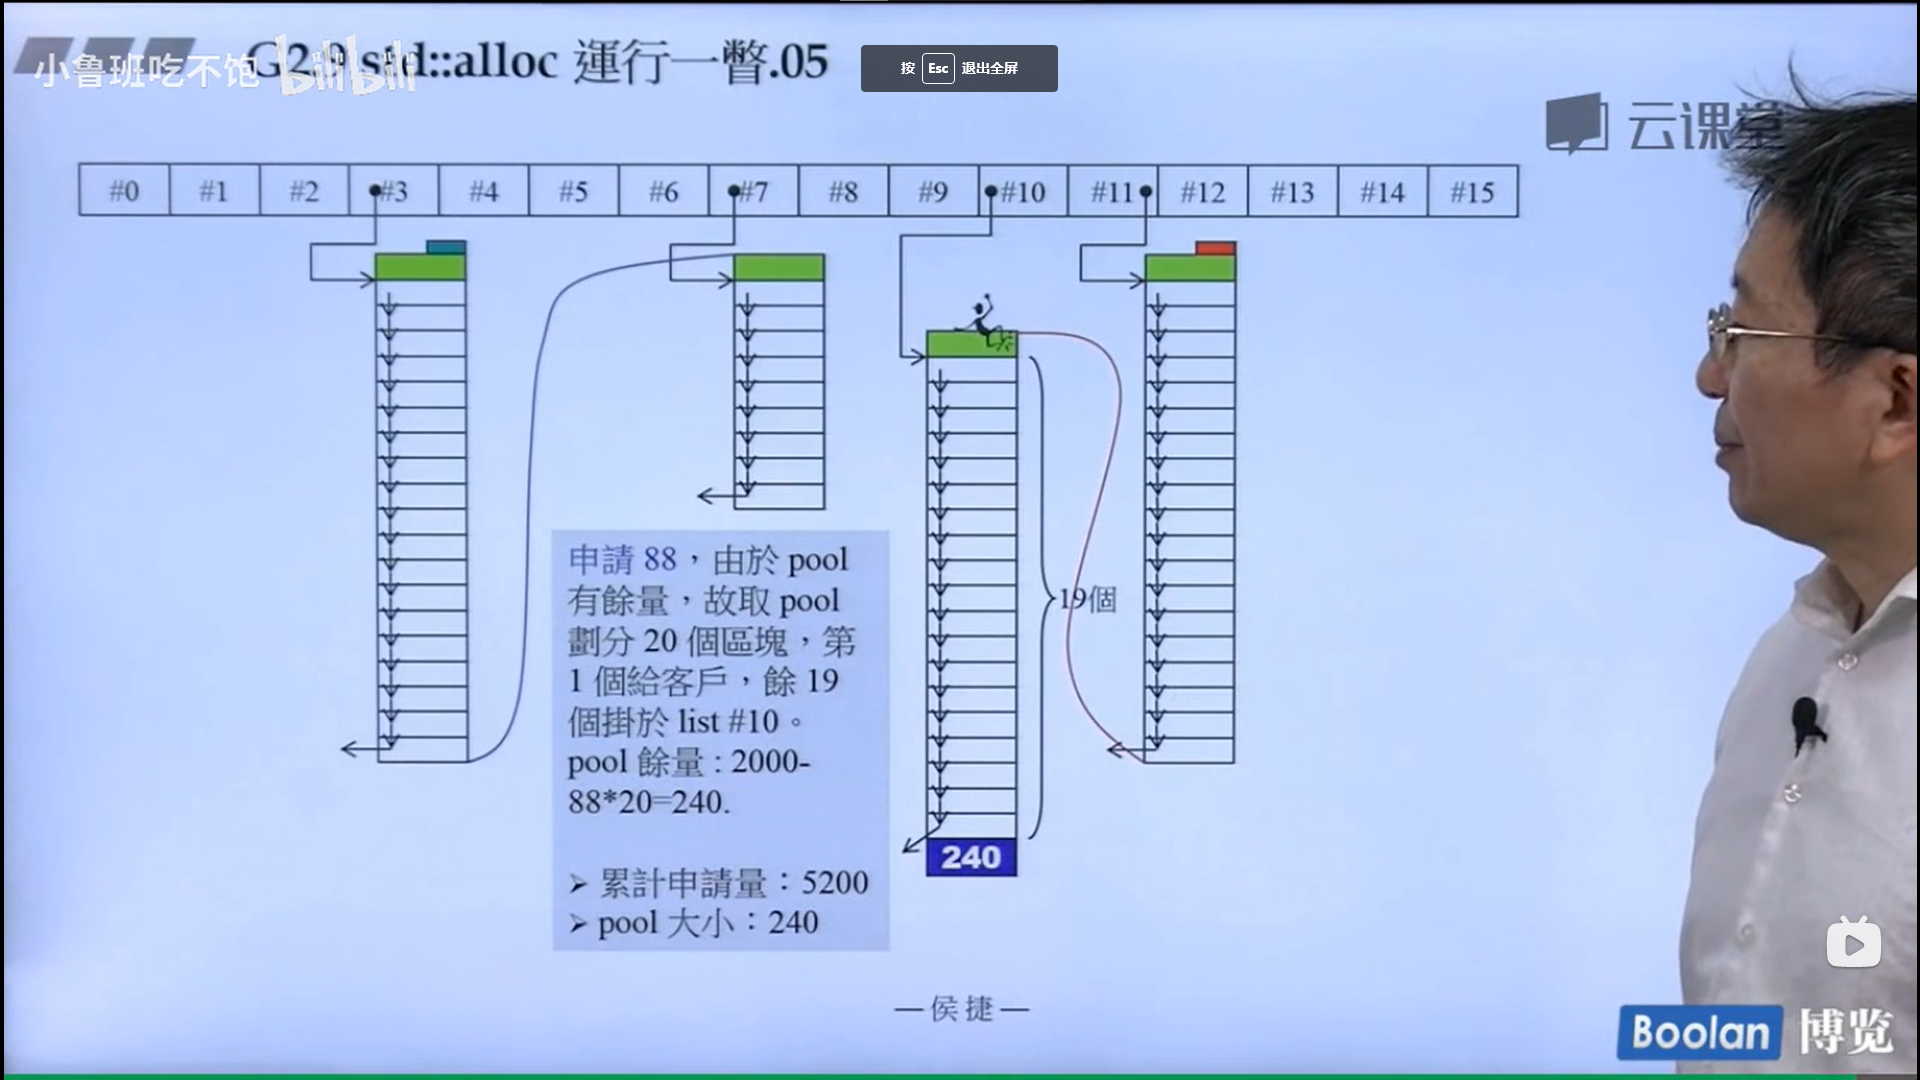
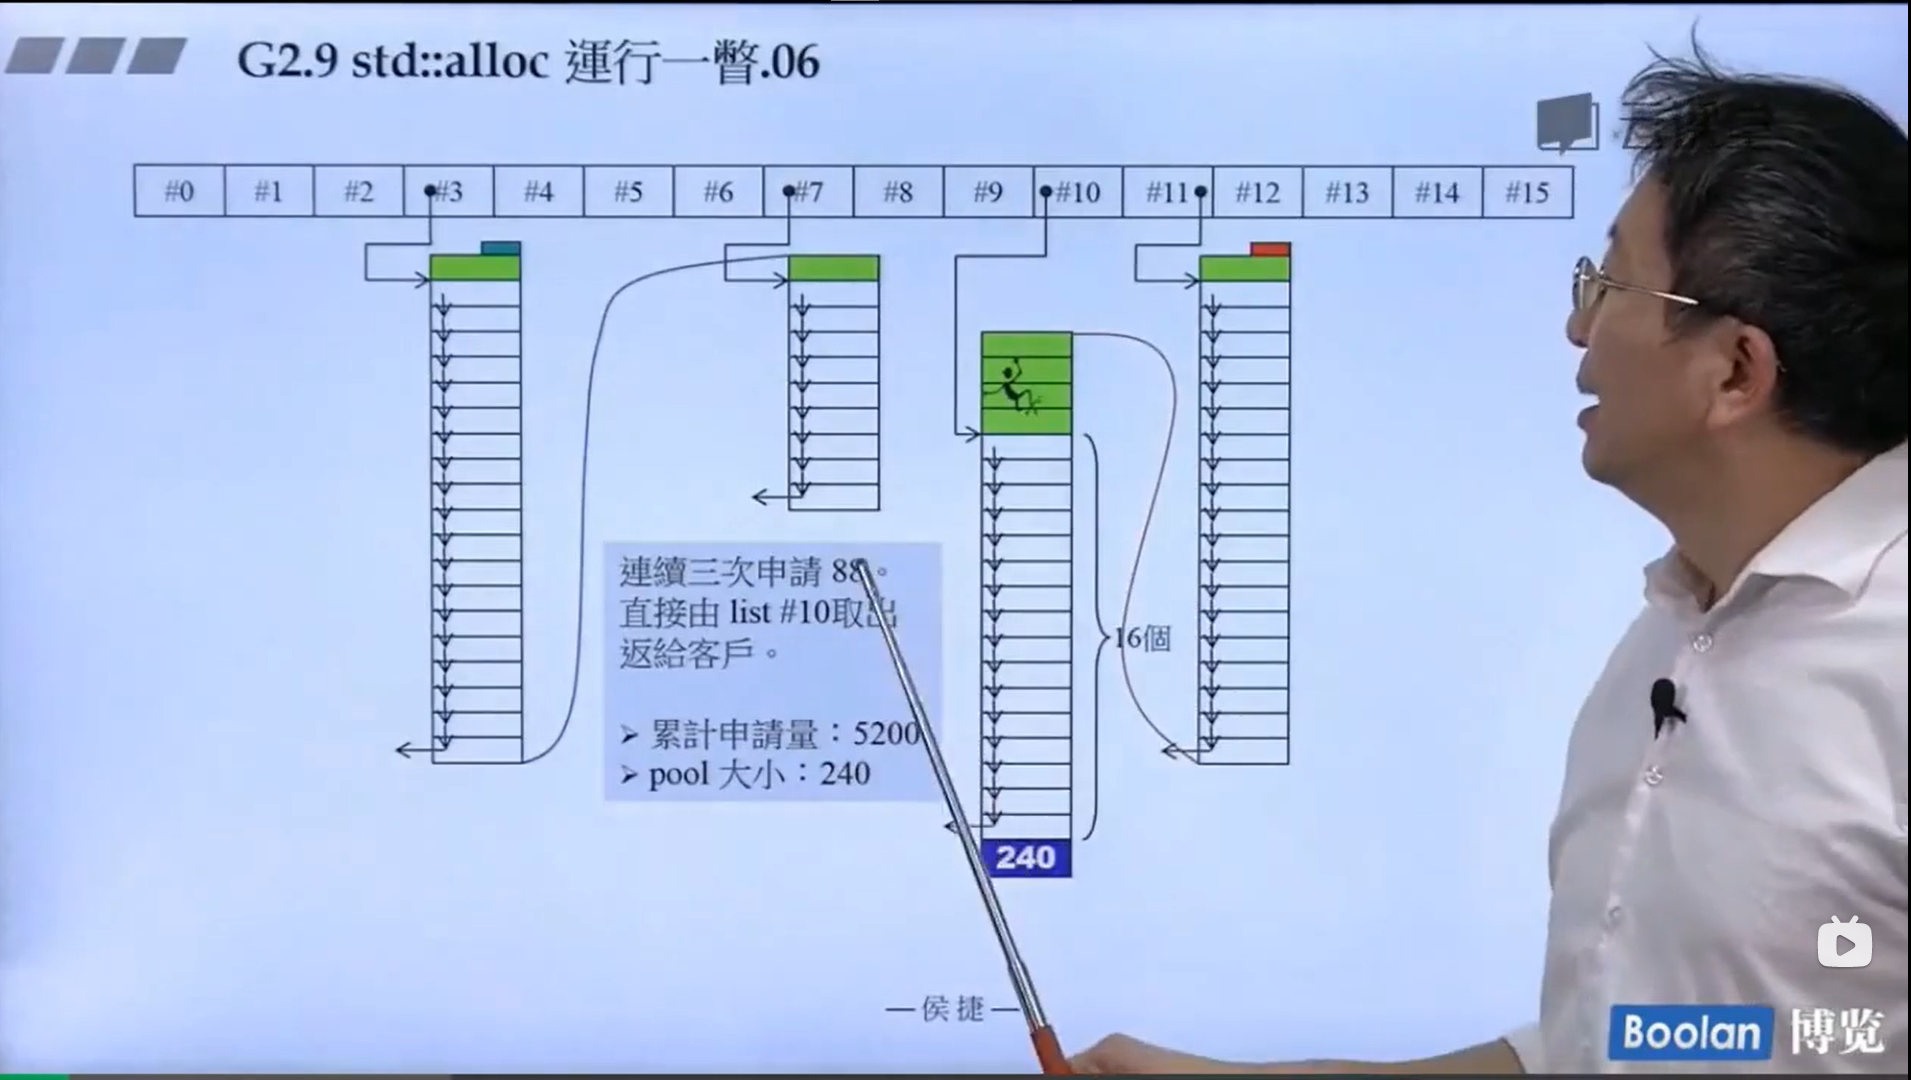
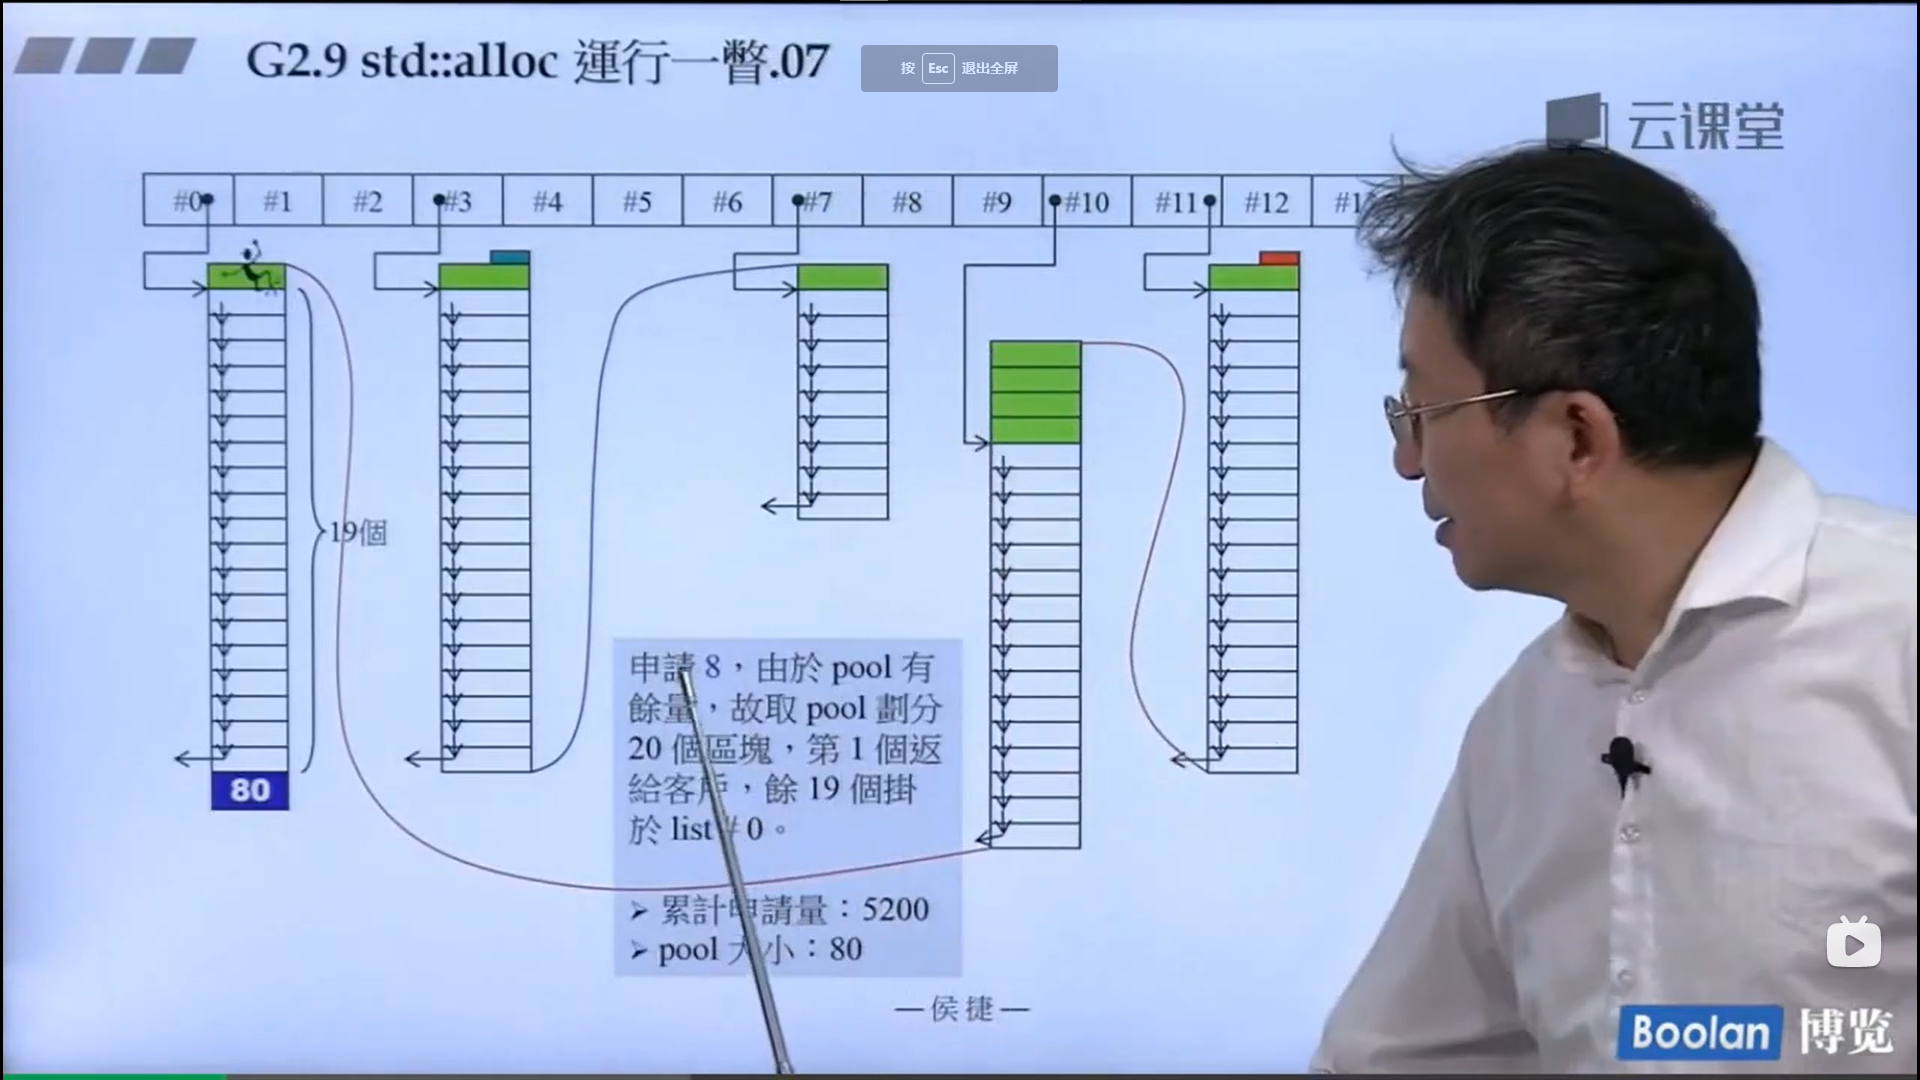
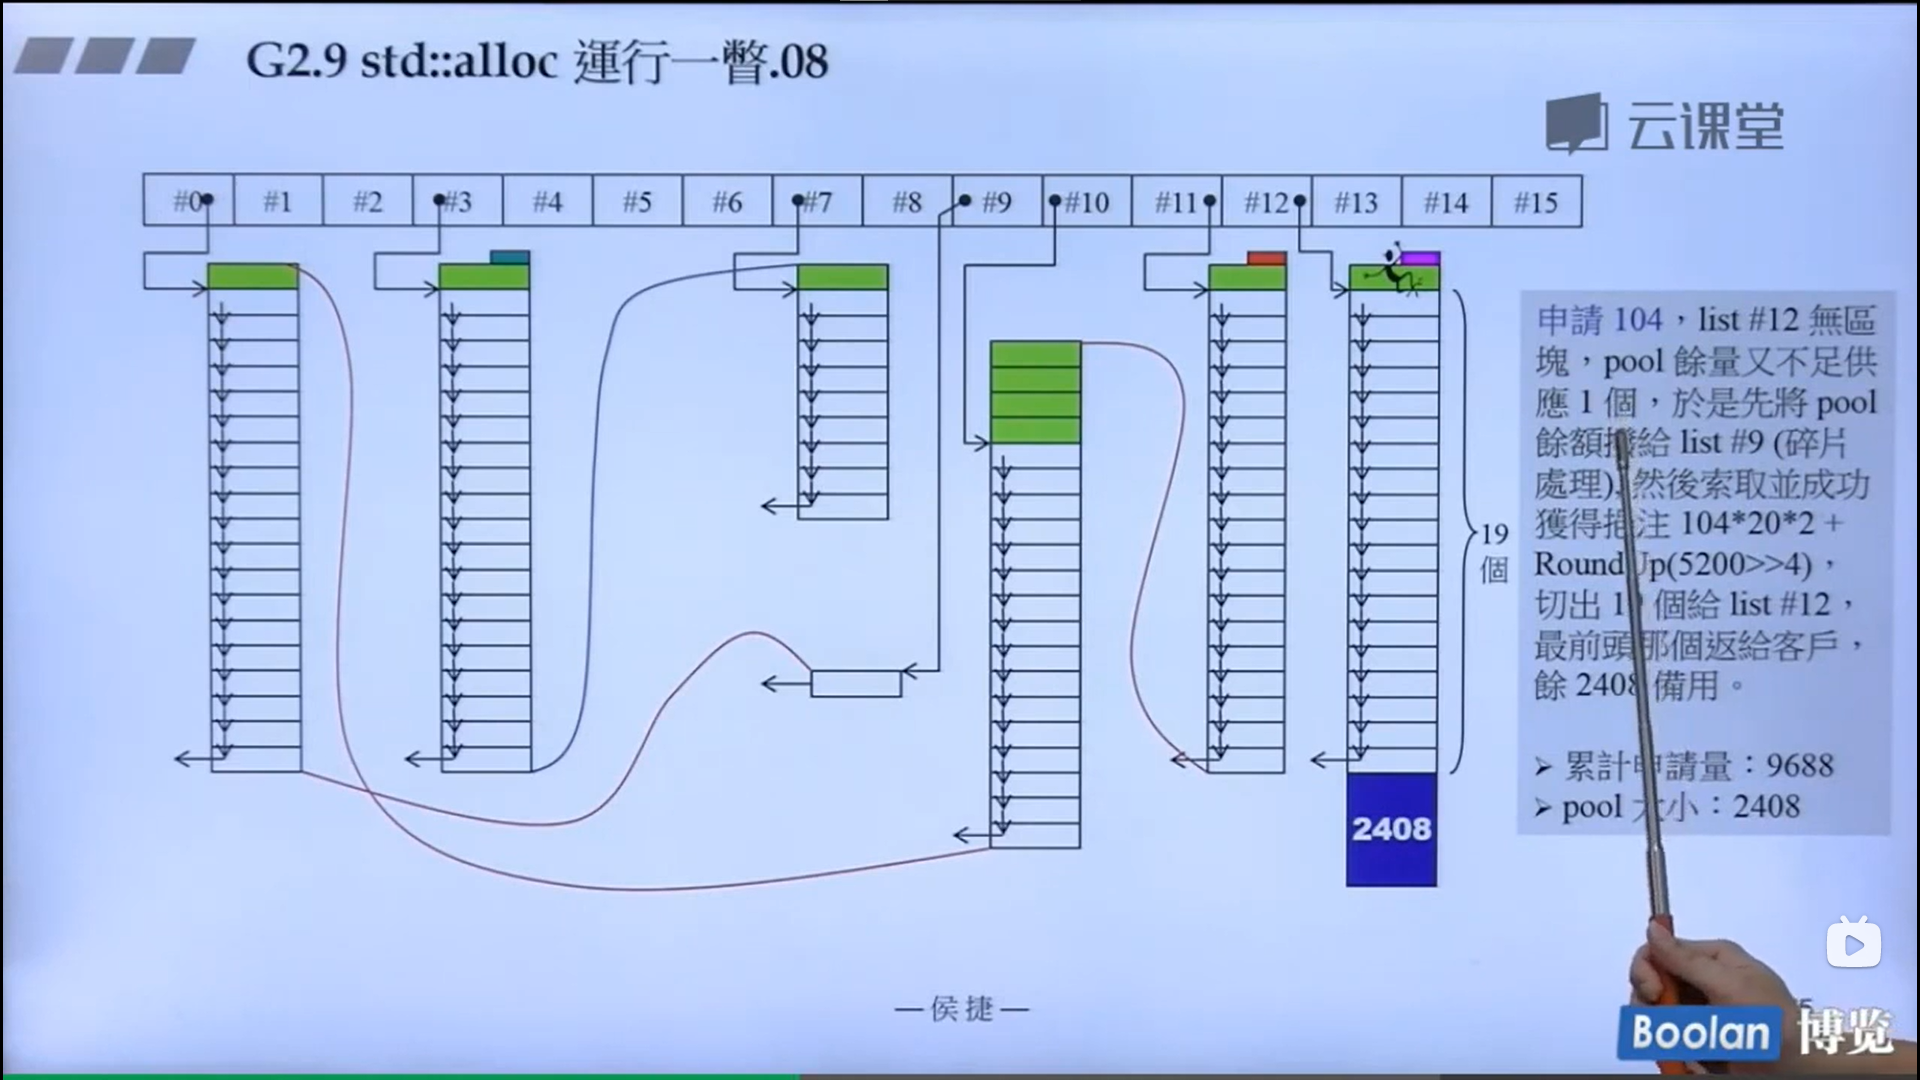
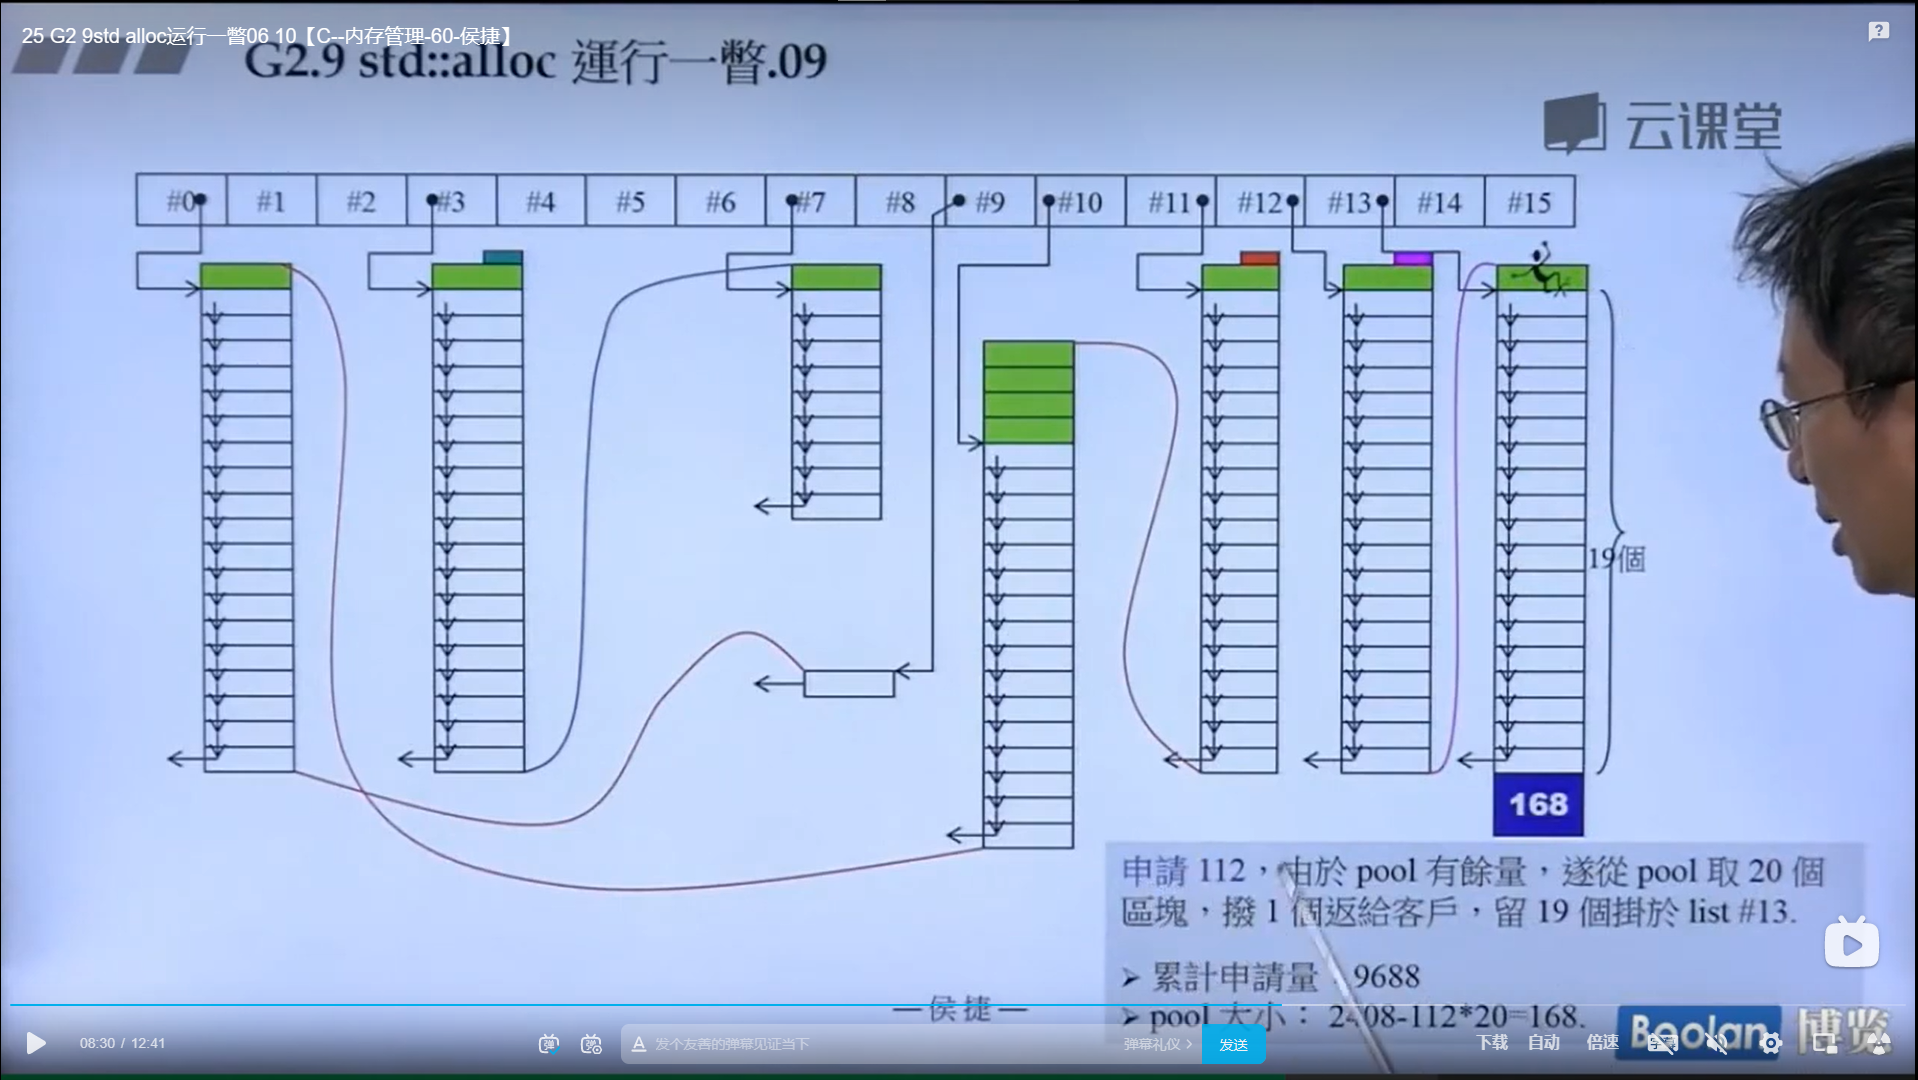
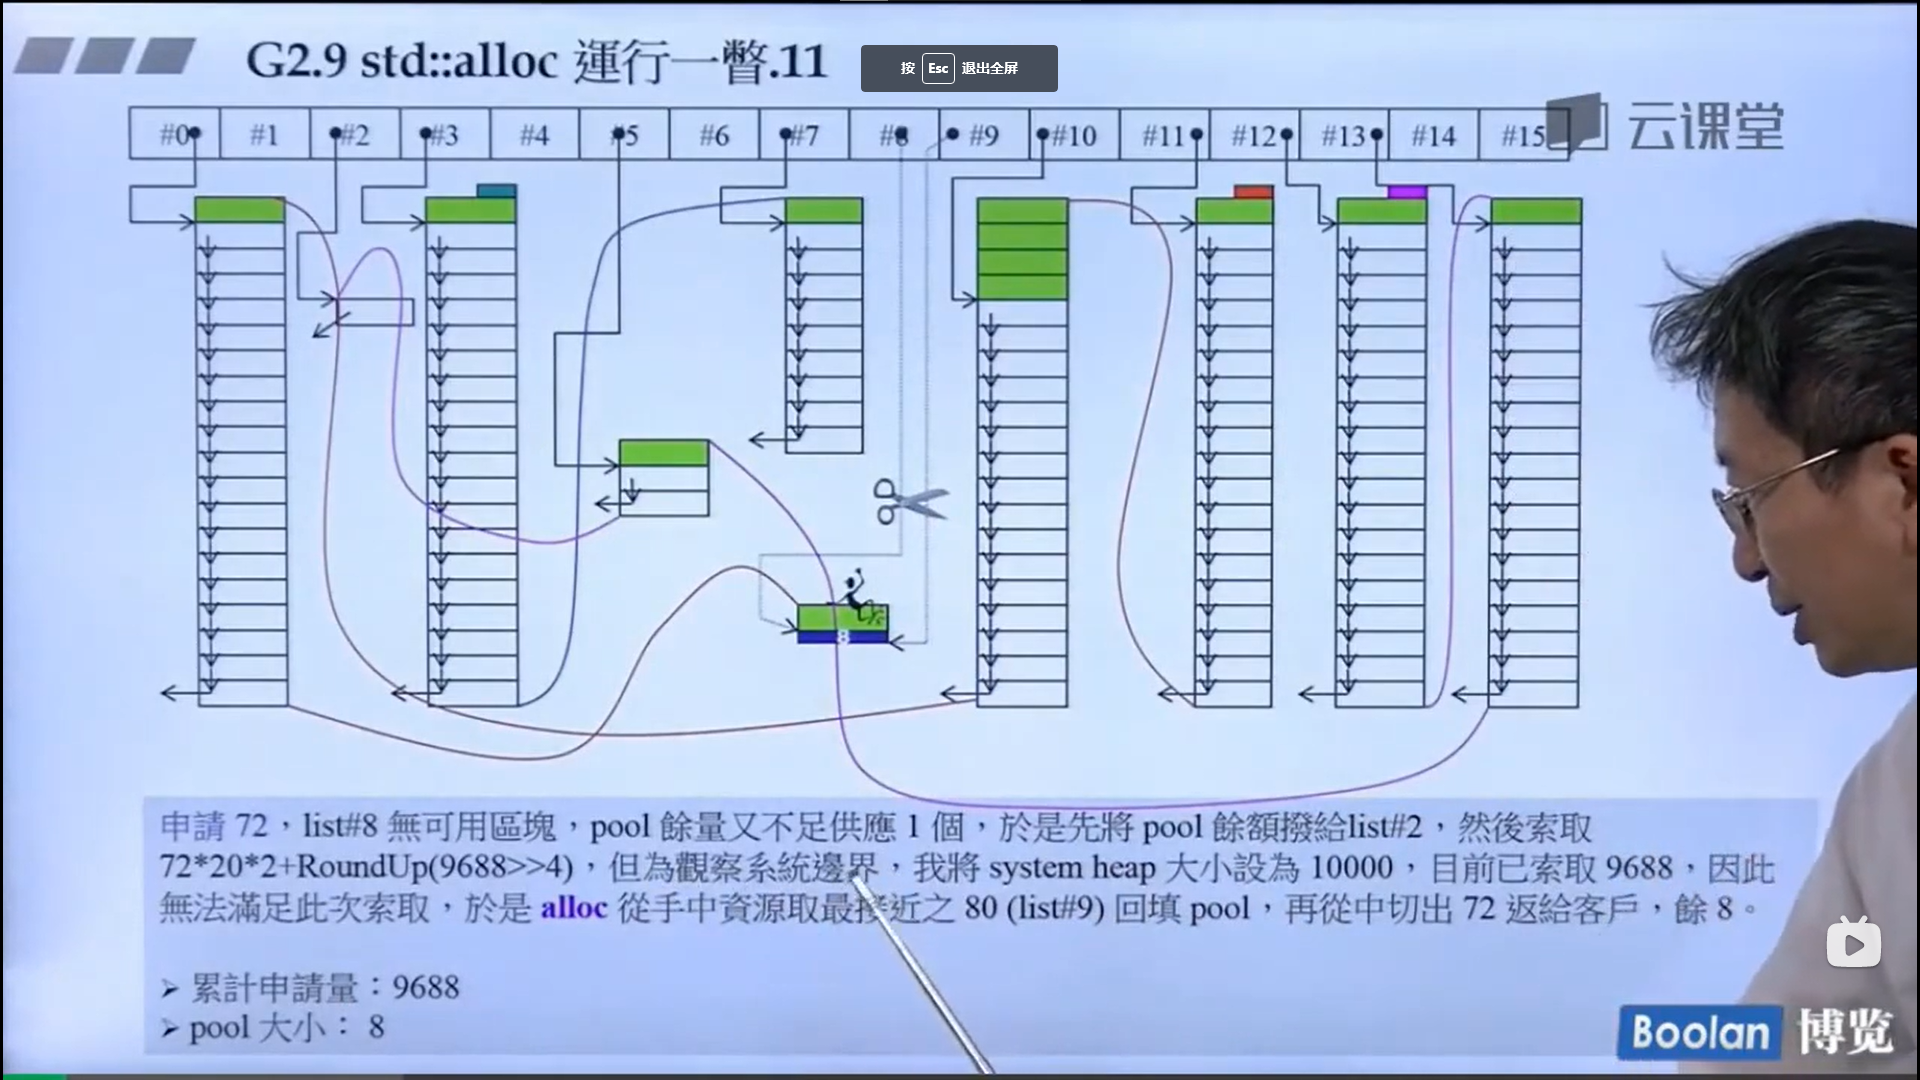
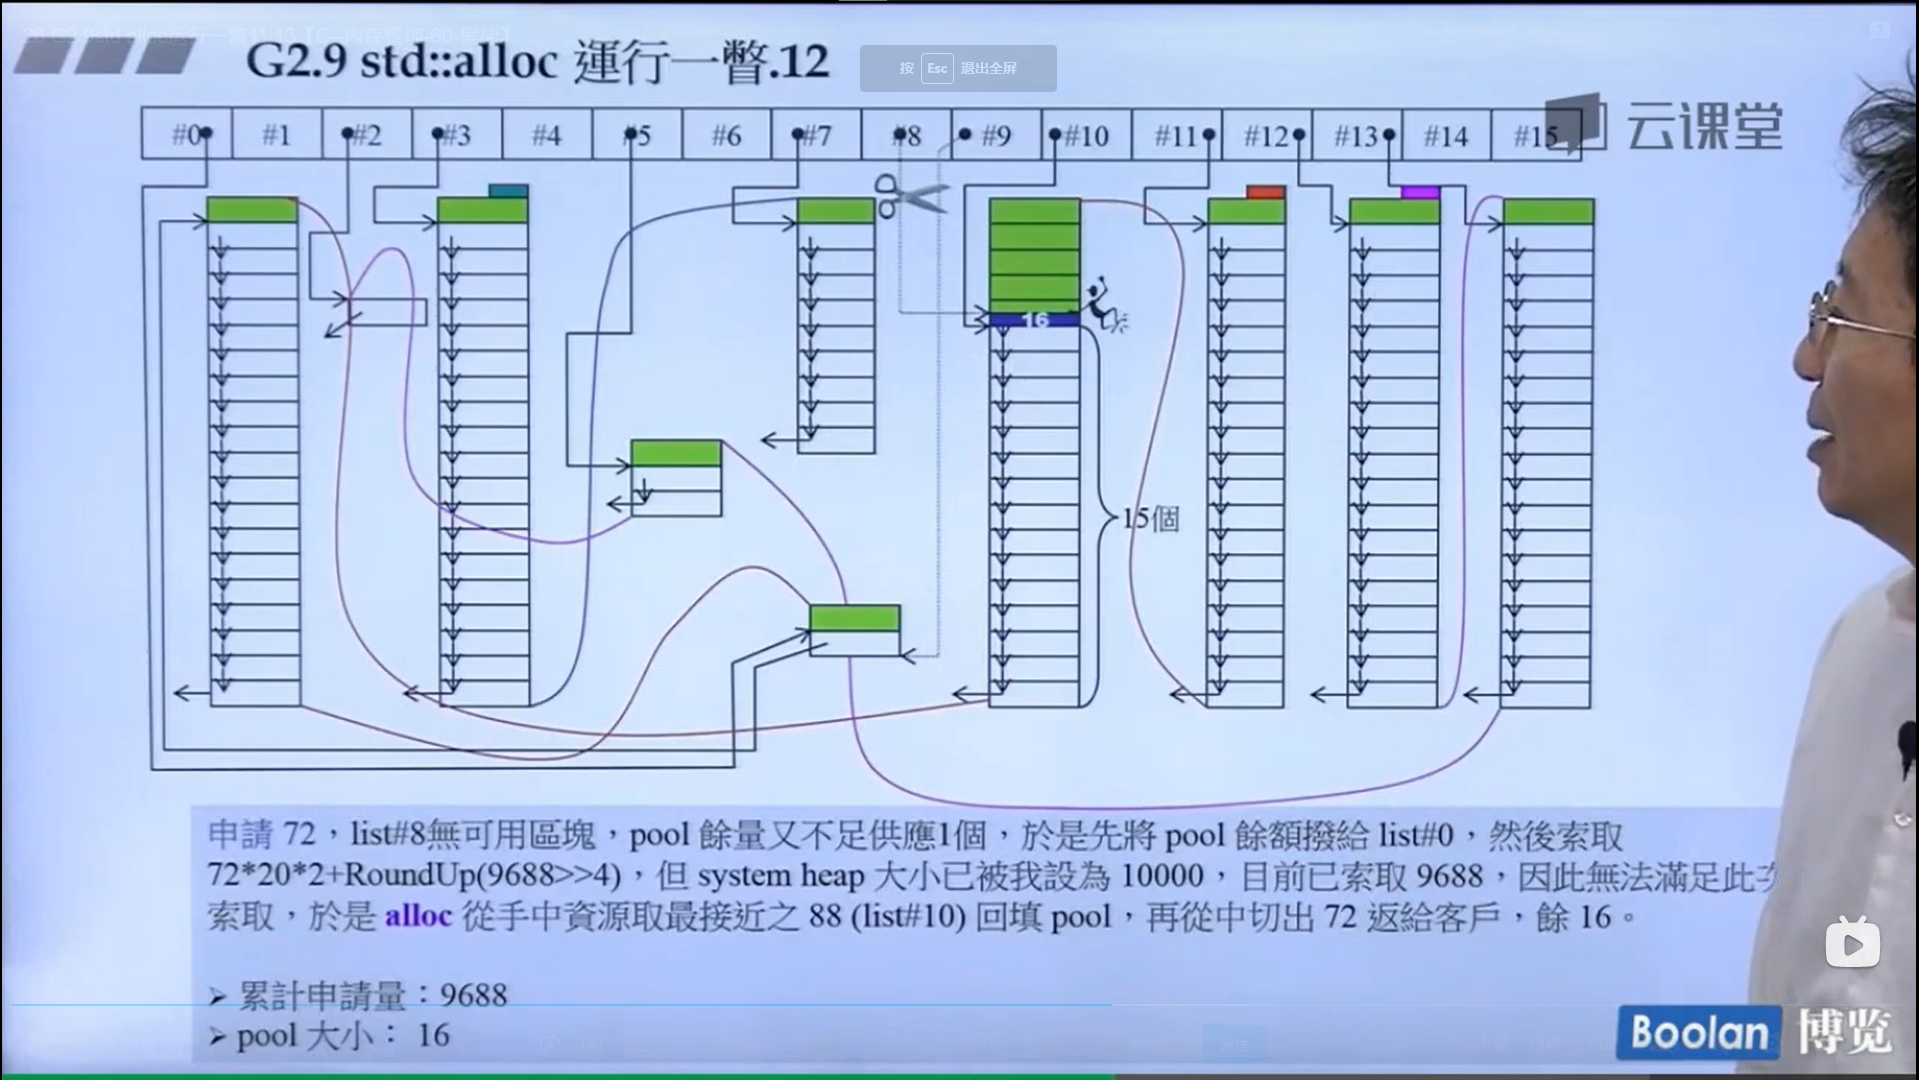
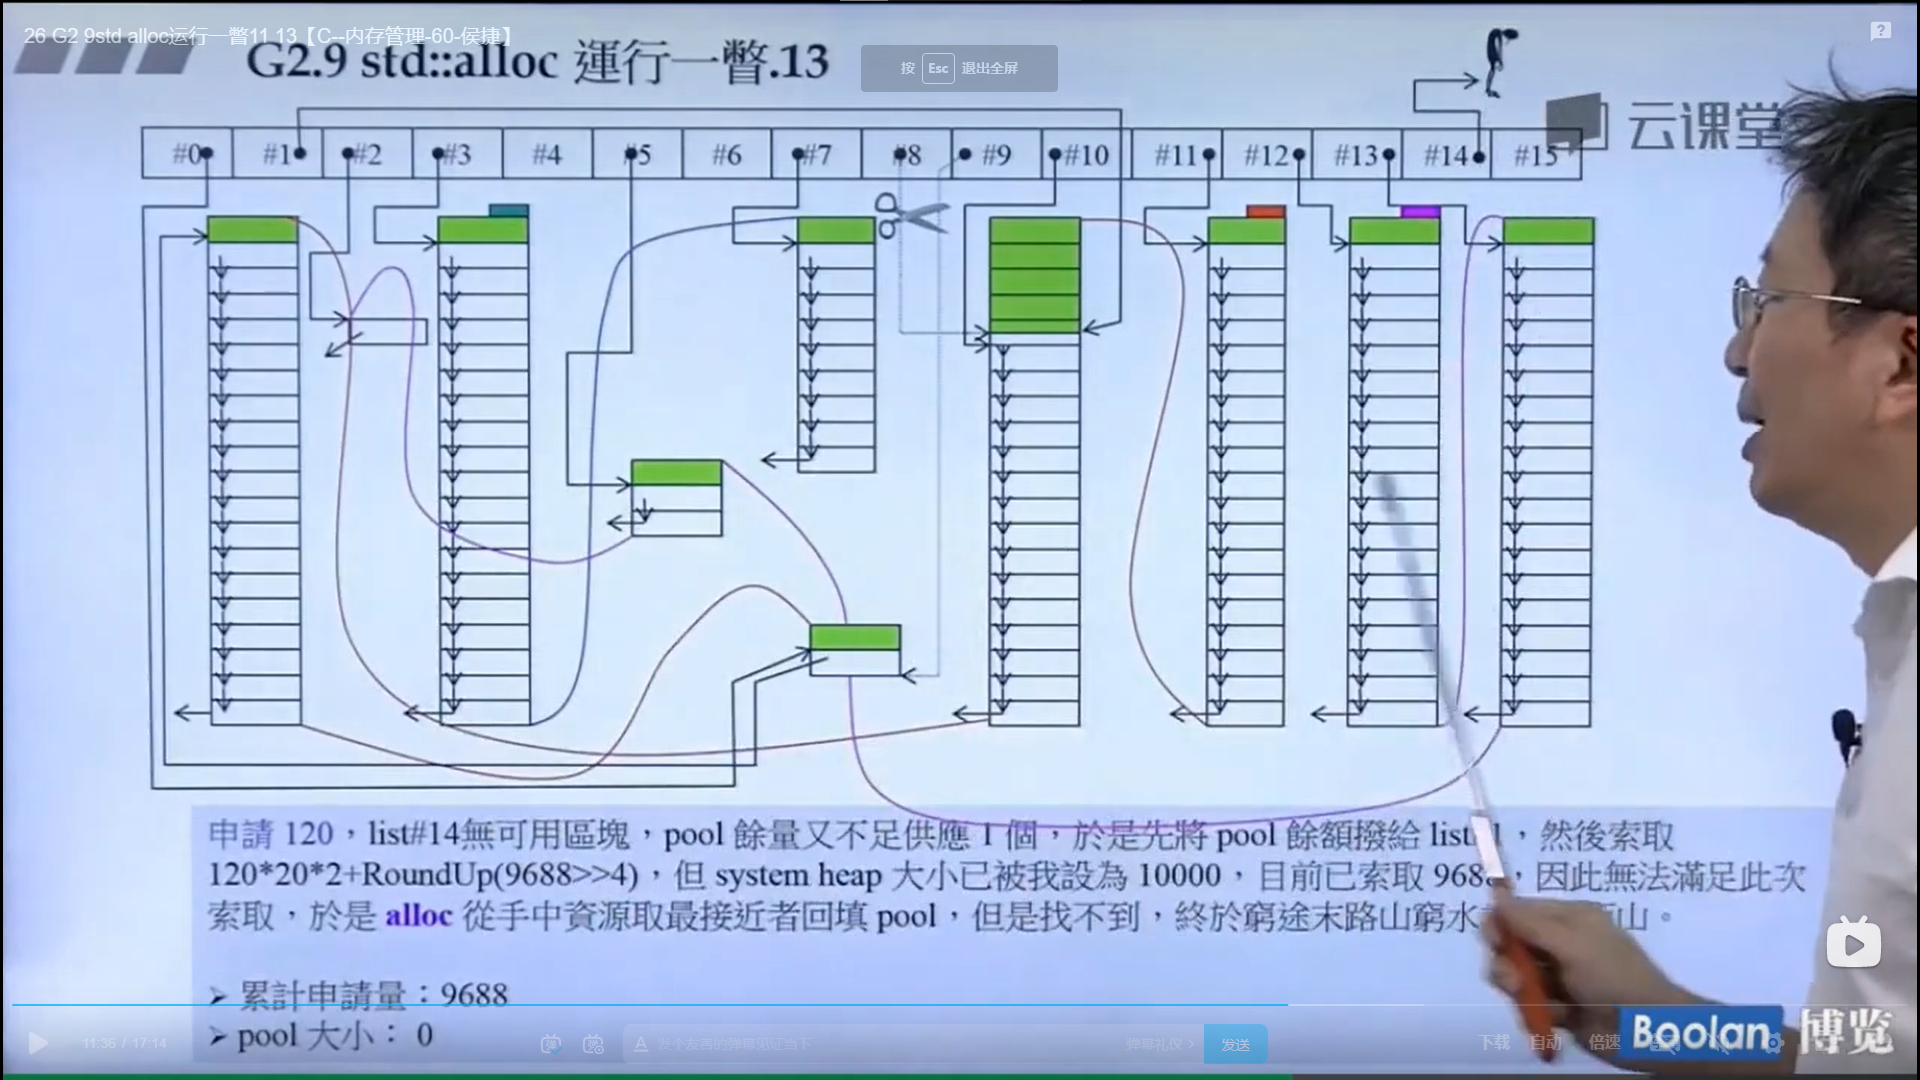
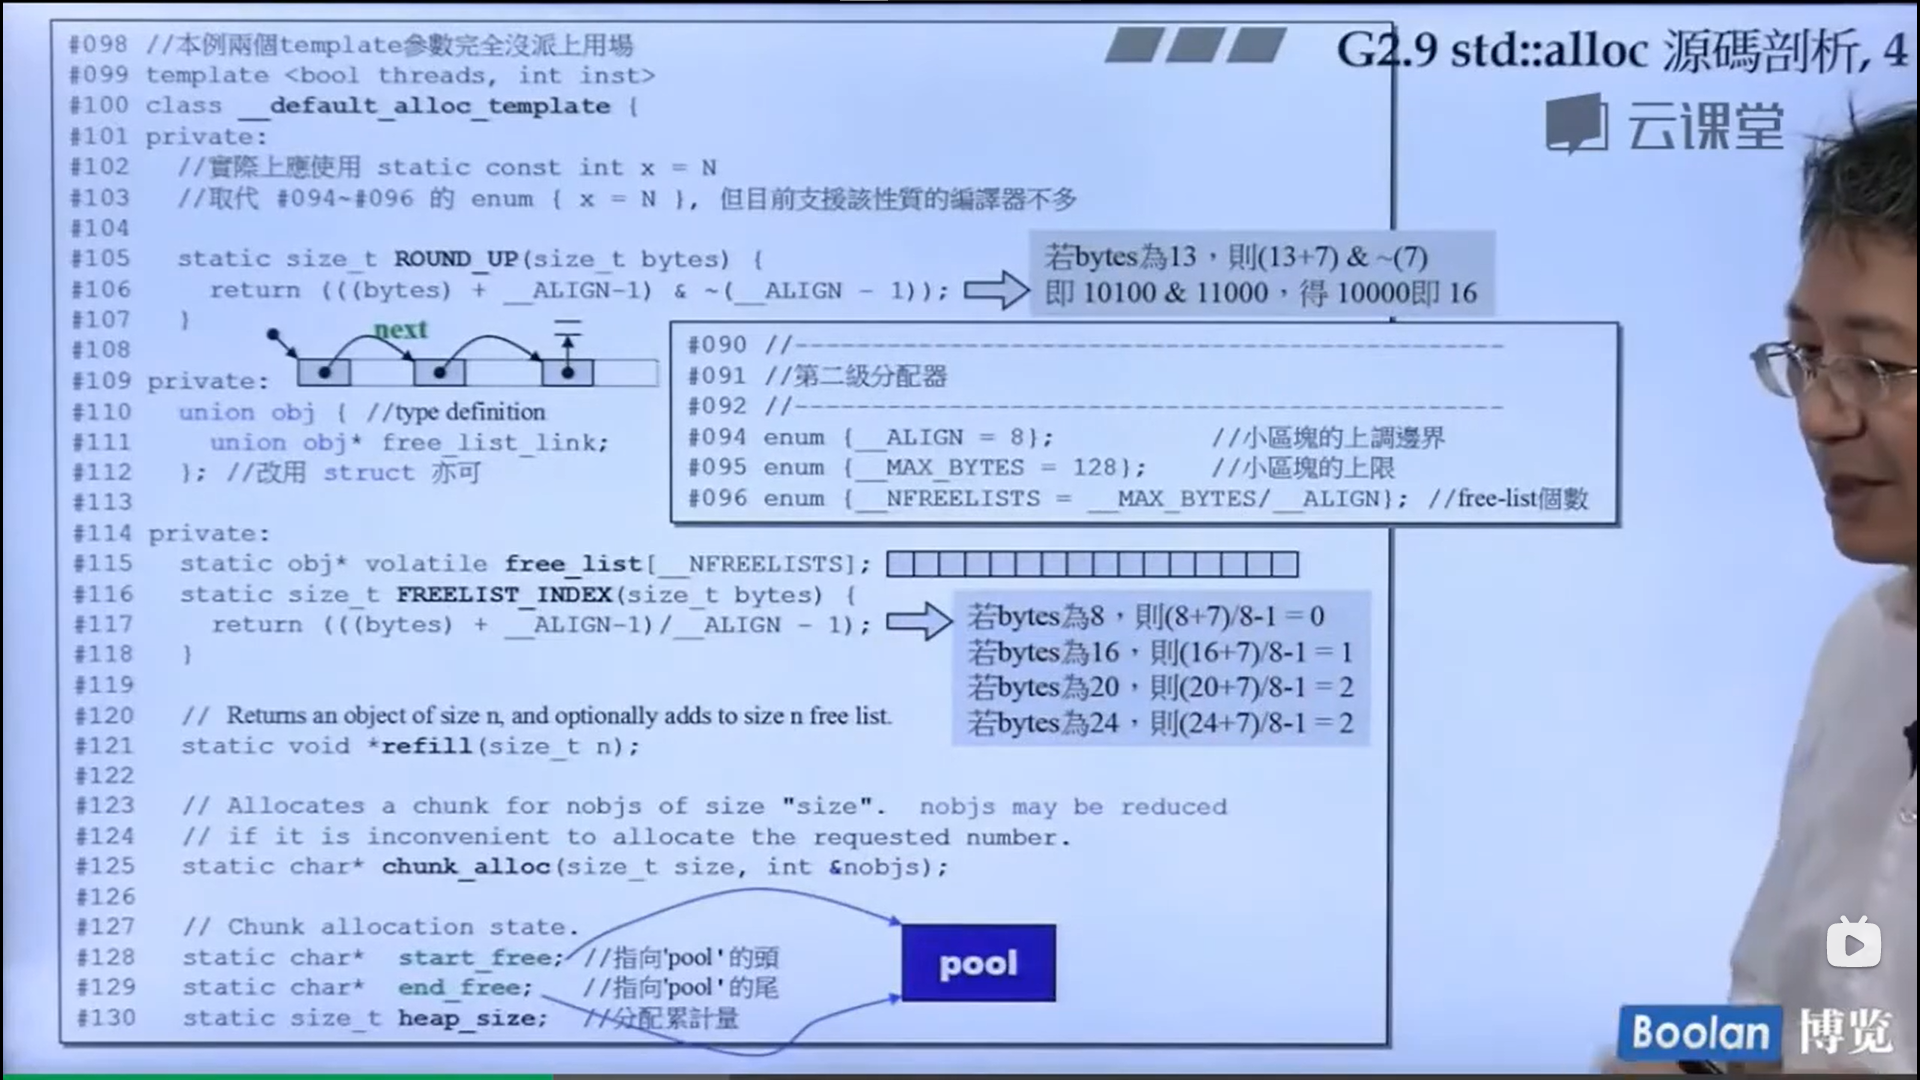
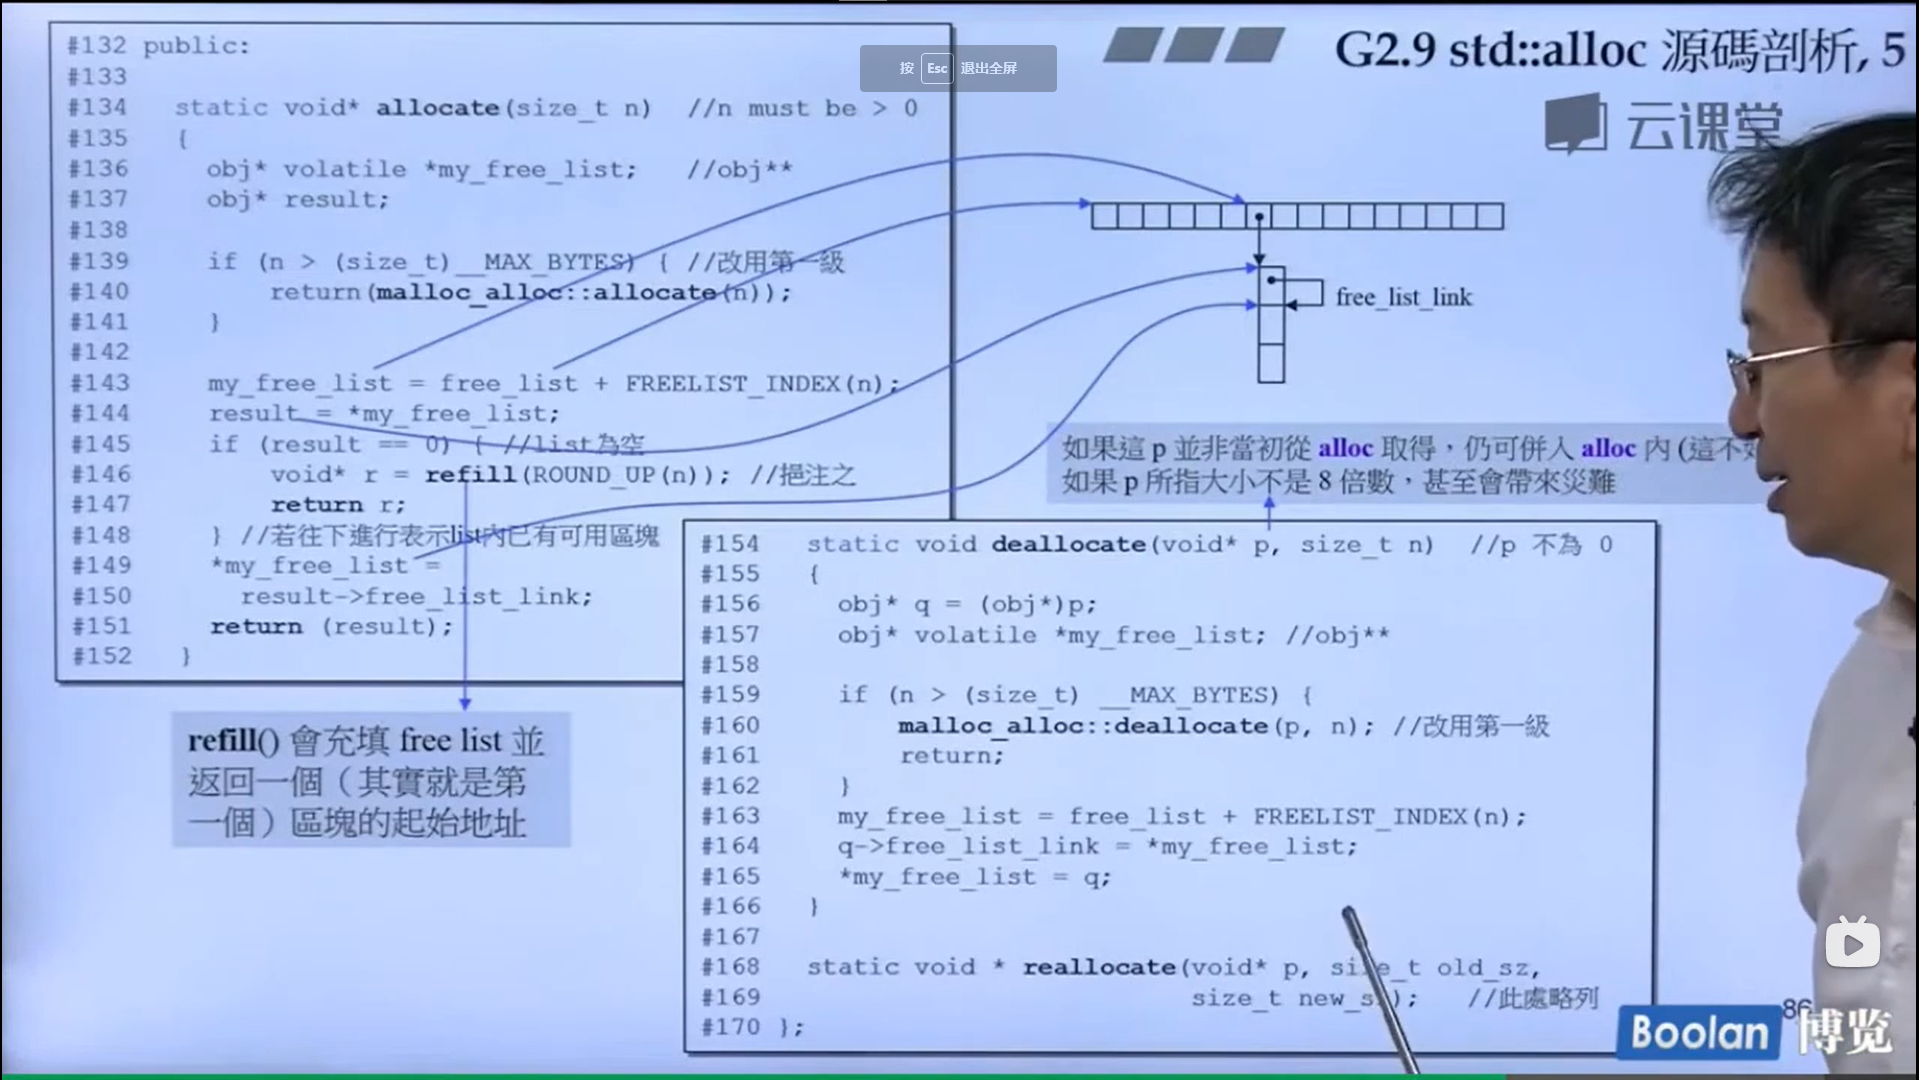
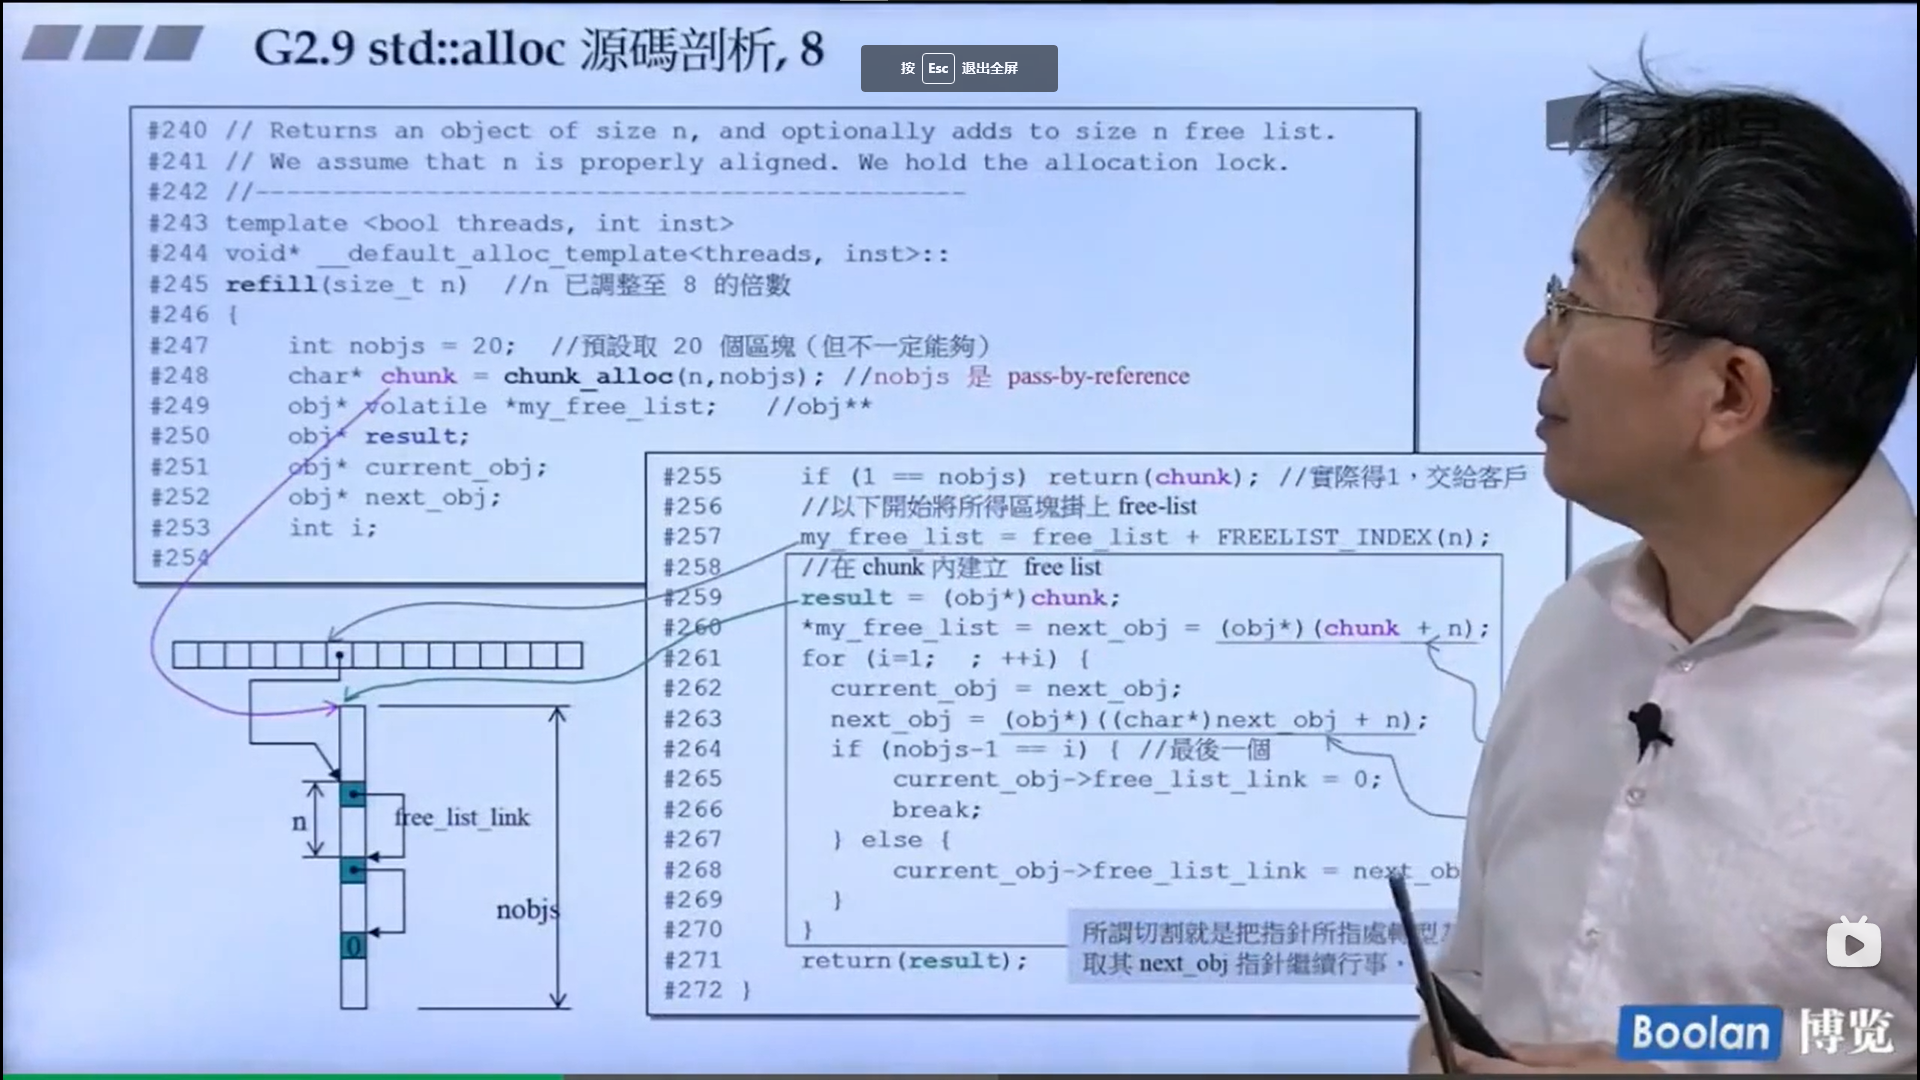
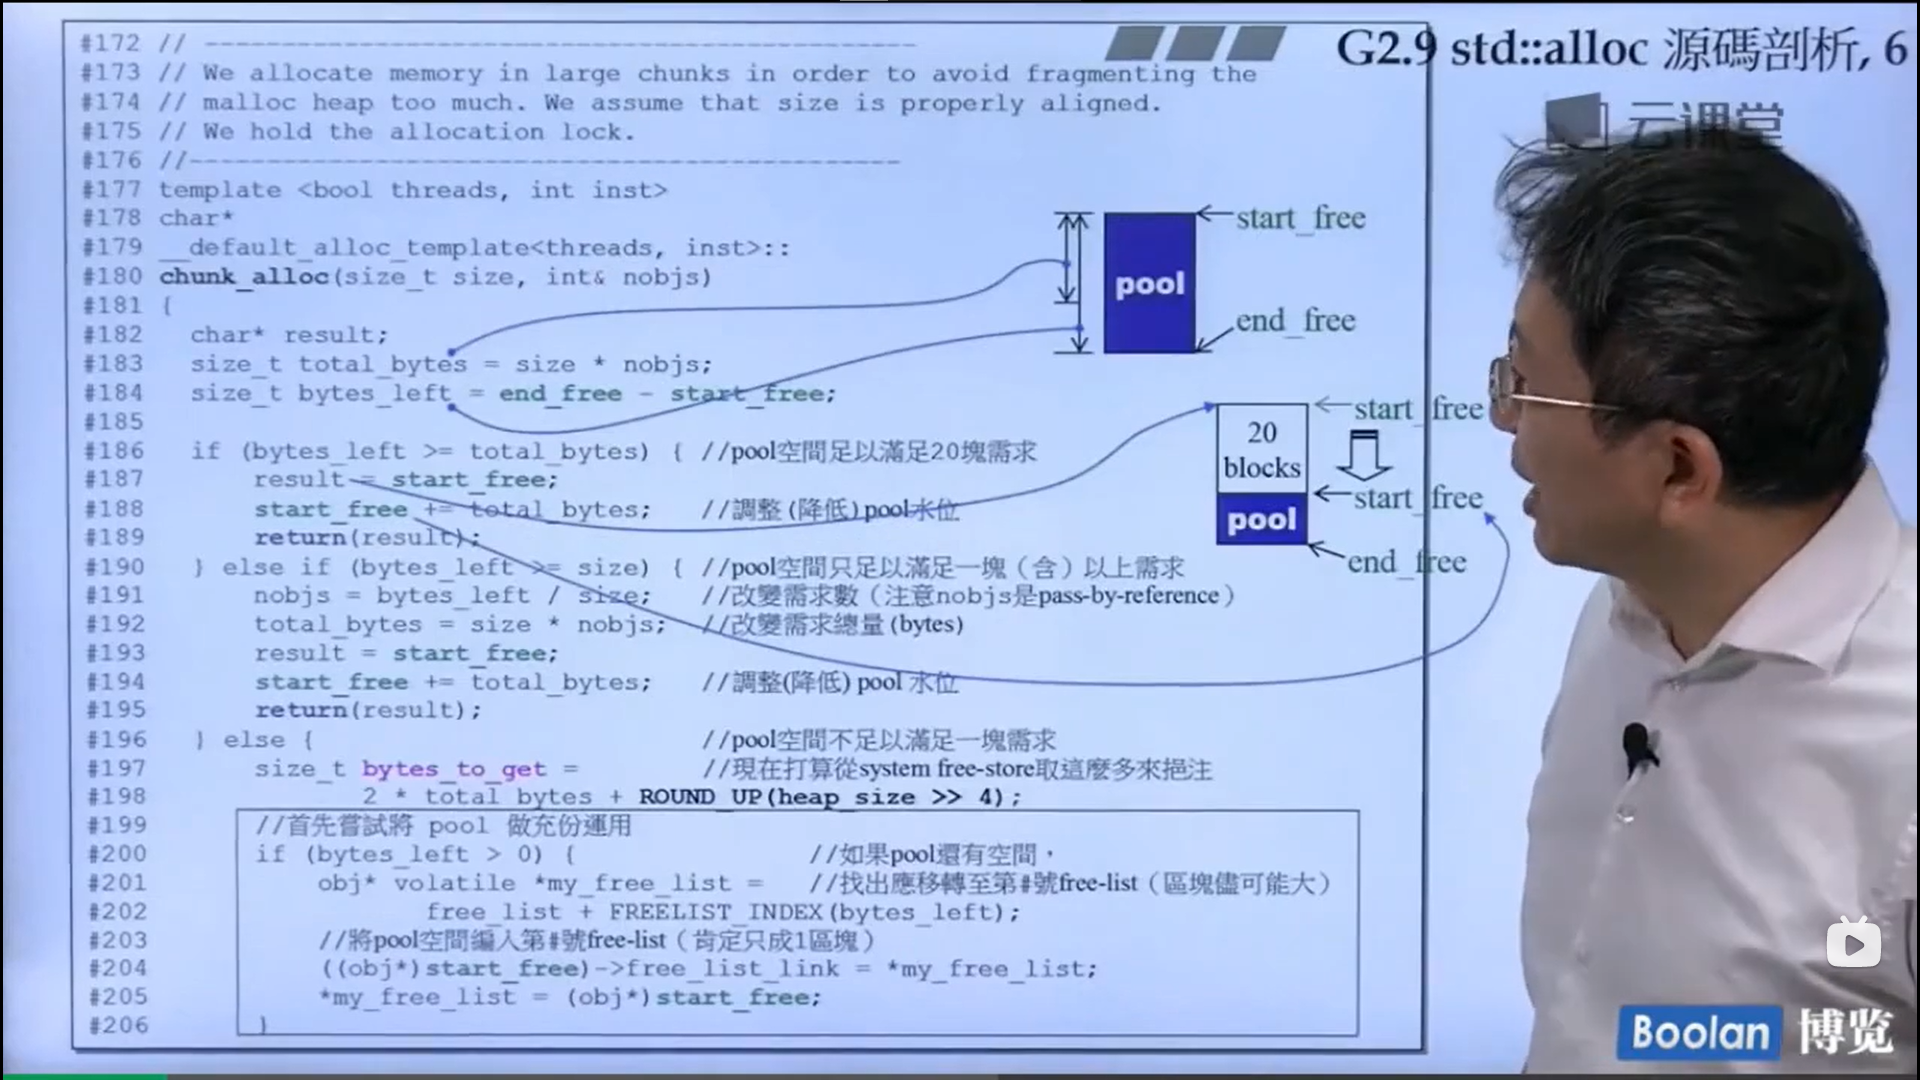
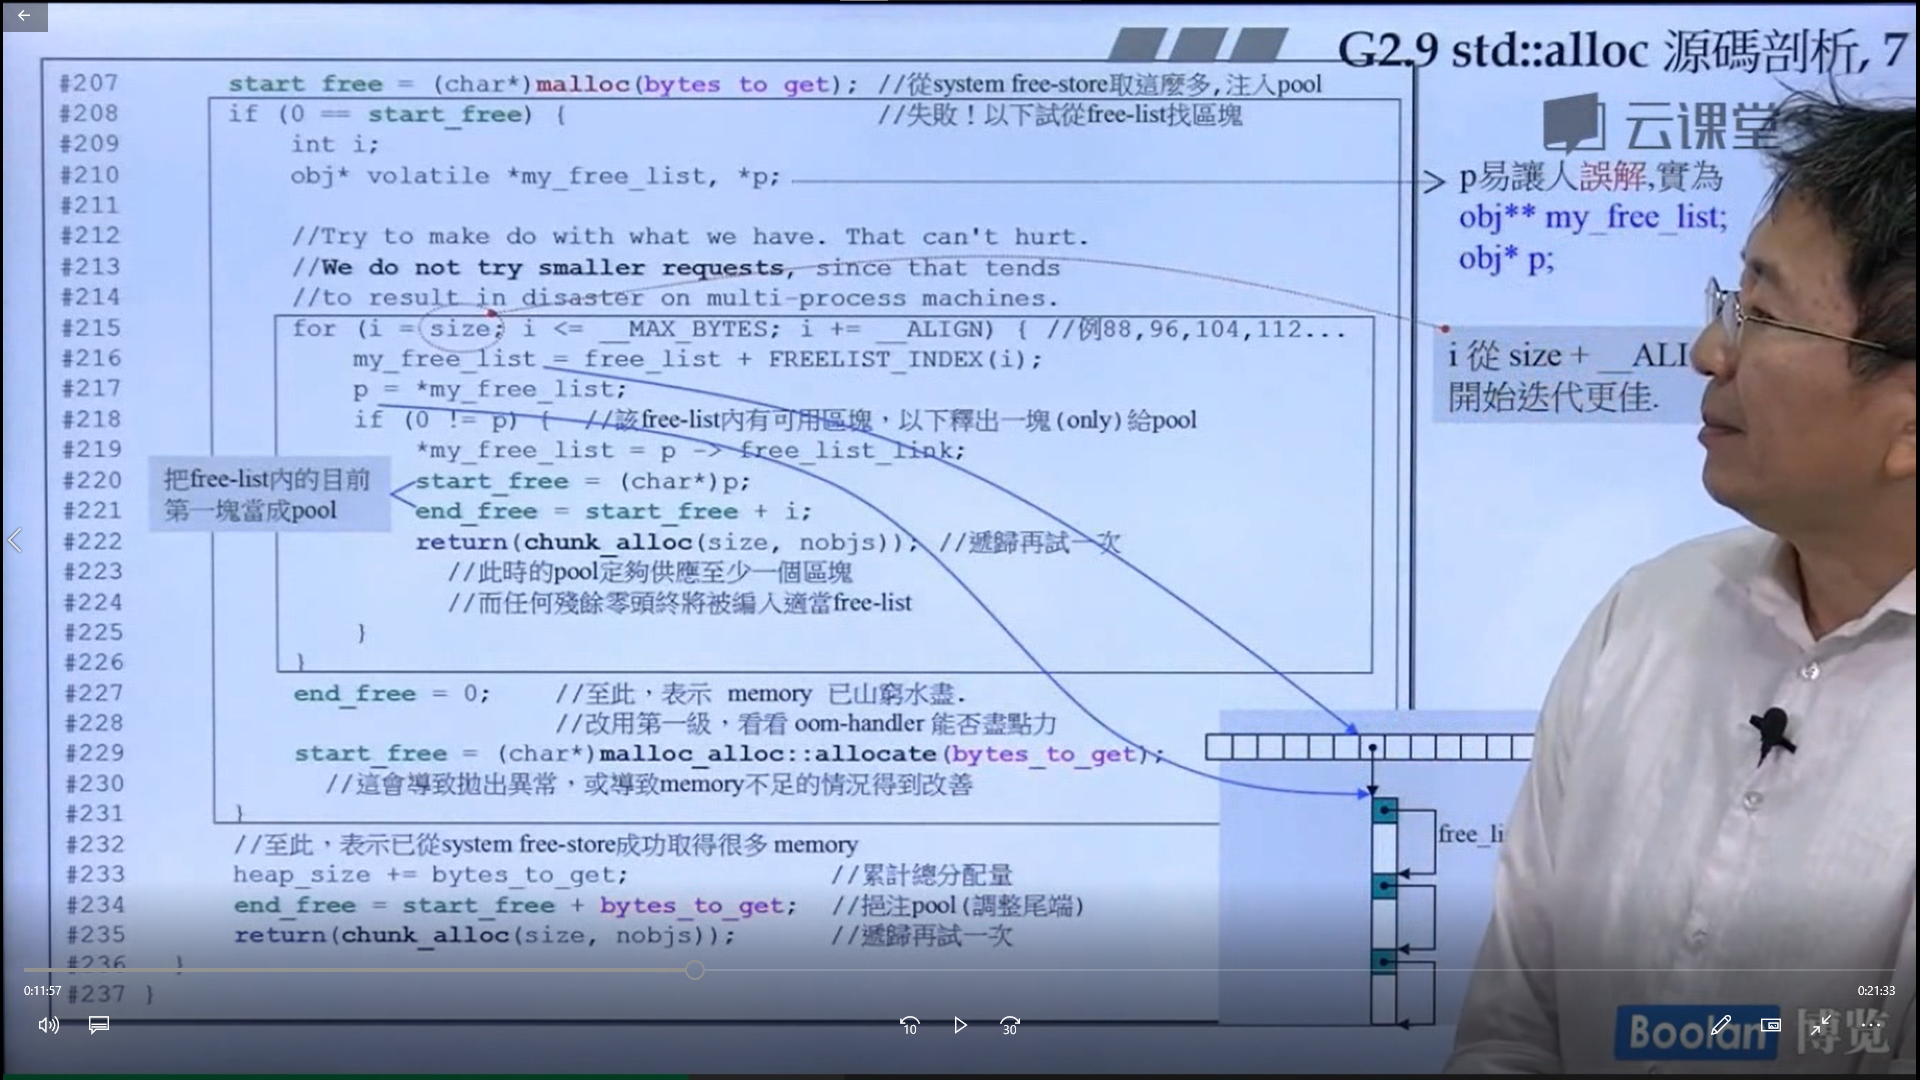
怎么实现的呢?设计了16个链表,每个链表管理特定大小的区块,#0管理8个字节,#1管理16,以此类推,最后#15管理168个字节。所有使用这个分配器的元素的大小会被调整到8的倍数,比如50的大小会被调整到56。如果该链表下面没有挂内存块,那么会向操作系统用malloc函数申请一大块内存块,然后做切割,之后分出一块给该容器,用单项链表存储。这样的好处是避免了cookie的额外开销,减少了内存浪费。
这个东西的缺陷到内存管理里面去讲。
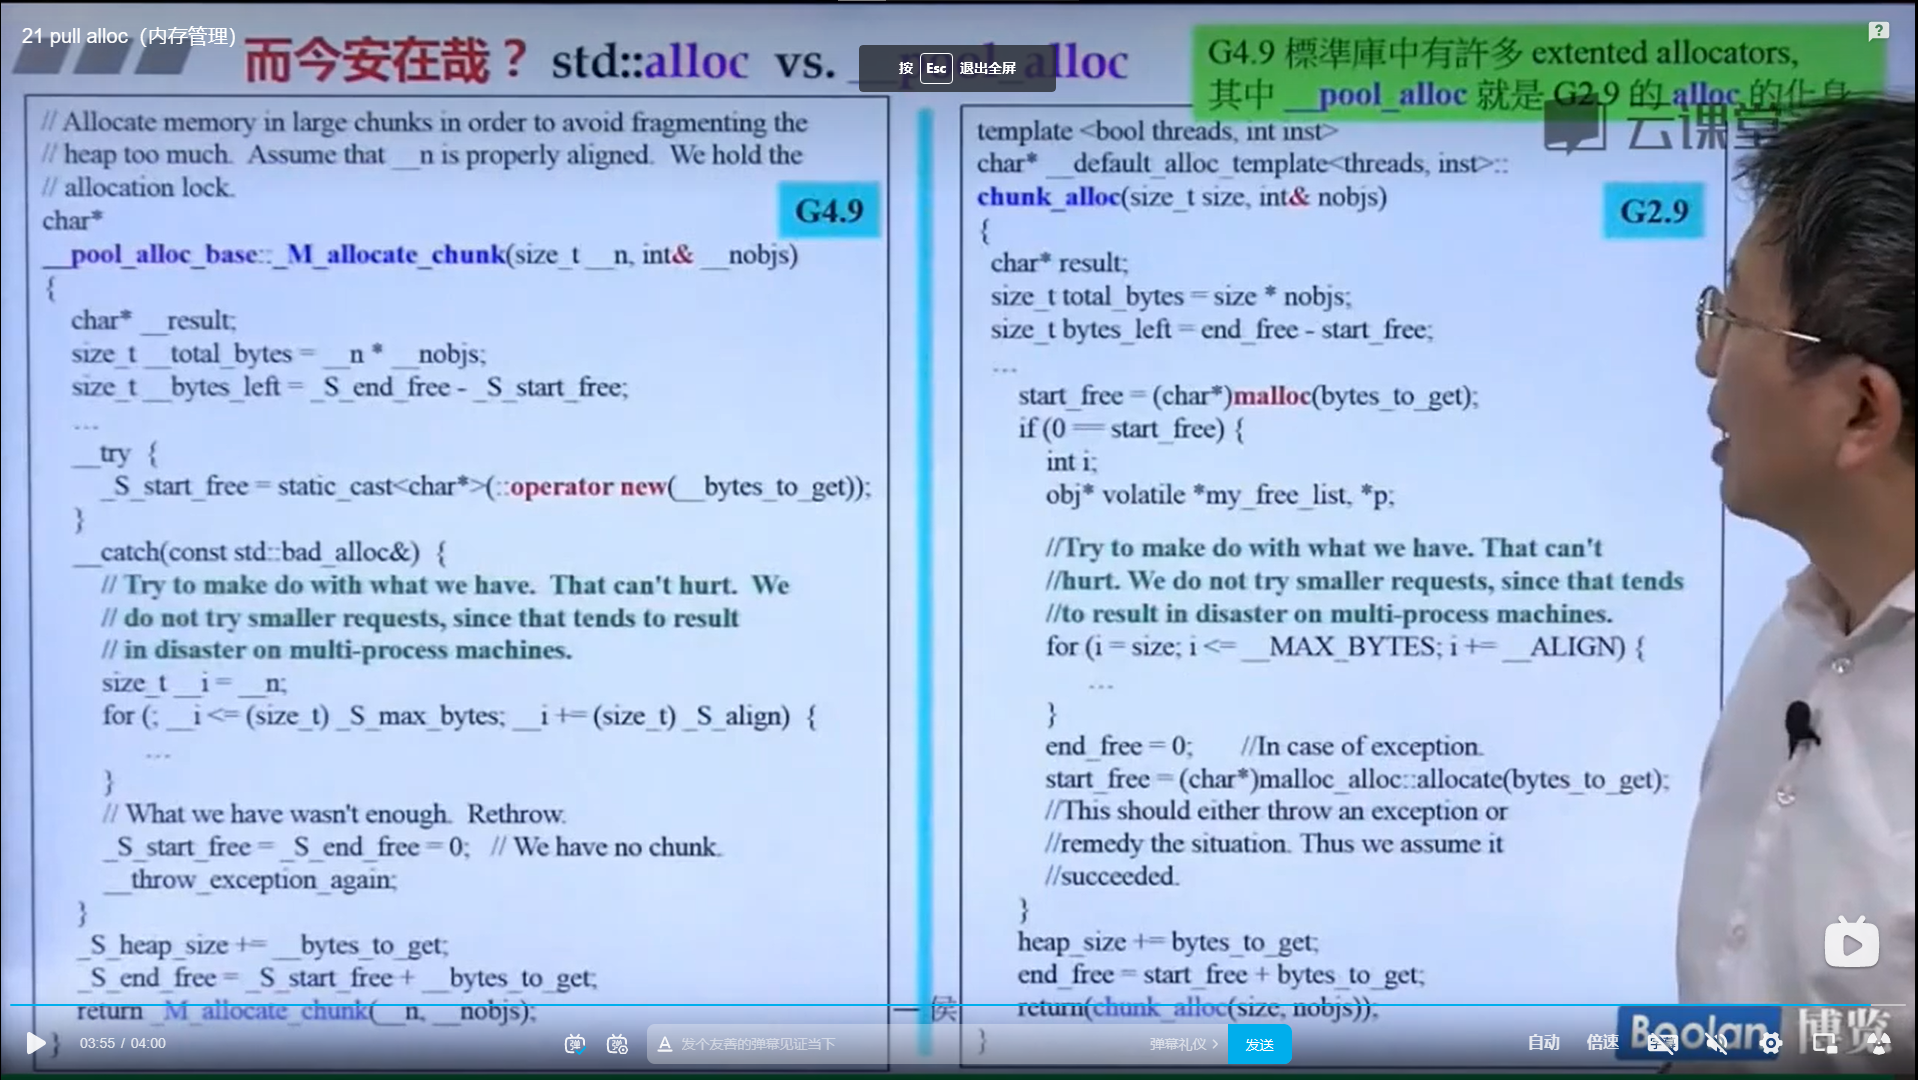
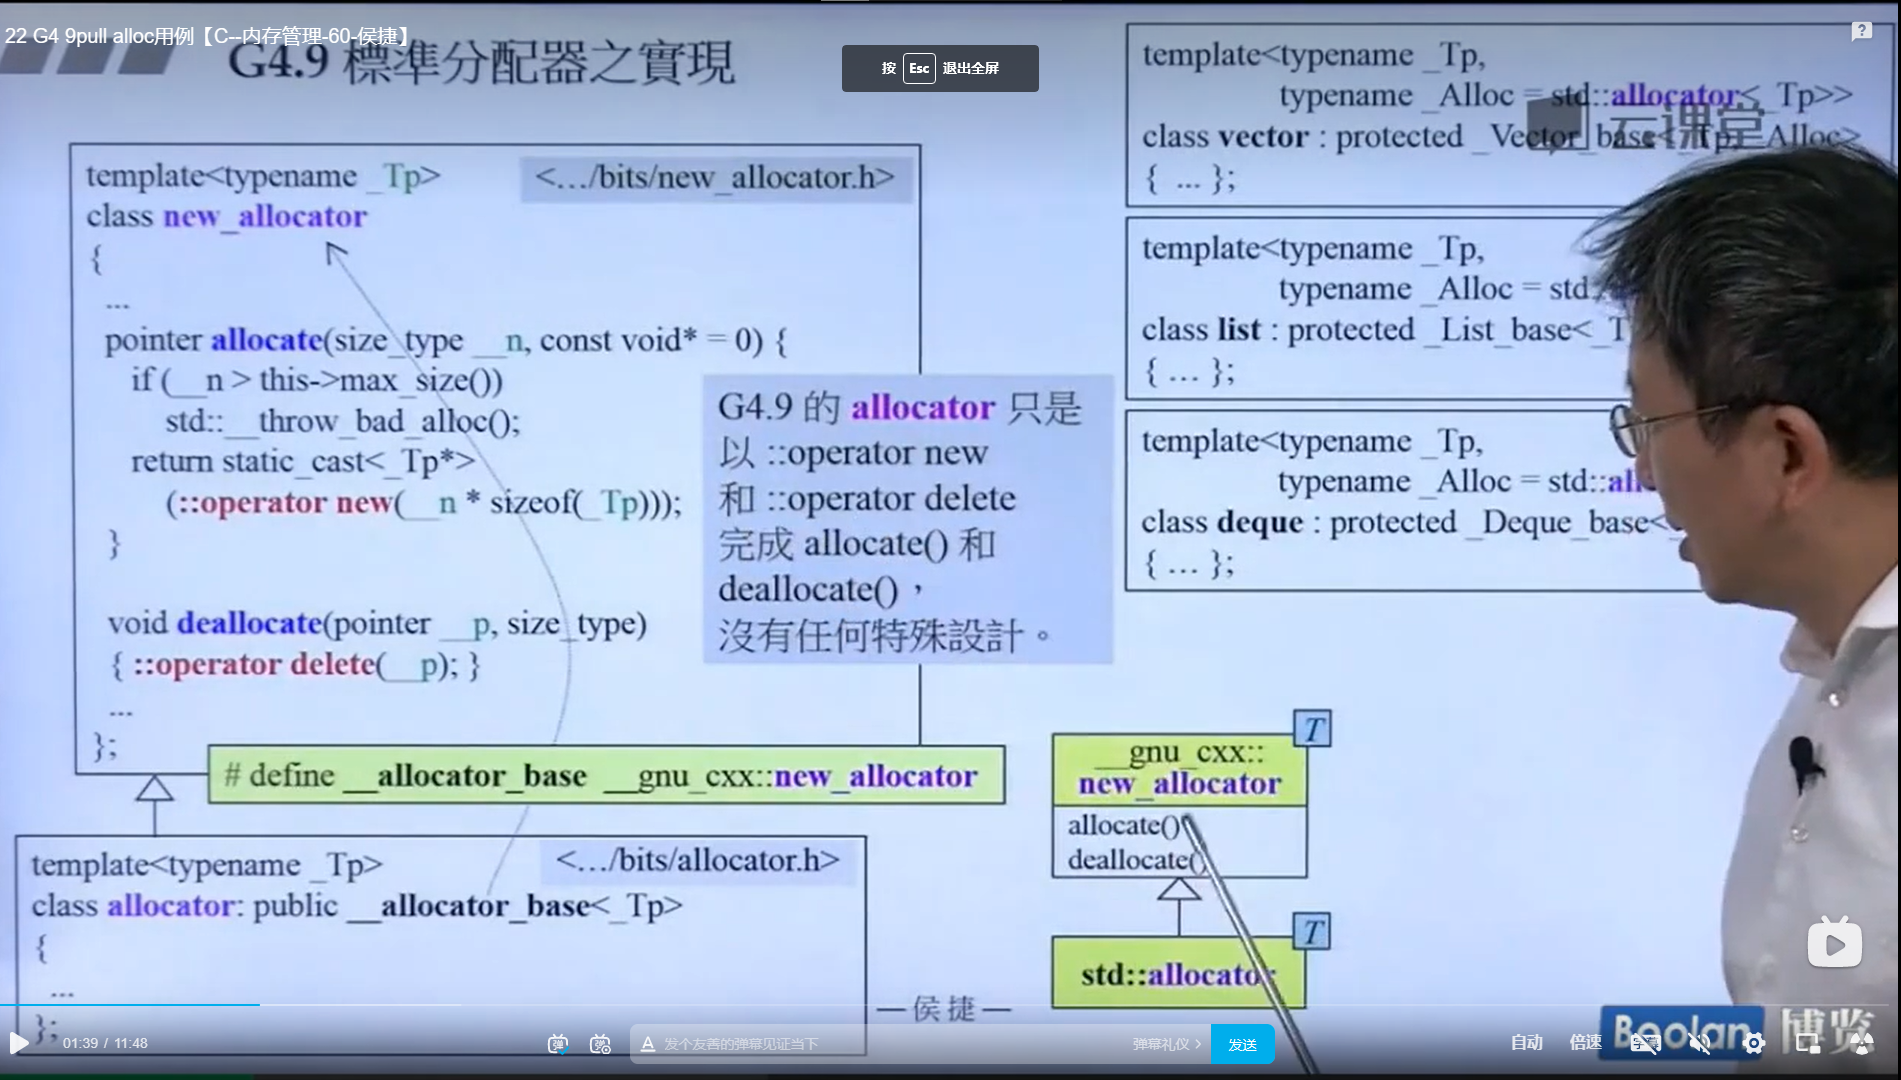
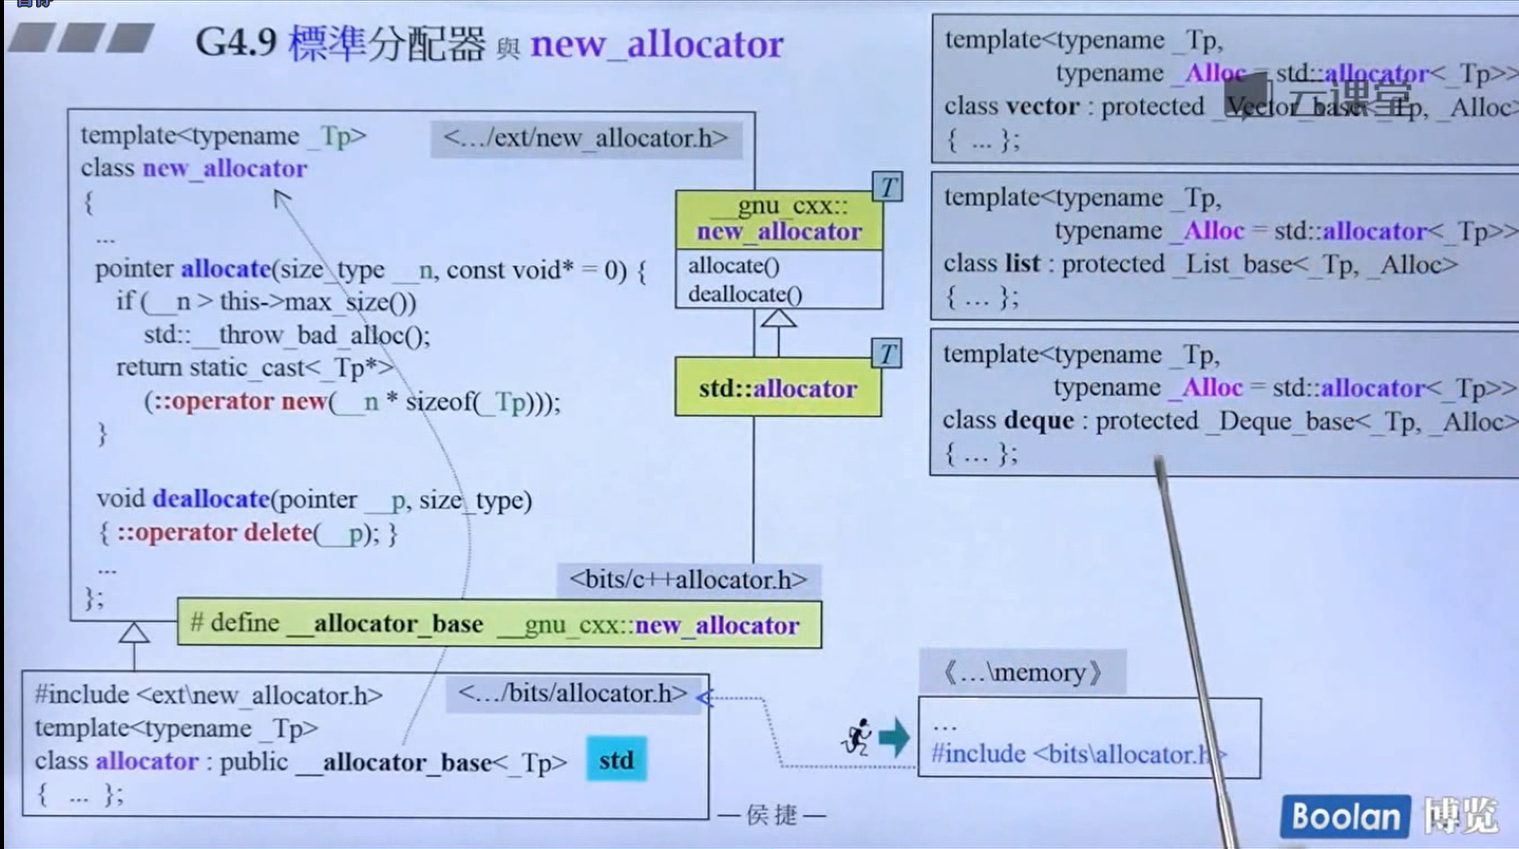
发现 allocator 是继承的父类 new_allocator
发现GCC4.9使用的分配器和之前的分配器没什么区别,没有特殊设计,就是调用的malloc函数和free函数,不知道为什么(这个团队没解释)
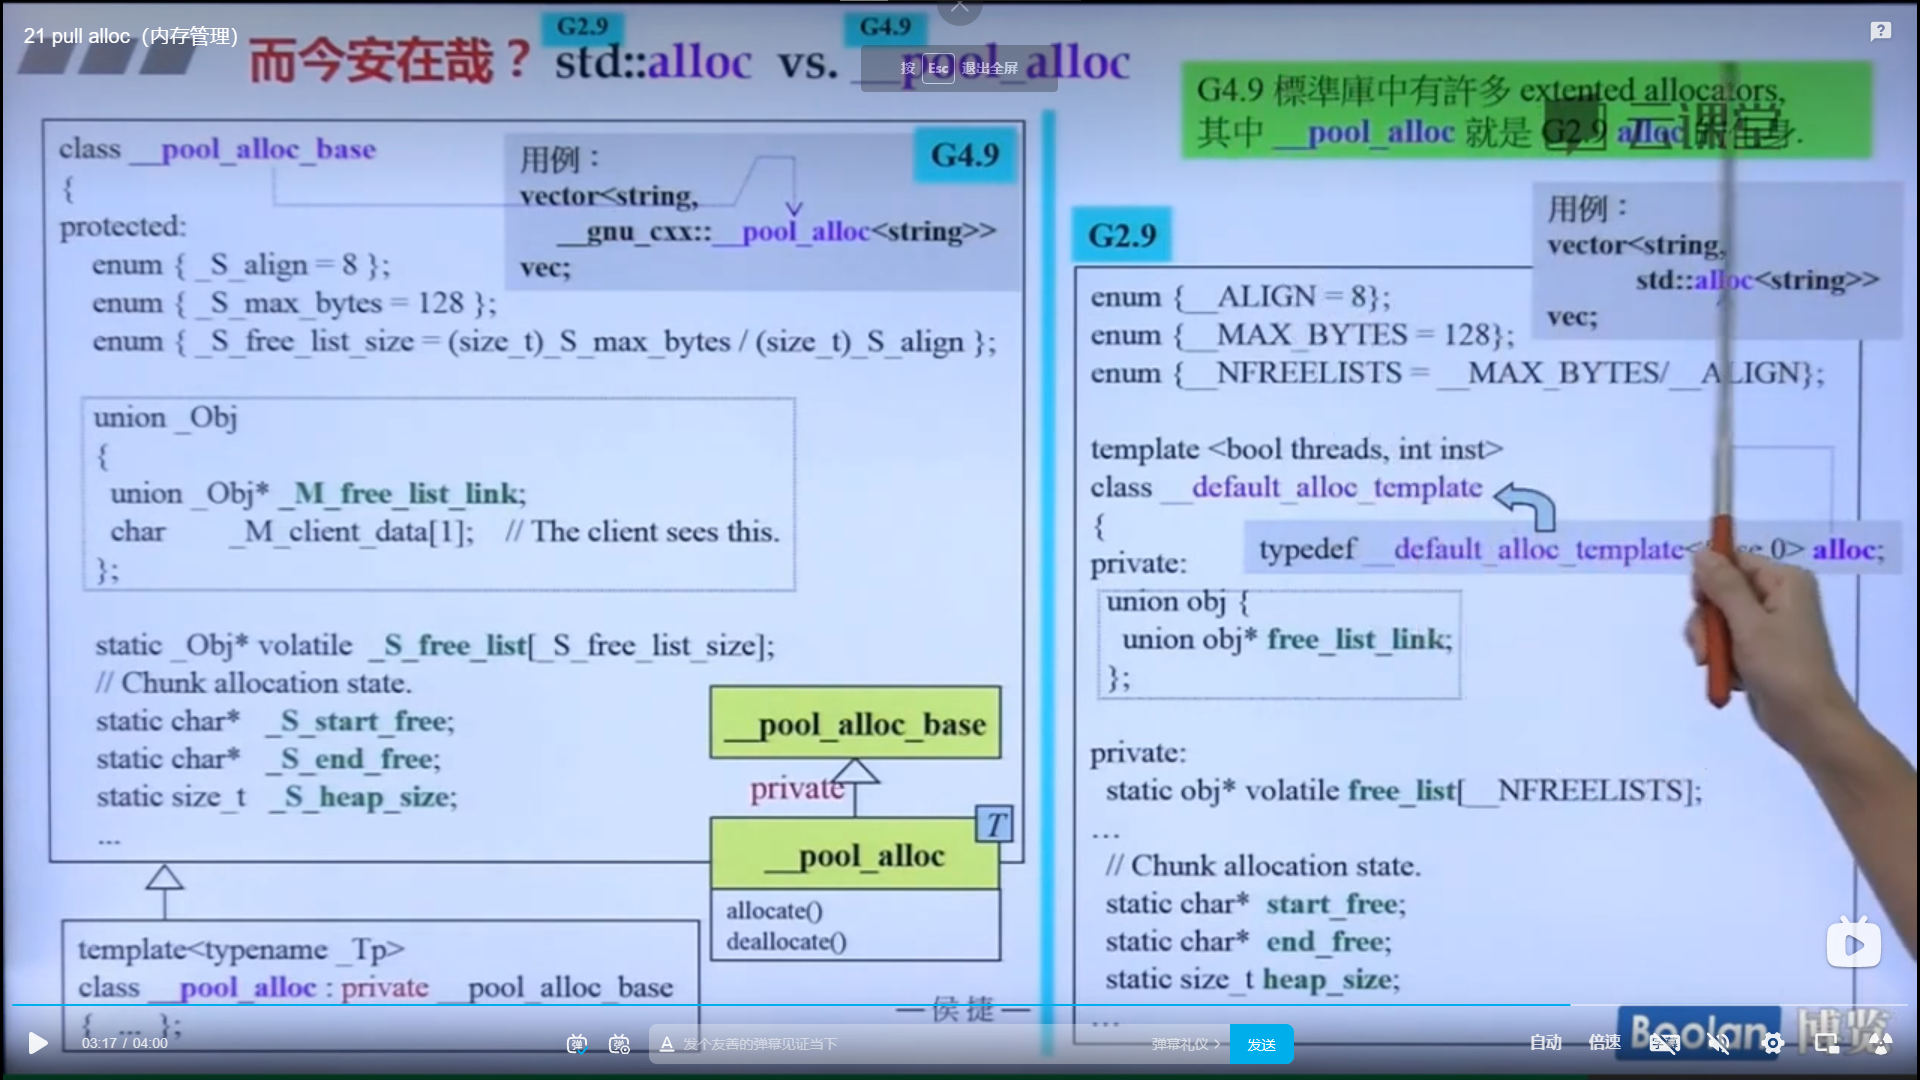
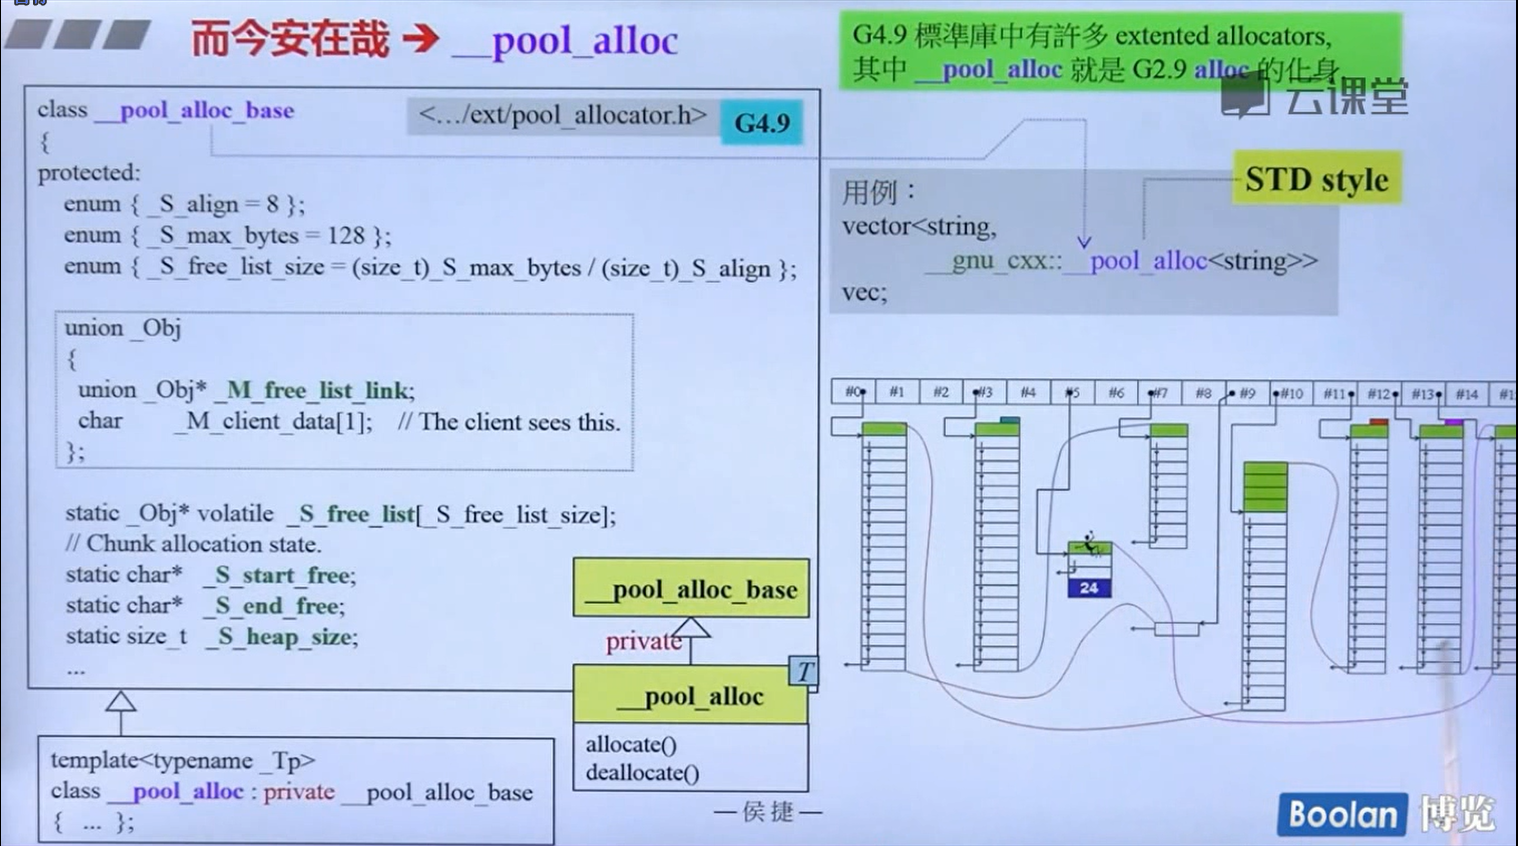
但是但是!GCC4.9里面的__pool_alloc就是GCC2.9里面的alloc,非常好用的那个
容器与容器之间的关系基本上都是复合的关系,比如set/multiset和map/multimap底层都是由rbtree红黑树实现的等等,具体见下图
以容器list为例,list.size()和sizeof(list)是没有直接的大小联系的(单项链表forward_list不存在size()方法)
1 2 3 4 5 6 7 list<char > l; for (int i = 0 ; i < 26 ; ++i) l.push_back ('a' + i); cout << l.size () << endl; cout << sizeof (l) << endl;
l.size()指的是容器中存放的元素个数;sizeof(l)指的是需要形成list这个容器需要这个类所占的内存有多大,list类里面不仅存放了链表的指针,还有其他的成员属性来配合控制这个容器的运行.所以sizeof(l)和这个元素的个数一般没有关系。
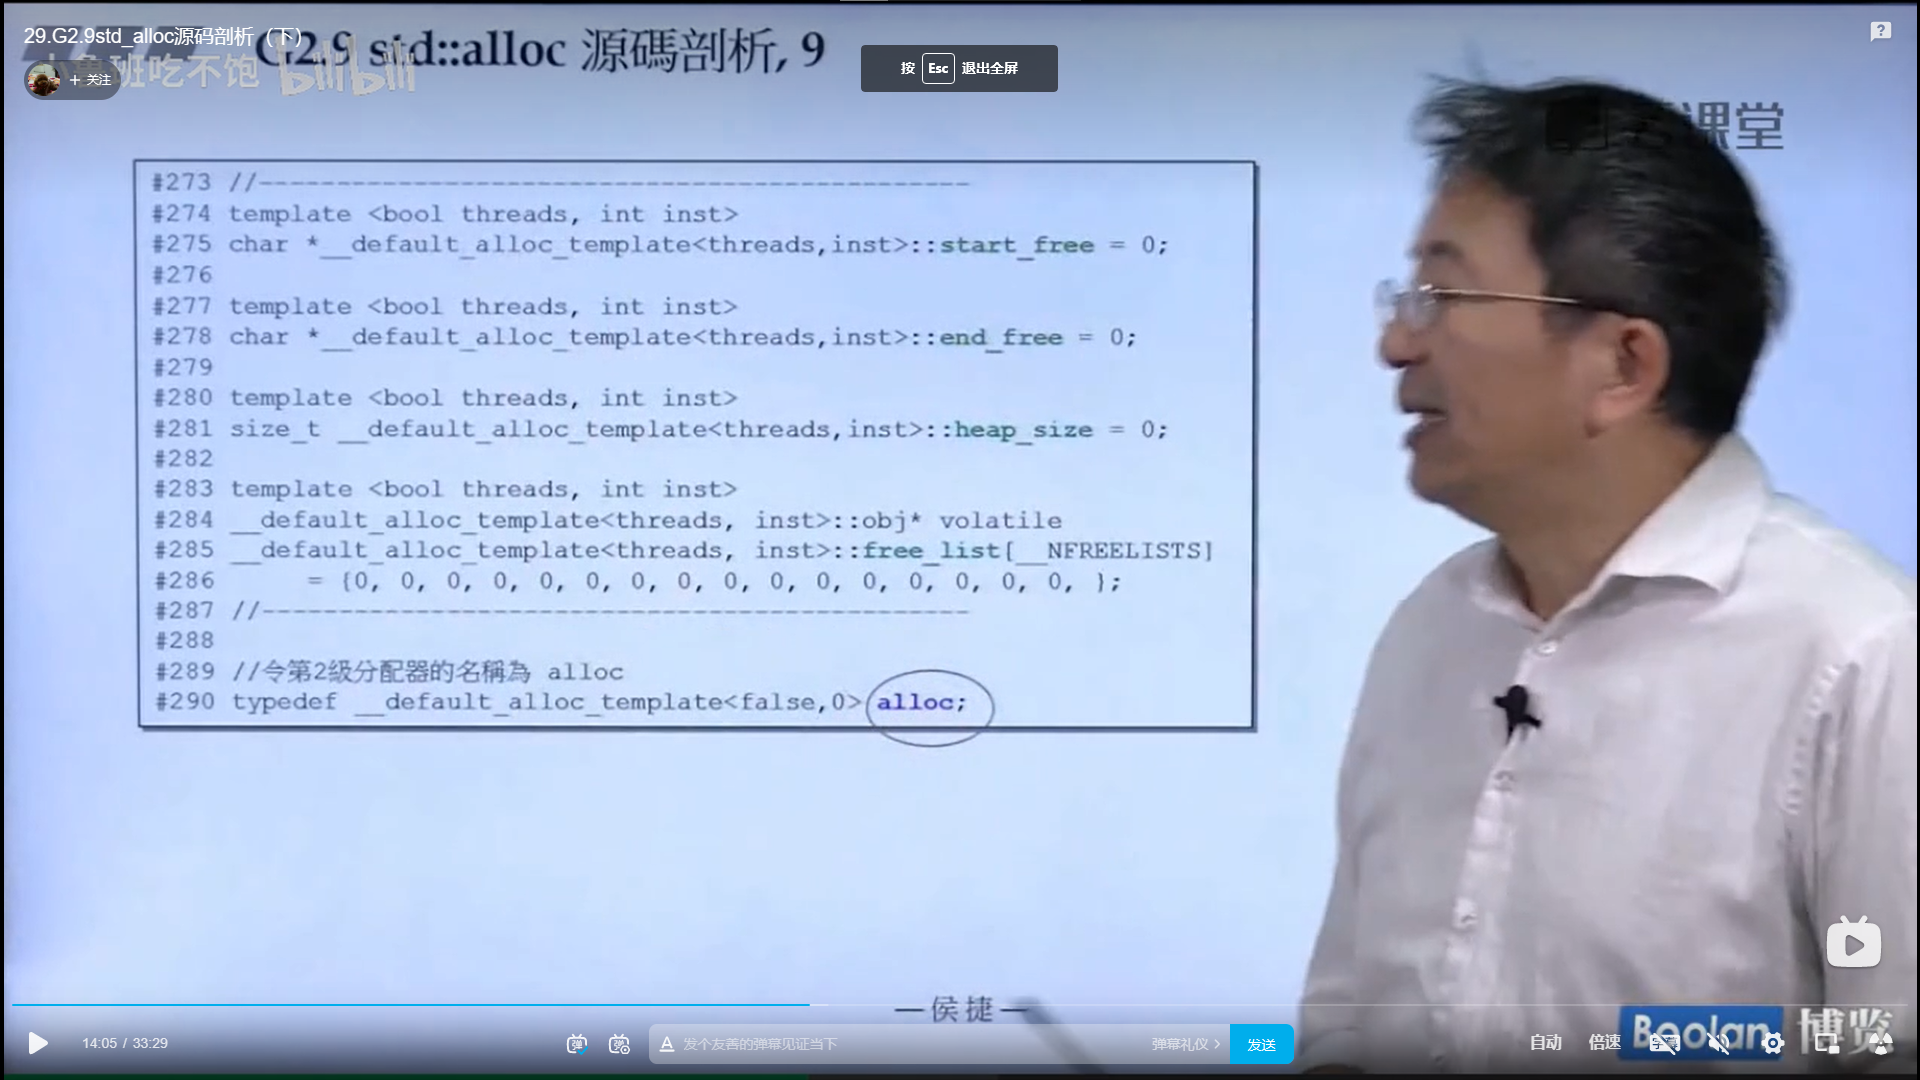
GCC2.9是这样写的
可以看出,list里面非常重要的一点设计就是委托 设计,即list本身的类并不是实际的双向链表,用户所能操作的这个类其实可以看作双向链表的管理类,里面有成员函数,迭代器,还有一根指向双向链表的指针,实际的双向链表结构就如上面所示,__list_node,这个才是真正的存储结构 ,这也是为什么sizeof()和size()是不一样的,因为设计者很好的把二者分开了,使得用户和写代码的人都能很好的管理自己的部分。
由于list的存储是不连续的,所以相应的他的迭代器也需要是智能指针,需要重载++和–运算符,(注意list的迭代器不是随机访问迭代器,所以不能使用+ -号运算符,也不能使用算法库的函数sort(),而需要使用自带的函数sort() )那么就应该是一个类了。进而推得所有的容器(除了vector和array)的迭代器,最好都写成一个类来实现。
这个迭代器最重要的就是重载 ++ 运算符,也就是前置++和后置++
前置++和后置++的区别就是后置++的参数列表里面会有一个占位符int来表示他是后置++
1 2 3 4 5 6 7 self& operator ++(){ node=(link_type)((*node).next); return *this ; }
1 2 __list_iterator(const iterator& x):node (x.node){}
1 2 reference operator *()const {return (*node).data;}
1 2 3 4 5 6 7 8 9 10 self operator ++(int ){ self tmp=*this ; ++*this ; return tmp; }
1 2 int i=2 ,j=2 ;cout<< ++++i << j++++ << endl;
我们尝试将i和j分别进行前置和后置++分别加两次,c++的编译器允许前置++连续加,但是不允许后置++连续加,我们知道想要连续加的条件就是要返回引用继续修改原本的值,所以既然不允许连续后置++,那么就return by value,直接创建一个新对象
然后类在重载这两个运算符的时候也会向编译器自带的规则看起,也不允许后置++连续加,所以就只能return by value
1 2 3 4 5 6 7 8 9 10 11 12 13 14 15 16 17 18 19 20 21 22 23 24 25 26 27 #include <iostream> using namespace std;#include <list> class fuck { public : void print () "hello" << endl; } fuck (int data = 0 ) : _data(data) {} int getData () return this ->_data; } private : int _data; }; int main () list<fuck> l{1 , 2 , 3 , 6 , 5 , 8 , 8 , 9 }; auto iter = l.begin (); cout << (*iter).getData () << endl; iter->print (); return 0 ; }
*和->的具体实现,Type是类的类型
1 2 3 4 5 6 7 8 9 10 typedef Type& reference;typedef Type* pointer;reference operator *(){ return *(this ->node); } pointer operator ->(){ return &(operator *()); }
具体区别就如下图所示:
在4.9版本当中
刻意在list尾端加上一段空白的区域来复合STL迭代器前闭后开的特征!!!但是相应的这个设计的复杂度又大大增加了。
Iterator需要遵循的原则:在调用算法的时候,iterator作为中间桥梁连接容器和算法,所以算法需要知道Iterator的很多东西
算法需要知道迭代器的必要信息,进而决定采取最优化的动作
在C++标准库当中设计出五种标准类型:
1 2 3 4 5 6 7 iterator_category; difference_type; value_type; reference; pointer;
这五种类型被称作 associated type 相关类型 ;迭代器本身必须定义出来,以便回答算法
比如我自己写一下链表list的五个相关类型
1 2 3 4 5 6 7 8 9 10 template <class _Type >struct List_Iterator { typedef std::bidirectional_iterator_tag _iterator_category; typedef ptrdiff_t _difference_type; typedef _Type _value_type; typedef _Type& _reference; typedef _Type* _pointer; };
引出问题:算法调用的时候传进去的可能不是个迭代器,可能是个指针,这个时候该怎么办呢?
当然,指针是个退化 的迭代器!!!
Iterator Traits用于区分是 class Iterators (也就是一般的迭代器)还是 non-class Iterators(即 native pointer);两种情况对应不同的的处理!!
在算法和迭代器之间加一层中间层Iterator traits来进行判断,好针对性的进行设计!!!
具体怎么做呢?
这时候算法里面就不能直接问迭代器的五个类型了,因为 native pointer 里面没有这五个参数,所以需要间接通过Traits去问!!!
下面的例子先回答了一个问题 value_type
1 2 3 4 5 6 7 8 9 10 11 12 13 14 15 16 17 18 19 20 21 22 23 template <typename I,...>void algorithm (...) typename iterator_traits<I>::value_type v1; } template <class I >struct iterator_traits { typedef typename I::value_type value_type; } template <class T >struct iterator_traits <T*>{ typedef T value_type; } template <class T >struct iterator_traits <const T*>{ typedef T value_type; }
下面把指针的全回答完毕
1 2 3 4 5 6 7 8 9 10 11 12 13 14 15 16 17 18 template <class T >struct iterator_traits <T*>{ typedef random_access_iterator_tag iterator_category; typedef T value_type; typedef T* pointer; typedef T& reference; typedef ptrdiff_t difference_type; } template <class T >struct iterator_traits <const T*>{ typedef random_access_iterator_tag iterator_category; typedef T value_type; typedef const T* pointer; typedef const T& reference; typedef ptrdiff_t difference_type; }
其实自己都可以封装一个vector,当然所有的功能是不现实的,但是基本的功能还是可以
直观感受就是简洁明了
这里面有三根泛型指针,start,finish和end_of_storage
下面就是比较重要的push_back()查数据,引出后面的二倍扩展空间!!!
else这里,调用insert_aux之后为什么还要进行一次判断呢?
这是因为由于insert_aux是一个辅助函数,那么在实际操作过程中可能会被其他类函数调用,比如insert,在这些函数的实现逻辑当中是需要进行判断的。
这段源码的大致意思就是:capacity不够了就在内存中找另一块2倍大小的内存用于存放新的vector,把原来的元素拷贝过去然后把原来的vector杀掉,各种值迁移到新内存这边去!!!
至于拷贝安插点后的原内容是因为这里可能会被insert函数给调用,这个部分是insert函数的逻辑!!!
Vector容器的迭代器
既然vector是一个连续空间,那么iterator就不必要设置成为class了,只需要设置为pointer就可以
1 2 typedef value_type* iterator;
复杂,依托答辩
deque 双端队列的实现结构:
具体实现:将deque的存储划分为若干个等大的区域,每个区域的首元素用一个指针存放在一个vector容器中(就是图中的map数组),当缓冲区buffer的左端或者右端不够的时候,就新开一个缓冲区放在左边和右边,存入元素,并且把该buffer的首指针存入map数组的左边或者右边。因此deque的迭代器的就分为:
first 该缓冲区的首地址;last 该缓冲区的末尾(首闭尾开);cur 元素的位置;node 存入map数组的指针!!!
下面看一下deque的具体源代码设计:
GCC2.9:
其中第三个参数 Bufsiz 是可以人为指定缓冲区的大小
从这里可以看出,上面调用了一个函数,如果 BufSiz 不为0,那么就设置大小为人为指定;如果为0,则表示设置为预设的值,需要查看要存放的类型的大小,大于512就指定一个缓冲区只放这一个元素,个数设置为1;小于的话就计算出个数,计算出个数之后就可以知道缓冲区的大小了
这个迭代器里面也包含了五个必要类型,写的非常严谨,也有了四个需要的参数!!!
Insert函数:
如果是在头部和尾部插入,那么和push_front()和push_back()没有区别
如果在中间插入就调用赋值函数 insert_aux()
由于在中间插入必然会导致元素的拷贝过程,为了减少开销,提高效率,我们需要判断元素在deque靠近start和finish哪一端的位置,这样可以更好的去选择操作的方向
deque如何模拟连续空间操作?(操作符重载)
deque 的 - 号操作符重载
由于 deque 存储的缓冲区buffer机制,我们必须判断两个迭代器之间有多少个缓冲区buffer,然后再根据计算公式来进行计算得出两个迭代器之间元素的个数
具体就是这样!
根据两个迭代器的node指针找到map数组里面两个指针距离的位置就可以知道两个中间差了多少个缓冲区buffer了,再加上本缓冲区内的距离就是两个迭代器之间的元素个数!!!
++ 和 – 操作符重载
注意需要判断迭代器移动过程中是否超越了本缓冲区的界限移入另一个缓冲区!!!
一个比较好的编码习惯就是后++调用前++;后–调用前–
+= + 号操作符重载
在 += 运算符重载中,需要注意判断迭代器位置移动之后有没有超越边界,如果超越了边界,需要进行相应的边界修改
+= 如果没有正确的缓冲区需要切换到正确的缓冲区;如果是正确的缓冲区那就很简单了
-= - 号运算符重载
用的是+=和+号的重载
GCC 4.9: 依托答辩
内部存了一个 deque 容器,二者形成了复合 composition 关系
queue内部的函数,deque能完全满足它,所以调用 deque 的成员函数就可以了!!!
queue和stack,关于其iterator和底层容器
stack和queue不允许遍历,也不提供iterator!!!!
因为他们的模式是先进后出和先进先出,这样的模式不允许能访问到任意位置的元素
关于stack和queue的内部支撑容器,上面讲的是deque,其实也可以用list
默认提供的是deque,这个效率比较快一点
stack可以用vector做底部支撑;queue不可以用vector!!!
因为vector没有 pop_front() 函数!!!
关于其他的底部容器支撑,stack和queue都不可以选用set或者map做底部容器支撑,因为他们两个也没有相应的函数提供!!!
关于这些底部容器支撑,如果你没有调用它不存在的函数,那其实调用还是可以的,但是总体来看是不行的!!!
1 2 3 4 5 6 7 8 9 10 11 12 13 14 15 16 17 18 19 20 21 22 23 24 25 26 27 28 29 30 31 32 33 34 35 36 37 38 39 40 41 42 43 44 45 46 47 48 49 50 51 52 53 54 55 56 57 58 59 60 61 62 63 64 65 66 67 68 69 70 71 72 73 74 75 76 77 78 79 80 81 82 83 84 85 86 87 88 89 90 91 92 93 94 95 96 97 98 99 100 101 102 103 104 105 106 107 108 109 #ifndef __TREENODE__ #define __TREENODE__ enum Left_Right { Left, Right }; #include <iostream> template <class Type >struct TreeNode { typedef Type __ValueType; typedef TreeNode<__ValueType> __NodeType; typedef __NodeType *__pointer; __ValueType val; __pointer left; __pointer right; void __init__(); void insert (__ValueType val, bool is_left = Left) void PreOrder () void InOrder () void PostOrder () void visit () }; template <class Type >inline void TreeNode<Type>::__init__(){ this ->left = nullptr ; this ->right = nullptr ; } template <class Type >inline void TreeNode<Type>::insert (__ValueType val, bool is_left){ if (is_left == Left) { if (this ->left) { cout << "leftnode has already be used." << endl; return ; } __pointer newNode = new TreeNode<__ValueType>; newNode->__init__(); newNode->val = val; this ->left = newNode; } else { if (this ->right) { cout << "rightnode has already be used." << endl; return ; } __pointer newNode = new TreeNode<__ValueType>; newNode->__init__(); newNode->val = val; this ->right = newNode; } } template <class Type >inline void TreeNode<Type>::visit (){ cout << this ->val << endl; } template <class Type >inline void TreeNode<Type>::PreOrder (){ if (!this ) return ; visit (); left->PreOrder (); right->PreOrder (); } template <class Type >inline void TreeNode<Type>::InOrder (){ if (!this ) return ; left->InOrder (); visit (); right->InOrder (); } template <class Type >inline void TreeNode<Type>::PostOrder (){ if (!this ) return ; left->PostOrder (); right->PostOrder (); visit (); } #endif
1 2 3 4 5 6 7 8 9 10 11 12 13 14 15 16 17 18 19 20 21 22 23 24 25 26 27 28 29 30 31 32 33 34 35 36 37 38 39 40 41 42 43 44 45 46 47 48 49 50 51 52 53 54 55 56 57 58 59 60 61 62 63 64 65 66 67 68 69 70 71 72 73 74 75 76 77 78 79 80 #ifndef __BINARTTREE__ #define __BINARTTREE__ #include "TreeNode.h" enum Order { pre, in, post }; template <typename Type>inline void deleteNodes (TreeNode<Type> *node) if (node->left) deleteNodes (node->left); if (node->right) deleteNodes (node->right); delete node; } template <class Type >class BinaryTree { typedef Type __ValueType; typedef TreeNode<__ValueType> __NodeType; typedef __NodeType &__reference; typedef __NodeType *__pointer; public : explicit BinaryTree (__ValueType val = NULL ) ~BinaryTree () { deleteTree (); } void deleteTree () void printTree (Order ord) __reference getroot () const { return *root; } private : __pointer root; }; template <class Type >inline BinaryTree<Type>::BinaryTree (__ValueType val){ root = new TreeNode<Type>; root->val = val; root->left = nullptr ; root->right = nullptr ; } template <class Type >inline void BinaryTree<Type>::deleteTree (){ deleteNodes (root); } template <class Type >inline void BinaryTree<Type>::printTree (Order ord){ switch (ord) { case pre: root->PreOrder (); break ; case in: root->InOrder (); break ; case post: root->PostOrder (); break ; } } #endif
1 2 3 4 5 6 7 8 9 10 11 12 13 14 15 16 17 18 19 20 21 22 23 24 25 26 27 28 29 30 31 32 33 34 35 36 37 38 39 40 41 42 43 44 45 46 #include <iostream> using namespace std;#include "BinaryTree.h" namespace test{ BinaryTree<int > sample () { BinaryTree<int > tree (1 ) ; tree.getroot ().insert (3 , Left); auto leftNode = tree.getroot ().left; leftNode->insert (4 , Left); leftNode->insert (6 , Right); auto leftNode2 = leftNode->right; leftNode2->insert (7 , Left); tree.getroot ().insert (2 , Right); auto rightNode = tree.getroot ().right; rightNode->insert (8 , Left); auto rightNode2 = rightNode->left; rightNode2->insert (0 , Right); return tree; } } int main () auto tree = test::sample (); tree.printTree (pre); cout << endl; tree.printTree (in); cout << endl; tree.printTree (post); return 0 ; }
红黑树是一种高度平衡的二叉搜寻树;由于它保持尽量的平衡,非常有利于search和insert的操作,并且在改变了元素的操作之后会继续保持树状态的平衡
为什么要有红黑树?
大多数二叉排序树 BST 的操作(查找、最大值、最小值、插入、删除等等)都是 O(h)O(h)O(h) 的时间复杂度,h 为树的高度。但是对于斜树而言(BST极端情况下出现),BST的这些操作的时间复杂度将达到 O(n) 。为了保证BST的所有操作的时间复杂度的上限为 O(logn),就要想办法把一颗BST树
rb_Tree和AVL相比,虽然AVL更加平衡,但是条件更加苛刻,红黑树追求的是大致平衡。 AVL 树比红黑树更加平衡,但AVL树在插入和删除的时候也会存在大量的旋转操作。所以涉及到频繁的插入和删除操作,切记放弃AVL树,选择性能更好的红黑树;当然,如果你的应用中涉及的插入和删除操作并不频繁,而是查找操作相对更频繁,那么就优先选择 AVL 树进行实现
红黑树提供遍历操作以及迭代器iterator ,但是这个迭代器是只读迭代器 ,因为不能修改节点上元素的值 ,如果修改了元素的值,那么会导致大小关系发生变化,整个红黑树的平衡性就发生变化了
图中第三段,按理来说红黑树的元素是不能通过迭代器修改元素值的,但是这个红黑树后面是用于set和map容器的,set的key和value相等不能修改;但是map的key和value没有必然联系,排序和查找都是基于key来进行的,value可以任意修改,所以可以通过迭代器修改value,这么做做是正确的
红黑树的设计当中存在两种设计 insert_unique() 和 insert_equal() ,表示key可以重复或者不重复,这样就可以引申出 set和 multiset,mal和 multimap
这里标准库里面的value不是指我们理解的value值,这里的value是key和data合起来叫做value,也就是一整个节点的类型;第三个参数是说我们怎么样从这个节点value当中把重要的key拿出来!!!第四个参数是说如何根据key来进行比较,因为后续要进行排序操作!!!
在rb_tree类当中,它的设计和我的设计差不多,都是把树和节点分开的来设计,所以在树rb_tree当中只用了三个参数来向外表现
1 2 3 size_type node_count; link_type header; Compare key_compare;
在红黑树的结构里有一个 header 节点,他的元素值为空,跟list的设计一样,前闭后开的区间!!!
这样的设计会使后面的实现方便很多
虽然红黑树不推荐直接使用,因为更好的做法是使用上层容器;但是可以简单的使用一下来测试我们对其的理解
1 2 rb_tree<int ,int ,identity<int >,less<int >,alloc>;
使用红黑树的测试程序:(新版本的名称有些变化)
1 2 3 4 5 6 7 8 9 10 11 12 13 14 15 16 17 18 19 20 21 22 23 24 25 26 27 28 29 #include <iostream> using namespace std;#include <bits/stl_tree.h> int main () _Rb_tree<int , int , _Identity<int >, less<int >, allocator<int >> rbtree; cout << rbtree.size () << endl; cout << sizeof (rbtree) << endl; cout << rbtree.empty () << endl; rbtree._M_insert_unique(3 ); rbtree._M_insert_unique(8 ); rbtree._M_insert_unique(5 ); rbtree._M_insert_unique(9 ); rbtree._M_insert_unique(13 ); rbtree._M_insert_unique(3 ); cout << rbtree.size () << endl; cout << rbtree.empty () << endl; cout << rbtree.count (3 ) << endl; rbtree._M_insert_equal(3 ); rbtree._M_insert_equal(3 ); cout << rbtree.size () << endl; cout << rbtree.empty () << endl; cout << rbtree.count (3 ) << endl; return 0 ; }
由于set/multiset的key和value相同,所以没有办法通过迭代器修改元素的值,也就是修改key,error
set插入元素使用 insert_unique();multiset可以重复,使用 insert_equal()
注意不能修改迭代器的值,const_iterator,以下是示例代码:
1 2 3 4 5 6 7 8 9 10 11 12 13 14 15 16 17 18 19 20 21 22 23 24 #include <iostream> using namespace std;#include <set> #include <vector> int main () vector<int > v{1 , 3 , 5 , 4 , 6 , 8 , 8 , 9 }; for (int &val : v) ++val; for (int &val : v) cout << val << ' ' ; cout << endl; set<int , less<int >> s{3 , 1 , 5 , 4 , 6 , 8 , 8 , 9 }; for (int val : s) cout << val << ' ' ; cout << endl; return 0 ; }
map没有办法通过迭代器修改key的值,但是可以用过迭代器修改value的值!!!!!
map插入元素使用 insert_unique();multimap 可以重复,使用 insert_equal()
key_type和data_type被包装成为一个pair<const Key,T>;注意这里const修饰代表key无法修改,然后value_type是真正的存放类型,然后select1st代表拿取pair里面的第一个元素!!!!
使用红黑树测试map:
1 2 3 4 5 6 7 8 9 10 11 12 13 14 15 16 17 18 19 20 21 22 23 24 25 26 27 28 29 30 31 32 33 34 35 36 37 38 39 40 41 42 43 44 45 46 47 48 49 50 51 52 #include <iostream> using namespace std;#include <bits/stl_tree.h> template <class T >struct SelectFirst { template <class Pair > typename Pair::first_type & operator () (Pair &x) const { return x.first; } }; int main () typedef int Key_Type; typedef pair<const int , char > Value_Type; _Rb_tree<Key_Type, Value_Type, SelectFirst<Value_Type>, less<int >> rbtree; cout << rbtree.size () << endl; cout << sizeof (rbtree) << endl; cout << rbtree.empty () << endl; rbtree._M_insert_unique(make_pair (3 , 'a' )); rbtree._M_insert_unique(make_pair (8 , 'b' )); rbtree._M_insert_unique(make_pair (5 , 'c' )); rbtree._M_insert_unique(make_pair (9 , 'd' )); rbtree._M_insert_unique(make_pair (13 , 'e' )); rbtree._M_insert_unique(make_pair (3 , 'f' )); cout << rbtree.size () << endl; cout << rbtree.empty () << endl; cout << rbtree.count (3 ) << endl; rbtree._M_insert_equal(make_pair (3 , 'a' )); rbtree._M_insert_equal(make_pair (3 , 'a' )); cout << rbtree.size () << endl; cout << rbtree.empty () << endl; cout << rbtree.count (3 ) << endl; return 0 ; }
其他都没什么,其中第三个模板参数SelectFirst<>(我自己写的)不是很理解为什么这么写
1 2 3 4 5 6 7 8 9 10 template <class T >struct SelectFirst { template <class Pair > typename Pair::first_type & operator () (Pair &x) const { return x.first; } };
使用map的示例代码:
1 2 3 4 5 6 7 8 9 10 11 12 13 14 15 16 17 18 19 20 21 22 23 24 25 26 27 #include <iostream> using namespace std;#include <map> int main () map<int , char , less<int >> m{make_pair (9 , 'a' ), make_pair (5 , 'b' ), make_pair (6 , 'c' ), make_pair (4 , 'd' ), make_pair (8 , 'c' ), make_pair (9 , 'b' ), make_pair (6 , 'd' ), make_pair (1 , 'a' )}; m[0 ] = 'f' ; for (auto &val : m) { cout << val.first << ' ' << m[val.first] << endl; val.second++; cout << val.first << ' ' << val.second << endl; } return 0 ; }
作用:根据key传回data。注意只有map有,因为key不为data并且key是独一无二的!!!
如果key不存在的话,就会创建这个key并且data使用默认值!!! (和py的字典差不多)
使用二分查找在有序的key当中查找目标key,如果找不到的话就进行insert操作创建一个新的key!!!
哈希表的设计
在有限的空间之下根据哈希函数将元素(分为key和data)的key映射成为hashcode放到对应的位置下面,key下面用一个链表将key和data串起来!!!!
由于bucket数组存的是链表指针,这个链表如果串的元素太多了之后那么搜索效率会大大降低,这个状态就是非安全状态。程序员的经验告诉我们当所有的链表下面串的元素个数大于buckets数组的大小的时候就比较危险了。
这个时候需要打散hashtable,增大buckets数组的size,一般是两倍左右,并且数组的size最好是质数,并且将元素按照新的hash规则重新插入链表中!!!!
总结就是:不能让hashtable下面串的链表太长,太长了需要增加buckets的size来打散哈希表重新回到安全状态。
GCC下面的buckets数组的size是这么确定的:大致都是2倍附近的质数
来看看hashtable的实现:
Value代表key和data集合,key就是键值,HashFcn代表哈希函数,就是如何把key映射为编号hashcode,ExtractKey代表如何从value里面取出key;EqualKey代表如何判断两个key相同!!!
至于是单向链表还是双向链表,这个就看不同的版本了。
参数模板里面最难的一点就是决定hashtable的hash函数,怎么样将hash的key值映射为hashcode!!!
参考系统提供的hash模板函数
注意:hash函数(一般是个仿函数)返回的值应该是一个编号,也就是 size_t
定义了hash函数,然后什么也不做,后面进行一些特化的处理!!!
注意这里的hash函数设计,我们在将key转化为hashcode的过程中,可以任意设计hash函数使得转化成为的hashcode尽量不重复,尽量够乱!!!
在算出hashcode之后还要放入篮子,这个时候就很简单了,就把hashcode求篮子的size的余数就可以知道放在哪里了!!!! (现在基本都是这么做的)
使用hashtable的例子:
1 2 3 4 5 6 7 8 9 10 11 12 13 14 15 16 17 18 19 20 21 22 23 24 25 26 27 28 29 30 31 32 33 34 35 36 37 38 39 40 41 42 43 44 45 46 #include <iostream> using namespace std;#include <hashtable.h> #include <cstring> struct eqstr { bool operator () (const char *str1, const char *str2) const { return strcmp (str1, str2) == 0 ; } }; inline size_t _hash_string(const char *s){ size_t ret = 0 ; for (; *s != '\n' ; ++s) ret = 10 * ret + *s; return ret; } struct fuck { size_t operator () (const char *s) const return _hash_string(s); } }; int main () __gnu_cxx::hashtable<const char *, const char *, hash<const char *>, _Identity<const char *>, eqstr> ht (50 , hash <const char *>(), eqstr ()); ht.insert_unique ("kiwi" ); ht.insert_unique ("plum" ); ht.insert_unique ("apple" ); for_each(ht.begin (), ht.end (), [&](auto data) { cout << data << endl; }); return 0 ; }
算法没有办法直接面对容器,他需要借助中间商迭代器才可以,换句话说,算法不关系容器是怎么样的,只关心容器提供给我的迭代器是怎么样的,而迭代器的设计的符号重载是普适的,这样就可以适用于大多数容器了。
random_access_iterator_tag 随机访问迭代器:可以跳着访问,任意一个都可以访问(重载了+ - += -= ++ – 运算符)
bidirectional_iterator_tag 双向访问迭代器:可以往前走或者往后走,但是一次只能走一格(重载了 ++ – 运算符)
farward_iterator_tag 单向访问迭代器:只能向一个方向走,inin一次只能走一格
打印一下各种容器的iterator_category
1 2 3 4 5 6 7 8 9 10 11 12 13 14 15 16 17 18 19 20 21 22 23 24 25 26 27 28 29 30 31 32 33 34 35 36 37 38 39 40 41 42 43 44 45 46 47 48 49 50 51 52 53 54 55 56 57 58 59 60 61 62 63 64 65 66 #include <iostream> using namespace std;#include <array> #include <vector> #include <map> #include <list> #include <forward_list> #include <deque> #include <set> #include <unordered_set> #include <unordered_map> #include <bits/stream_iterator.h> void __display_category(random_access_iterator_tag){ cout << "random_access_iterator" << endl; } void __display_category(bidirectional_iterator_tag){ cout << "bidirectional_iterator" << endl; } void __display_category(forward_iterator_tag){ cout << "forward_iterator" << endl; } void __display_category(output_iterator_tag){ cout << "output_iterator" << endl; } void __display_category(input_iterator_tag){ cout << "input_iterator" << endl; } template <typename I>void display_category (I iter) typename iterator_traits<I>::iterator_category cagy; __display_category(cagy); } int main () display_category (array<int , 10 >::iterator ()); display_category (vector<int >::iterator ()); display_category (list<int >::iterator ()); display_category (forward_list<int >::iterator ()); display_category (deque<int >::iterator ()); display_category (set<int >::iterator ()); display_category (map<int , int >::iterator ()); display_category (multiset<int >::iterator ()); display_category (multimap<int , int >::iterator ()); display_category (unordered_set<int >::iterator ()); display_category (unordered_map<int , int >::iterator ()); display_category (unordered_multiset<int >::iterator ()); display_category (unordered_multimap<int , int >::iterator ()); display_category (istream_iterator <int >()); display_category (ostream_iterator <int >(cout, "" )); return 0 ; }
不同的迭代器类型会导致在访问的过程中效率有区别
注意对右边代码的解读,这个distance函数是找两个迭代器之间的距离(ptrdiff_t 类型),然后就问萃取机迭代器的类型是什么?然后针对函数调不同的重载函数就可以了!!!
1 2 3 4 5 6 7 8 9 10 11 12 13 14 15 16 17 18 19 20 21 22 23 24 25 26 27 28 29 30 31 32 33 34 35 36 37 38 39 40 41 42 43 44 45 46 47 48 49 50 51 52 #include <iostream> using namespace std;#include <vector> #include <list> template <typename Iterator, typename Distance>inline Iterator &_advance(Iterator &iter, Distance n, std::random_access_iterator_tag) { iter += n; return iter; } template <typename Iterator, typename Distance>inline Iterator &_advance(Iterator &iter, Distance n, std::bidirectional_iterator_tag) { if (n >= 0 ) while (n--) ++iter; else while (n++) --iter; return iter; } template <typename Iterator, typename Distance>inline Iterator &_advance(Iterator &iter, Distance n, std::input_iterator_tag) { while (n--) ++iter; return iter; } template <typename Iterator, typename Distance>inline Iterator Advance (Iterator iter, Distance n) { typedef typename std::iterator_traits<Iterator>::iterator_category Iterator_Category; return _advance(iter, n, Iterator_Category ()); } int main () vector<int > v{3 , 5 , 6 , 7 }; cout << *myadvance ().Advance (v.begin () + 2 , -1 ) << endl; list<int > l{3 , 5 , 6 , 7 , 12 }; cout << *myadvance ().Advance (l.begin (), 4 ) << endl; return 0 ; }
注意注释的内容,为什么这里该传引用,这里不该传引用!!!
从这里我们可以看出,迭代器类型的不同会导致算法效率的不同,但是我们不是通过模板特化来实现的,是通过函数重载来实现的!!!
算法源码对 iterator_category 的暗示:
因为上面的迭代器都是模板,但是有些算法在实现的过程中只对某种类型的迭代器有效,所以设计者会暗示迭代器的类型来方便阅读和修改!!!
C++ STL 库里面的标准算法格式
1 2 3 4 5 6 7 8 9 10 template <typename Iterator>std::Algorithm (Iterator iter1,Iterator iter2){ ... } template <typename Iterator,typename Cmp>std::Algorithm (Iterator iter1,Iterator iter2,Cmp cmp){ ... }
遍历整个容器对每个元素进行操作(可以是累加)然后返回值
测试accumulate:
1 2 3 4 5 6 7 8 9 10 11 12 13 14 15 16 17 18 19 20 21 22 23 24 25 26 27 28 29 30 31 32 33 int myfunc (int x, int y) return x + 2 * y; } struct myclass { int operator () (int x, int y) const return x + 3 * y; } } myobj; void test_accumulate () cout << "test_accumulate().........." << endl; int init = 100 ; int nums[] = {10 , 20 , 30 }; cout << "using default accumulate: " ; cout << accumulate (nums, nums + 3 , init); cout << '\n' ; cout << "using functional's minus: " ; cout << accumulate (nums, nums + 3 , init, minus <int >()); cout << '\n' ; cout << "using custom function: " ; cout << accumulate (nums, nums + 3 , init, myfunc); cout << '\n' ; cout << "using custom object: " ; cout << accumulate (nums, nums + 3 , init, myobj); cout << '\n' ; }
自己实现以下accumulate:
1 2 3 4 5 6 7 8 9 10 11 12 13 14 15 16 17 18 19 20 21 22 23 24 25 26 27 28 29 30 31 32 33 34 35 36 37 38 39 40 41 42 43 44 45 46 47 48 49 50 51 52 53 54 55 56 57 #include <iostream> using namespace std;#include <vector> #include <list> #include <bits/stl_numeric.h> #include <string> struct Sum_Square { template <class Value_Int > inline Value_Int &operator () (Value_Int &val, Value_Int val_iter) { val += val_iter * val_iter; return val; } }; struct String_Append { template <class Value_String > inline Value_String &operator () (Value_String &val, Value_String val_iter) { val_iter.append (" " ); val.append (val_iter); return val; } }; struct Algorithm { template <class Iterator , class Value_Type > inline static Value_Type Accumulate (Iterator begin, Iterator end, Value_Type val) { for (; begin != end; ++begin) val += *begin; return val; } template <class Iterator , class Value_Type , class Binary_Operation > inline static Value_Type Accumulate (Iterator begin, Iterator end, Value_Type val, Binary_Operation binary_op) { for (; begin != end; ++begin) val = binary_op (val, *begin); return val; } }; int main () vector<int > v{5 , 3 , 6 , 9 , 10 }; cout << Algorithm::Accumulate (v.begin (), v.end (), 0 << endl; cout << Algorithm::Accumulate (v.begin (), v.end (), 0 , Sum_Square ()) << endl; list<string> l{"hello" , "I" , "want" , "to" , "fuck" , "you" , "my" , "friend." }; cout << Algorithm::Accumulate (l.begin (), l.end (), string (), String_Append ()) << endl; return 0 ; }
容器的遍历算法
自己实现一下for_each
1 2 3 4 5 6 7 8 9 10 11 12 13 14 15 16 17 18 19 20 21 22 23 24 25 26 27 28 29 30 31 32 33 34 35 36 #include <iostream> using namespace std;#include <vector> #include <algorithm> struct Algorithm { template <class Iterator , class Function > inline static Function For_each (Iterator first, Iterator last, Function f) { for (; first != last; ++first) f (*first); return f; } }; int main () vector<int > v1{2 , 5 , 3 , 6 , 9 }; vector<int > v2; Algorithm::For_each (v1. begin (), v1. end (), [&](int val) { val*=2 ;v2. push_back (val); }); for_each(v1. begin (), v1. end (), [&](auto val) { cout << val << ' ' ; }); cout << endl; for (auto val : v2) cout << val << ' ' ; cout << endl; return 0 ; }
看到for_each的返回值,我不得不思考为什么要返回Function仿函数呢?(很少情况下函数指针)
原因是:可以监视仿函数对象在经过这个for_each操作之后的状态
1 2 3 4 5 6 7 8 9 10 11 12 13 14 15 16 17 18 19 20 21 22 23 24 25 26 27 28 29 30 31 32 33 34 35 #include <iostream> #include <vector> #include <algorithm> using namespace std;class CSum { public : CSum () { m_sum = 0 ; } void operator () (int n) int GetSum () const return m_sum; } private : int m_sum; } cs; int main () vector<int > vi; for (int i = 1 ; i <= 100 ; i++) vi.push_back (i); cs = for_each(vi.begin (), vi.end (), cs); cout << cs.GetSum () << endl; return 0 ; }
1 2 3 4 5 6 7 8 9 10 11 12 13 14 15 16 17 18 19 20 21 22 23 24 25 26 27 28 29 30 31 32 33 34 35 36 37 38 39 40 41 42 43 44 45 46 47 48 49 50 51 52 53 54 55 56 57 58 59 60 61 #include <iostream> using namespace std;#include <vector> #include <algorithm> template <typename Container>void print (Container con) for (auto val : con) cout << val << ' ' ; cout << endl; } struct Algorithm { template <class Iterator , class Value_Type > inline static void Replace (Iterator first, Iterator last, const Value_Type oldval, const Value_Type newval) { for (; first != last; ++first) if (*first == oldval) *first = newval; } template <class Iterator , class Value_Type , class Predicate > inline static void Replace_if (Iterator first, Iterator last, Predicate pred, const Value_Type newval) { for (; first != last; ++first) if (pred (*first)) *first = newval; } template <class Value_Type > bool operator () (const Value_Type &val) { return val > 5 ; } }; int main () vector<int > v{1 , 1 , 1 , 1 , 2 , 3 , 4 , 5 , 6 , 7 , 8 , 9 , 10 }; print (v); Algorithm::Replace (v.begin (), v.end (), 1 , 66 ); print (v); vector<int > v2{1 , 1 , 1 , 1 , 2 , 3 , 4 , 5 , 6 , 7 , 8 , 9 , 10 }; Algorithm::Replace_if (v2. begin (), v2. end (), bind2nd (greater <int >(), 5 ), 666 ); print (v2); vector<int > v3; v3. resize (v.size ()); replace_copy (v.begin (), v.end (), v3. begin (), 10 , 50 ); print (v3); return 0 ; }
这个差不多就不写了
为什么要返回difference_type呢?
算法通过萃取机询问迭代器,迭代器之间的间距类型怎么表示,这个类型就是difference_type
标准库的定义是 ptrdiff_t,也就是 long long,这下就可以理解了
有些容器自带的成员函数,比如图中的,这些函数的执行效率肯定比全局的执行效率更高!!!
循序式查找,效率并不是很高,找不到返回last迭代器
1 2 3 4 5 6 7 8 9 10 11 12 13 14 15 16 17 18 19 20 21 22 23 24 25 26 27 28 29 30 31 32 33 34 35 36 37 38 39 40 41 42 43 44 45 46 47 48 #include <iostream> using namespace std;#include <vector> #include <array> #include <algorithm> template <typename Container>void print (Container con) for (auto val : con) cout << val << ' ' ; cout << endl; } bool myfunc (int i, int j) return i < j; } struct myclass { bool operator () (int i, int j) return i < j; } } myobj; int main () array<int , 8> arr = {32 , 71 , 12 , 45 , 26 , 80 , 53 , 33 }; vector<int > v (arr.begin(), arr.end()) ; print (v); sort (v.begin (), v.begin () + 4 ); print (v); sort (v.begin () + 4 , v.end (), myfunc); print (v); sort (v.begin (), v.end (), myobj); print (v); sort (v.rbegin (), v.rend (), less <int >()); print (v); return 0 ; }
注意一点的是stl标准库里面的 sort 函数要求的是 random_access_iterator_tag!!!!!
所以list和forward_list没办法调用,只能调用他们自己的类函数sort!!!
二分查找一定只能适用于一个有序序列!!!!并且在库函数当中只能用于升序序列!!!!
使用例子:
1 2 3 4 5 6 7 8 9 10 11 12 13 14 15 16 17 18 19 20 21 22 23 24 25 26 27 28 29 30 31 32 33 34 35 36 37 38 39 40 41 42 43 44 45 46 47 48 49 50 51 52 53 54 55 56 57 58 59 60 61 62 63 64 65 66 67 68 69 70 71 72 73 74 75 76 77 78 79 80 81 82 83 84 85 86 87 88 89 90 91 92 93 94 95 96 #include <iostream> using namespace std;#include <algorithm> #include <vector> template <typename Container>void Sort (Container &con) sort (con.begin (), con.end ()); } template <typename Container>void rSort (Container &con) sort (con.rbegin (), con.rend ()); } template <typename Container>void print (Container &con) for (auto val : con) cout << val << ' ' ; cout << endl; } namespace Fuck{ template <typename Random_Iterator, typename Value_Type> bool __Binary_Search(Random_Iterator first, Random_Iterator last, const Value_Type &val, random_access_iterator_tag) { if (val < *first) return false ; while (first != last) { Random_Iterator mid = first + (last - first) / 2 ; if (*mid > val) last = mid; else if (*mid < val) first = ++mid; else return true ; } return false ; } template <typename Random_Iterator, typename Value_Type> bool __Binary_Search(Random_Iterator first, Random_Iterator last, const Value_Type &val, random_access_iterator_tag, int ) { if (val > *first) return false ; while (first != last) { Random_Iterator mid = first + (last - first) / 2 ; if (*mid > val) first = ++mid; else if (*mid < val) last = mid; else return true ; } return false ; } template <typename Iterator, typename Value_Type> bool Binary_Search (Iterator first, Iterator last, const Value_Type &val) { typedef typename iterator_traits<Iterator>::iterator_category Iterator_Category; if (*first < *(last - 1 )) return __Binary_Search(first, last, val, Iterator_Category ()); else return __Binary_Search(first, last, val, Iterator_Category (), true ); } } int main () vector<int > v{1 , 3 , 6 , 8 , 7 , 9 , 2 , 0 }; Sort (v); print (v); cout << Fuck::Binary_Search (v.begin (), v.end (), 2 ) << endl; rSort (v); print (v); cout << Fuck::Binary_Search (v.begin (), v.end (), 2 ) << endl; return 0 ; }
标准库提供的三大类型的仿函数:算术类 逻辑运算类 相对运算类
还有之前提到过的几个仿函数:
标准库的示范:
注意到一点:标准库提供的functors都存在继承关系!!!!只有这样才算是真正融入了STL体系,这样才能更好的运作。
仿函数的 adaptable可适配 条件
STL规定,每个Functor都应该挑选适当的类来继承,因为适配器adapter会提出一些问题!!!!
什么叫adaptable?如果你希望自己的仿函数是可以被适配器调整的话,那么就继承一个适当的类,这样可以完成更多的操作!!!为什么要继承呢?因为可能在被adapter改造的时候可能会问这些问题。这也和算法问迭代器的五个问题一样,那里是通过迭代器的萃取机 Iterator Traits (也叫迭代器适配器 Iterator Adapters )去问的,这里同理通过继承的关系去回答adapter的问题!!!
存在多种 Adapters ,还是那张图,注意关系
Adapter的关键是:
这个Adapter要去改造某个东西(比如图中的container,functor,iterator),这里就有两种解决方式,第一种是继承的方式,就是Adapter继承这个东西,拥有这个东西的属性来进行改造;第二种是内含的方式,Adapter内部有这个东西来进行改造!!!!
在标准库里面的实现绝大多数都是内含的方式!!!
一下就是一些适配器的例子:
这个之前用过很多次了,就是把默认的容器拿进来进行改造,比如这里给的默认值是 deque ,改造之后能够以一种全新的面貌展现给用户,能够更加准确的针对用户的需要来进行相应的操作。
1 2 3 4 5 6 7 8 9 10 11 12 13 14 15 16 17 18 19 20 21 22 23 24 25 26 27 28 29 30 31 32 33 34 35 36 37 38 39 40 41 42 43 44 45 46 47 48 49 #include <iostream> using namespace std;#include <vector> #include <algorithm> namespace fuck{ template <class Binary_Op > class _BinderSecond { protected : Binary_Op op; typename Binary_Op::second_argument_type value; public : _BinderSecond(const Binary_Op &x, const typename Binary_Op::second_argument_type &y) : op (x), value (y) {} typename Binary_Op::result_type operator () (const typename Binary_Op::first_argument_type &x) { return op (x, value); } }; template <class Binary_Op , class Value_Type > inline _BinderSecond<Binary_Op> _BindSecond(const Binary_Op &op, const Value_Type &val) { typedef typename Binary_Op::second_argument_type second_type; return _BinderSecond(op, second_type (val)); }; } int main () vector<int > v{1 , 3 , 2 , 5 , 9 , 8 , 7 , 6 , 4 , 10 }; cout << count_if (v.begin (), v.end (), fuck::_BindSecond(less <int >(), 5 )) << endl; return 0 ; }
注意其中的一些代码:
1 typename Binary_Op::second_argument_type value;
为什么要加上 typename ,是为了通过编译,因为这个时候我们不知道Binary_Op是什么类型,然后如果他是我们想要的,也就是其中含有这个类型定义,那么就能通过编译,否则在这里就会报错!!!!
仿函数functors的可适配(adaptable)条件
继承(因为adapter会问问题,提问类型),是一个functor
1 2 3 4 5 6 7 8 9 10 11 12 13 14 15 16 17 18 19 20 21 22 23 24 25 26 27 28 29 30 31 32 33 34 35 36 37 38 39 40 41 42 #include <iostream> using namespace std;#include <vector> #include <algorithm> namespace fuck{ template <class Predicate > class _unary_negate : public unary_function<typename Predicate::argument_type, bool > { protected : Predicate pred; public : _unary_negate(const Predicate &x) : pred (x) {} bool operator () (const typename Predicate::argument_type &x) const { return !pred (x); } }; template <class Predicate > inline _unary_negate<Predicate> _Not1(const Predicate &pred) { return _unary_negate<Predicate>(pred); } } int main () vector<int > v{1 , 3 , 2 , 5 , 9 , 8 , 7 , 6 , 4 , 10 }; cout << count_if (v.begin (), v.end (), fuck::_Not1(bind2nd (less <int >(), 5 ))) << endl; return 0 ; }
观察发现这些adapter的实现方法基本都是一个模板辅助函数,调用一个模板类,这个类里面有构造函数和小括号重载!!!!
右边是老版本,左边是新版本!!!
可见bind的实现是非常复杂的!!!!
下面是对bind的一些测试:
bind 可以绑定:
functions函数;function objects 函数对象(仿函数);
member functions 成员函数;data members 成员属性
前两个比较好理解,其中第三个和第四个的绑定规则是:
注意第一个参数传入的是传的是地址!!!!
member functions, _1;
data members,_1
必须有第二个参数,第二个参数必须是必须是某个object的地址,可以是一个占位符,在调用的时候被外界指定!!!
第一个参数可以理解为调用类里面的什么接口,第二个参数可以理解为谁来调用!!!!
使用例子:
1 2 3 4 5 6 7 8 9 10 11 12 13 14 15 16 17 18 19 20 21 22 23 24 25 26 27 28 29 30 31 32 33 34 35 36 37 38 39 40 41 42 43 44 45 46 47 48 49 50 51 52 53 54 55 56 57 58 59 60 #include <iostream> using namespace std;#include <functional> using namespace std::placeholders; #include <vector> #include <algorithm> double my_divide (double x, double y) return x / y; } struct MyPair { double a, b; double multiply () return a * b; } }; void Bind_Functions () auto fn_five = bind (my_divide, 10 , 2 ); cout << fn_five () << endl; auto fn_half = bind (my_divide, _1, 2 ); cout << fn_half (10 ) << endl; auto fn_rounding = bind (my_divide, _2, _1); cout << fn_rounding (10 , 2 ) << endl; auto fn_invert = bind <int >(my_divide, _1, _2); cout << fn_invert (10 , 3 ) << endl; } void Bind_Members () MyPair ten_two{10 , 2 }; auto bound_memfn = bind (&MyPair::multiply, _1); cout << bound_memfn (ten_two) << endl; auto bound_memdata = bind (&MyPair::a, ten_two); cout << bound_memdata () << endl; auto bound_memdata2 = bind (&MyPair::b, _1); cout << bound_memdata2 (ten_two) << endl; vector<int > v{1 , 2 , 3 , 4 , 5 , 6 , 7 , 8 , 9 , 10 }; auto _fn = bind (less <int >(), _1, 5 ); cout << count_if (v.cbegin (), v.cend (), _fn) << endl; cout << count_if (v.begin (), v.end (), bind (less <int >(), _1, 5 )) << endl; } int main () Bind_Functions (); Bind_Members (); return 0 ; }
这个迭代器就是在正向迭代器的基础之上进行改造的迭代器!!!
注意copy是已经写死的函数,那么如何才能改变他的行为呢?
答案是借助操作符重载,本例子就是重载了 = 号运算符就是实现了由赋值操作变为插入操作了!!!!
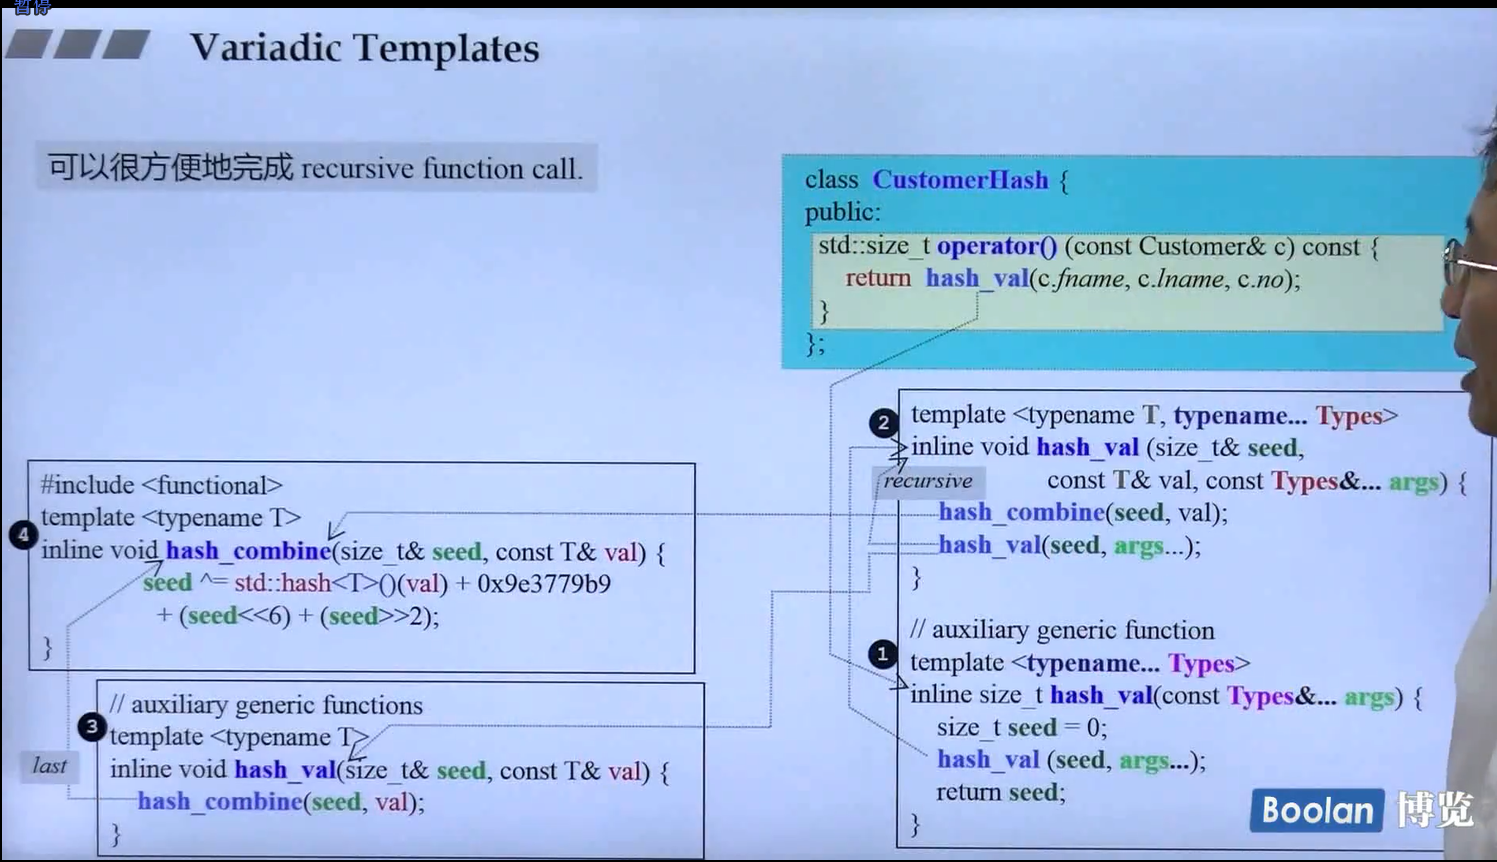
系统提供了一个非常不错的hashcode生成函数 hash_val() ,括号里面把元素的所有参数全部放进去就好!
1 2 3 4 5 6 7 8 9 10 11 12 13 14 15 16 17 18 19 20 21 22 23 24 25 26 27 28 29 30 31 32 33 template <typename ... Types> inline size_t hash_val (const Types &...args) { size_t seed = 0 ; hash_val (seed, args...); return seed; } template <typename Type, typename ... Types> inline void hash_val (size_t &seed, const Type &val, const Types &...args) { hash_combine (seed, val); hash_val (seed, args...); } template <typename Type> inline void hash_val (size_t &seed, const Type &val) { hash_combine (seed, val); } template <typename Type> inline void hash_combine (size_t &seed, const Type &val) { seed ^= std::hash <Type>()(val) + 0x9e3779b9 + (seed << 6 ) + (seed >> 2 ); }
上面的例子不是很好理解,这里写一个打印string的例子方便加深理解:
1 2 3 4 5 6 7 8 9 10 11 12 13 14 15 16 17 18 19 20 21 22 23 24 25 26 27 28 29 30 31 32 33 34 35 36 37 38 39 40 41 42 43 44 45 46 47 48 49 50 51 52 53 54 55 56 57 58 59 60 61 62 63 64 #include <iostream> using namespace std;#include <string> class StringPrint { public : inline void myprint (const string &str) { _myprint(str); cout << endl; } template <typename ... Types> inline void myprint (const string &str, const Types &...args) { _myprint(str, args...); cout << endl; } template <typename ... Types> void foo (const Types &...args) { cout << sizeof ...(Types) << endl; cout << sizeof ...(args) << endl; } private : inline void _myprint(const string &str) { cout << str; } template <typename Type, typename ... Types> inline void _myprint(const string &str, const Type &val, const Types &...args) { for (auto iter = str.begin (); iter != str.end (); ++iter) { if (*iter != '%' ) cout << *iter; else { cout << val; string newstr = string (++iter, str.end ()); _myprint(newstr, args...); return ; } } } } myPrint; int main () myPrint.myprint ("Hello , I'm % , % years old." , "David" , 20 ); myPrint.foo ("Hello , I'm % , % years old." , "David" , 20 ); myPrint.myprint ("fuck you!" ); myPrint.foo ("fuck you!" ); return 0 ; }
1.仿函数 functor
2.函数指针
1 2 3 4 5 6 7 8 9 10 11 12 13 14 15 16 17 18 19 20 21 22 23 24 25 26 27 class CustomerHash { public : size_t operator () (const Customer &c) const { return HashFunction ().hash_val (c.fname, c.lname, c.no); } }; size_t customer_hash_func (const Customer &c) return HashFunction ().hash_val (c.fname, c.lname, c.no); } int main () unordered_set<Customer, CustomerHash> custset; using function_pointer = size_t (*)(const Customer &); unordered_set<Customer, function_pointer> custset2; return 0 ; }
3.特化的版本
对于 unorder_set or unorder_map,如果不给hash函数,那么默认会使用系统的 hash,这个时候可以通过这个对其进行特化处理
1 2 3 4 5 6 7 8 9 10 11 12 namespace std{ template <> class hash <Customer> { size_t operator () (const Customer &c) { return HashFunction ().hash_val (c.fname, c.lname, c.no); } }; }
可以在我们的代码中对std里面的系统提供的hash函数进行特化版本的处理来实现
tuple是c++11新引入的一个好东西,他可以传入一个参数包,参数包里面可以放入任意大小,任意类型
示例代码:
1 2 3 4 5 6 7 8 9 10 11 12 13 14 15 16 17 18 19 20 21 22 23 24 25 26 27 28 29 30 31 32 33 34 35 36 37 38 39 40 41 42 43 44 45 46 47 48 49 50 51 52 53 54 55 56 57 58 #include <iostream> using namespace std;#include <string> #include <tuple> #include <complex> #include <typeinfo> #include "29_tuple_print.h" void test () cout << "string,sizeof = " << sizeof (string) << endl; cout << "double,sizeof = " << sizeof (double ) << endl; cout << "float,sizeof = " << sizeof (float ) << endl; cout << "int,sizeof = " << sizeof (int ) << endl; cout << "complex<double>,sizeof = " << sizeof (complex<double >) << endl; tuple<string, int , int , complex<double >> t; cout << "tuple<string,int,int,complex<double>,sizeof = " << sizeof (t) << endl; tuple<int , float , string> t1 (41 , 6.3 , "nico" ) ; cout << "tuple<int,float,string>,sizeof = " << sizeof (t1) << endl; cout << "t1: " << get <0 >(t1) << ' ' << get <1 >(t1) << ' ' << get <2 >(t1) << endl; auto t2 = make_tuple (22 , 44.0 , "stacy" ); get <1 >(t1) = get <1 >(t2); cout << "t1: " << get <0 >(t1) << ' ' << get <1 >(t1) << ' ' << get <2 >(t1) << endl; cout << "t2: " << get <0 >(t2) << ' ' << get <1 >(t2) << ' ' << get <2 >(t2) << endl; if (t1 < t2) cout << "t1 < t2" << endl; else if (t1 > t2) cout << "t1 > t2" << endl; else cout << "t1 == t2" << endl; t1 = t2; cout << t2 << endl; typedef tuple<int , float , string> TupleType; cout << tuple_size<TupleType>::value << endl; typedef tuple_element<1 , TupleType>::type Type1; cout << typeid (Type1).name () << endl; tuple<int , float , string> t3 (77 , 1.1 , "more light" ) ; int i1; float f1; string s1; tie (i1, f1, s1) = t3; cout << "i1 = " << i1 << " f1 = " << f1 << " s1= " << s1 << endl; } int main () test (); return 0 ; }
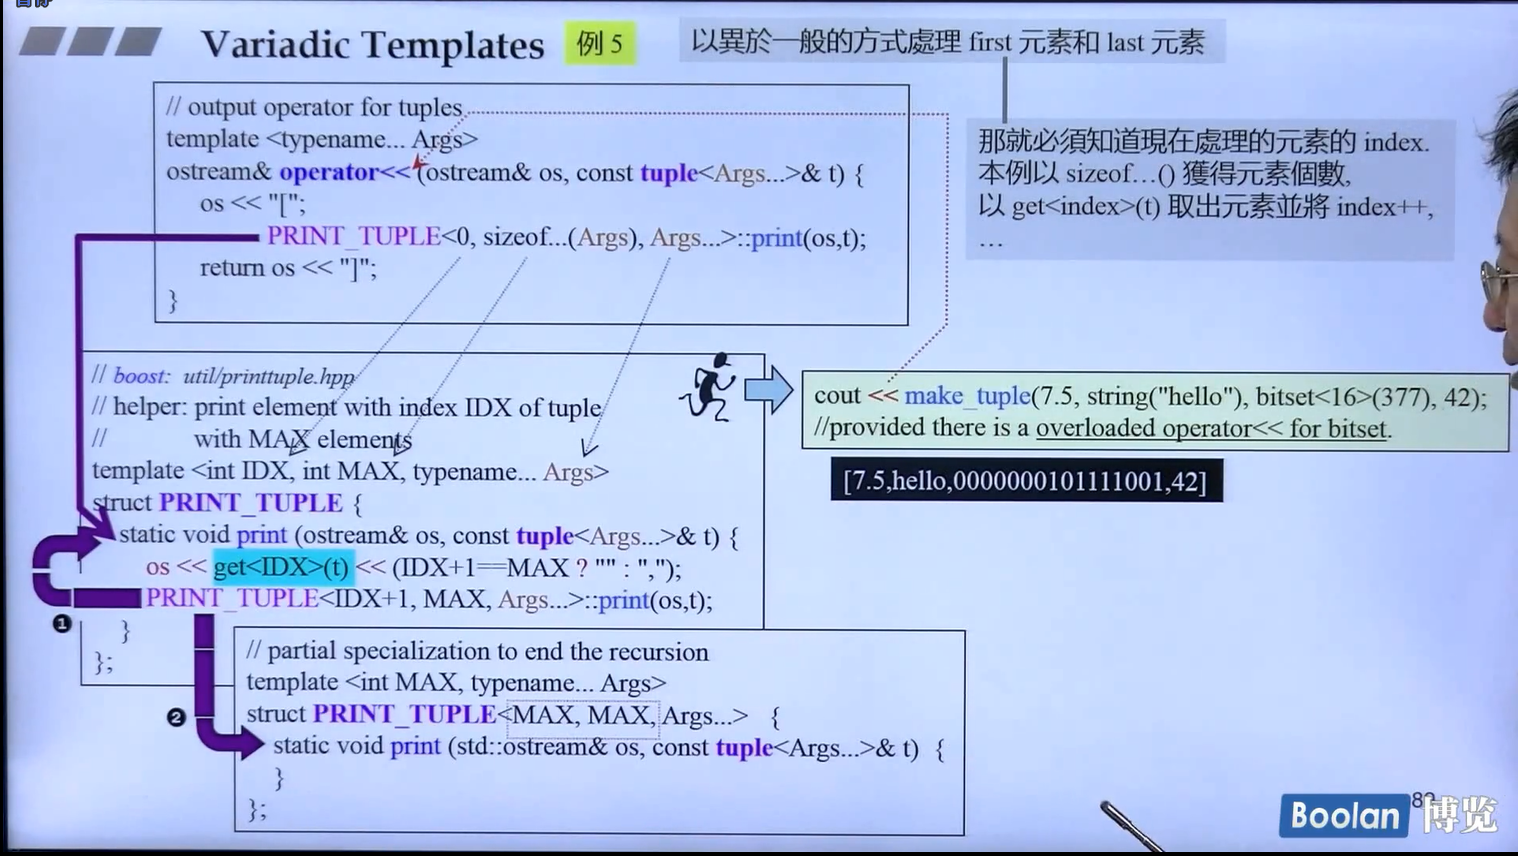
这里面就有学问了,重载 这个参数包的 左移运算符(代码建议重复看!!!!)
1 2 3 4 5 6 7 8 9 10 11 12 13 14 15 16 17 18 19 20 21 22 23 24 25 26 27 28 29 30 31 32 33 34 35 36 37 38 39 40 41 42 #ifndef __TUPLEPRINT__ #define __TUPLEPRINT__ #include <iostream> using namespace std;template <typename Tuple, size_t N>struct tuple_print { inline static void print (const Tuple &t, ostream &out) { tuple_print<Tuple, N - 1 >::print (t, out); out << ' ' << get <N - 1 >(t); } }; template <typename Tuple>struct tuple_print <Tuple, 1 >{ inline static void print (const Tuple &t, ostream &out) { out << get <0 >(t); } }; #include <tuple> template <typename ... Types>inline ostream &operator <<(ostream &out, const tuple<Types...> &t){ tuple_print<decltype (t), sizeof ...(Types)>::print (t, out); return out; } #endif
那么这个这么好用的tuple是怎么实现的呢?
他的大概意思就是接受参数包,然后将参数包分为1和n-1,本类继承上一级(n-1)的类,以此往上继承;由于本类当中的成员是head,就是这个1对应的元素,所以继承过后本类会获得所有的元素,可以通过head和tail接口进行调用!!!!!!
注意图中右上角的继承关系!!!
tuple里面有两个head和tail函数,这两个在现在的c++里面不太好用,因为新加了很多东西,接口也变了,所以就不用了
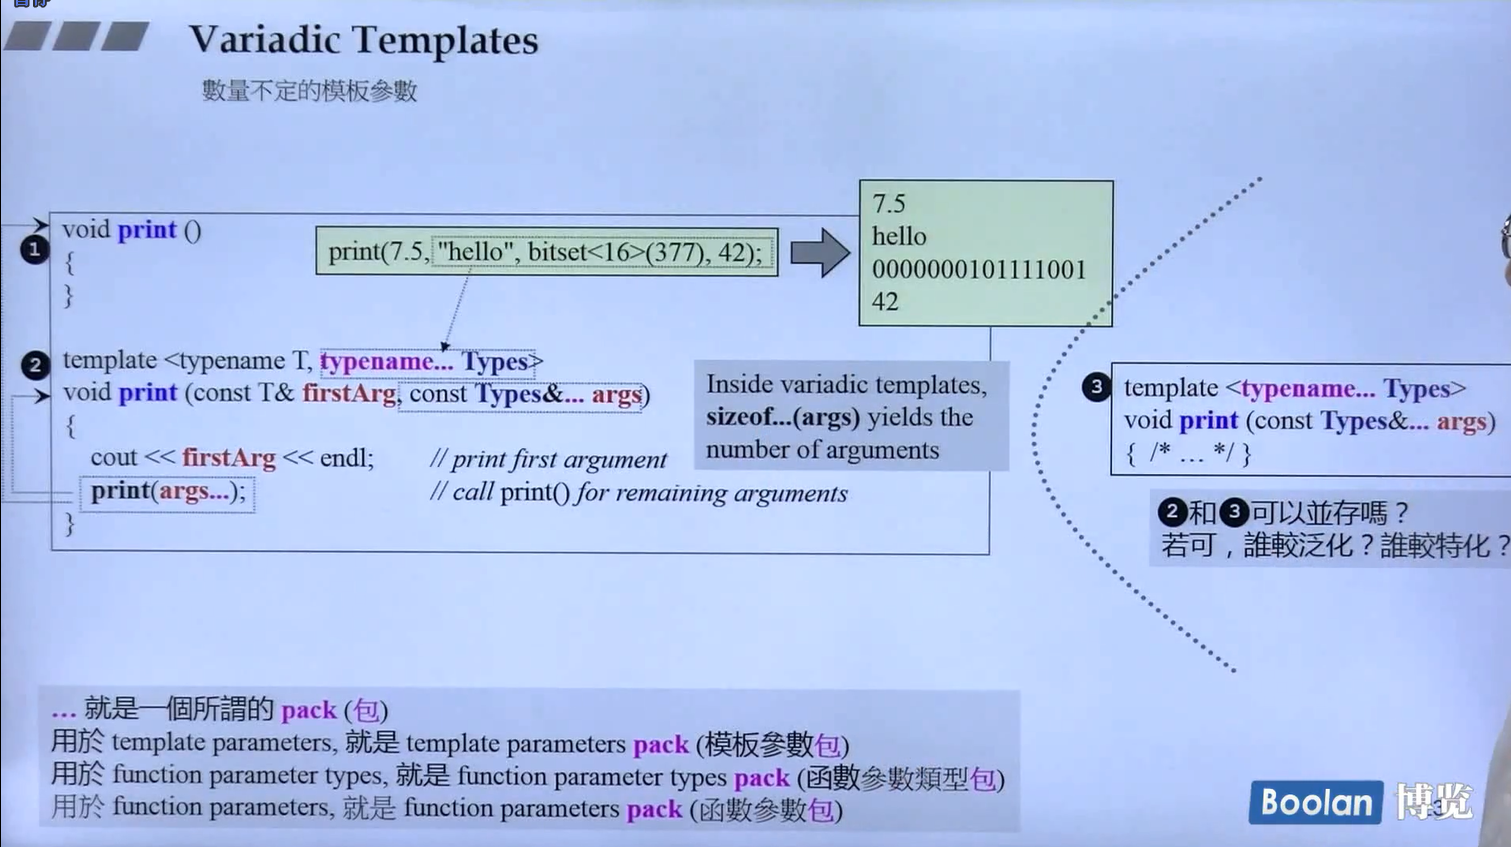
在类模板中,模板参数包必须是最后一个模板形参. 而在函数模板中则不必!!!!
这个之前提过了,就不细谈了
下面那三个分别对应:
1 2 3 typename ... Types const Types&... args print (args...)
利用参数包也可以实现万用的hashcode的实现: 之前写过就不细看了
1 2 3 4 5 6 7 8 9 10 11 12 13 14 15 16 17 18 19 20 21 #include <iostream> using namespace std;void f (int ) cout << "call of int" << endl; } void f (void *) cout << "call of void*" << endl; } int main () f (0 ); f (nullptr ); return 0 ; }
提醒:不要有了auto就以后都不写类型了,能不用就不用,除非是在类型名太长或者太复杂的类型才用一下,我们心里需要明白这到底是怎么类型,不要编译器知道了我们不知道
1 2 3 4 5 6 7 8 9 10 11 12 13 14 15 16 17 18 19 20 21 22 23 #include <iostream> using namespace std;auto Func (const int &val) return val > 0 ; } int main () auto func = [](const int &val) -> bool { return val > 0 ; }; bool (*func2)(const int &val) = Func; cout << func (1 ) << endl; cout << func2 (-1 ) << endl; return 0 ; }
任何初始化动作都可以用一个共同语法:{ //填入值 }
1 2 3 4 int values[] {1 ,2 ,3 };vector<string>cities{ "Berlin" ,"New York" ,"London" };
示例代码:
1 2 3 4 5 6 7 8 9 10 11 12 13 14 15 16 17 18 19 20 21 22 #include <iostream> using namespace std;#include <vector> template <typename Container>inline void print (const Container &con) for (auto val : con) cout << val << ' ' ; cout << endl; } int main () vector<int > v{1 , 2 , 3 }; vector<string> cities{ "Berlin" , "New York" , "London" }; print (v); print (cities); return 0 ; }
在编译器看到 {} 的时候会自动创建出来一个 initializer_list,这是一个类,具体代码实现如下:
1 2 3 4 5 6 7 8 9 10 11 12 13 14 15 16 17 18 19 20 21 22 23 24 25 26 27 28 29 30 31 32 33 34 35 36 37 38 template <class _E >class initializer_list { public : typedef _E value_type; typedef const _E &reference; typedef const _E &const_reference; typedef size_t size_type; typedef const _E *iterator; typedef const _E *const_iterator; private : iterator _M_array; size_type _M_len; constexpr initializer_list (const_iterator __a, size_type __l) : _M_array(__a), _M_len(__l) { }public : constexpr initializer_list () noexcept : _M_array(0 ), _M_len(0 ) { } constexpr size_type size () const noexcept { return _M_len; } constexpr const_iterator begin () const noexcept { return _M_array; } constexpr const_iterator end () const noexcept { return begin () + size (); }};
关于这个类的拷贝构造,可以看由于在类里面没有对拷贝构造的重写,导致两个initializer_list在拷贝的时候是浅拷贝,两个指针指向同一块内存空间,可能会出现危险,这个需要注意
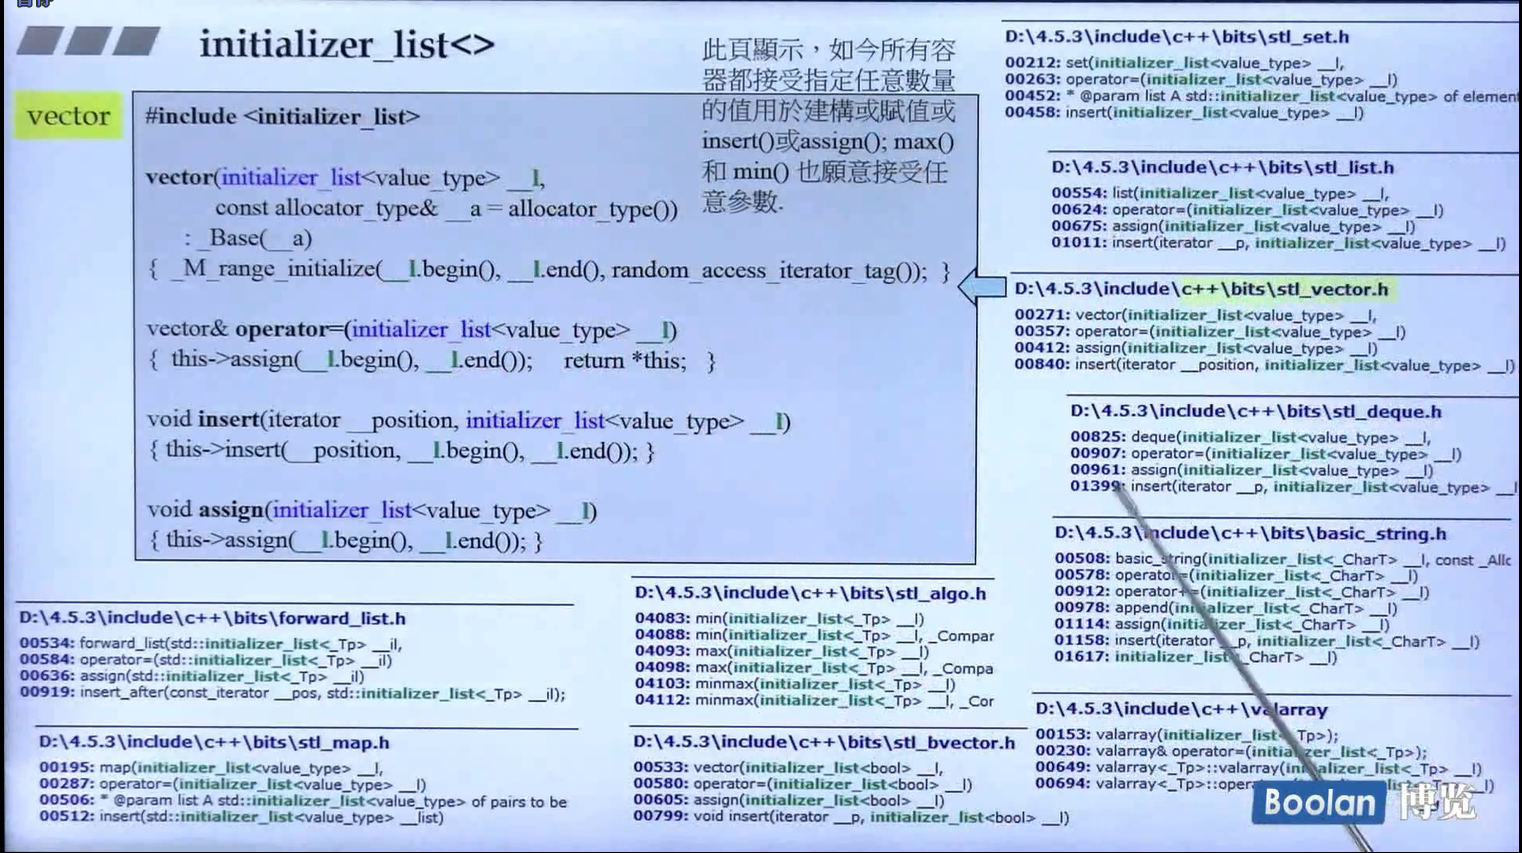
STL的容器是如何引入initializer_list的?
initializer_list<>里面内置了一个array数组的指针和这个数组的长度,编译器会读取{}里面的元素来进行容器的插入操作以实现初始化操作
示例代码:
1 2 3 4 5 6 7 8 9 10 11 12 13 14 15 16 17 18 19 20 21 22 23 24 25 26 27 28 29 30 31 32 33 34 35 36 37 38 39 40 41 42 43 44 45 46 47 48 49 50 51 52 53 54 55 56 57 58 59 60 61 62 63 64 65 66 67 68 #include <iostream> using namespace std;#include <vector> #include <initializer_list> #include <string> class Algorithm { public : template <typename Value_Type> inline Value_Type _min(const initializer_list<Value_Type> &init_list) { return Min (init_list.begin (), init_list.end ()); } template <typename Value_Type> inline Value_Type _max(const initializer_list<Value_Type> &init_list) { return Max (init_list.begin (), init_list.end ()); } private : template <typename Input_Iterator> inline typename iterator_traits<Input_Iterator>::value_type Min (Input_Iterator first, Input_Iterator last) { auto Min = *first; for (; first != last; ++first) Min = Min <= *first ? Min : *first; return Min; } template <typename Input_Iterator> inline typename iterator_traits<Input_Iterator>::value_type Max (Input_Iterator first, Input_Iterator last) { auto Max = *first; for (; first != last; ++first) Max = Max >= *first ? Max : *first; return Max; } }; template <typename Container>inline void print (const Container &con) for (auto val : con) cout << val << ' ' ; cout << endl; } int main () vector<int > v1{2 , 5 , 7 , 13 , 69 , 83 , 50 }; vector<int > v2 ({2 , 5 , 7 , 13 , 69 , 83 , 50 }) ; vector<int > v3; v3 = {2 , 5 , 7 , 13 , 69 , 83 , 50 }; v3. insert (v3. begin () + 2 , {0 , 1 , 2 , 3 , 4 }); print (v3); cout << Algorithm ()._max({54 , 16 , 48 , 5 }) << endl; cout << Algorithm ()._min({string ("Ace" ), string ("Hello" ), string ("Fuck" ), string ("Zion" )}) << endl; return 0 ; }
explicit for ctor taking one argument
1 2 3 4 5 6 7 8 9 10 11 12 13 14 15 16 17 18 19 20 21 22 23 24 25 26 27 28 29 30 31 32 33 #include <iostream> using namespace std;struct Complex { int real, imag; explicit Complex (int re, int im = 0 ) : real(re), imag(im) { Complex operator +(const Complex &x) { return Complex (real + x.real, imag + x.imag); } }; inline ostream &operator <<(ostream &os, const Complex &x){ os << '(' << x.real << ',' << x.imag << ')' ; return os; } int main () Complex c1 (12 , 5 ) ; cout << c1 << endl; return 0 ; }
这是一个实参加上 explicit 关键字的情况,前面已经提过很多了
explicit for ctors taking more than one argument
1 2 3 4 5 6 7 8 9 10 11 12 13 14 15 16 17 18 19 20 21 22 23 24 25 26 #include <iostream> using namespace std;#include <initializer_list> struct P { P (int a, int b) { cout << "P (int a , int b) " << endl; } explicit P (int a, int b, int c) "explicit P (int a , int b , int c) " << endl; } }; int main () P p1 (77 , 5 ) ; P p2{77 , 5 }; P p3 = {77 , 5 }; P p4{77 , 5 , 42 }; P p5 ({77 , 5 , 42 }) ; return 0 ; }
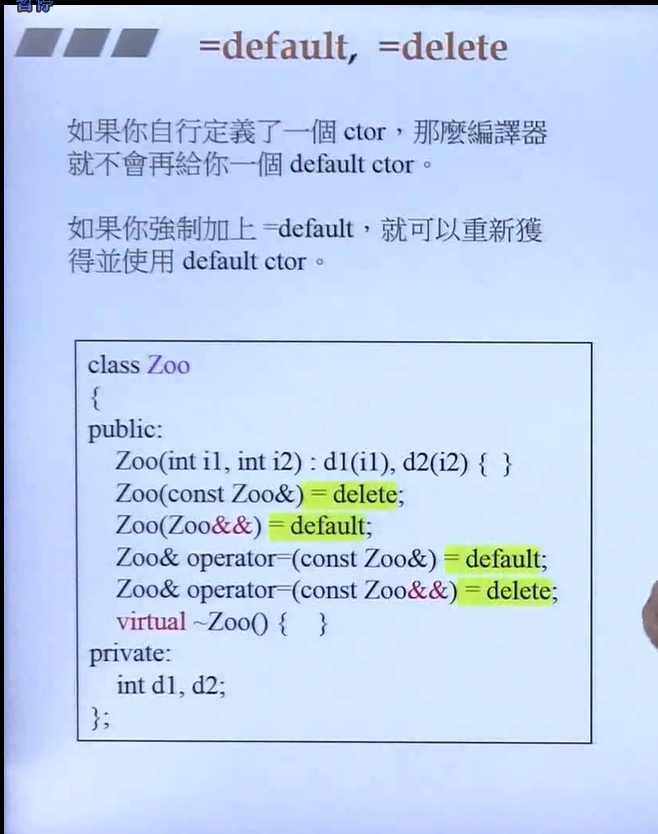
1 2 3 4 5 6 7 8 9 10 11 12 13 14 15 16 17 18 19 20 21 22 23 24 25 26 #include <iostream> using namespace std;class Zoo { public : Zoo (int i1, int i2) : d1 (i1), d2 (i2) {} Zoo (const Zoo &) = delete ; Zoo (Zoo &&) = default ; Zoo &operator =(const Zoo &) = default ; Zoo &operator =(const Zoo &&) = delete ; virtual ~Zoo () {} private : int d1, d2; }; int main () Zoo z1 (1 , 2 ) ; return 0 ; }
一般是应用在 Big 3 上面,即 构造函数,拷贝构造,拷贝赋值和析构函数
其中出现了右值引用,这个目前不了解
1 2 Zoo (const Zoo&)=delete ;Zoo (Zoo&&)=default ;
一个更细的例子:
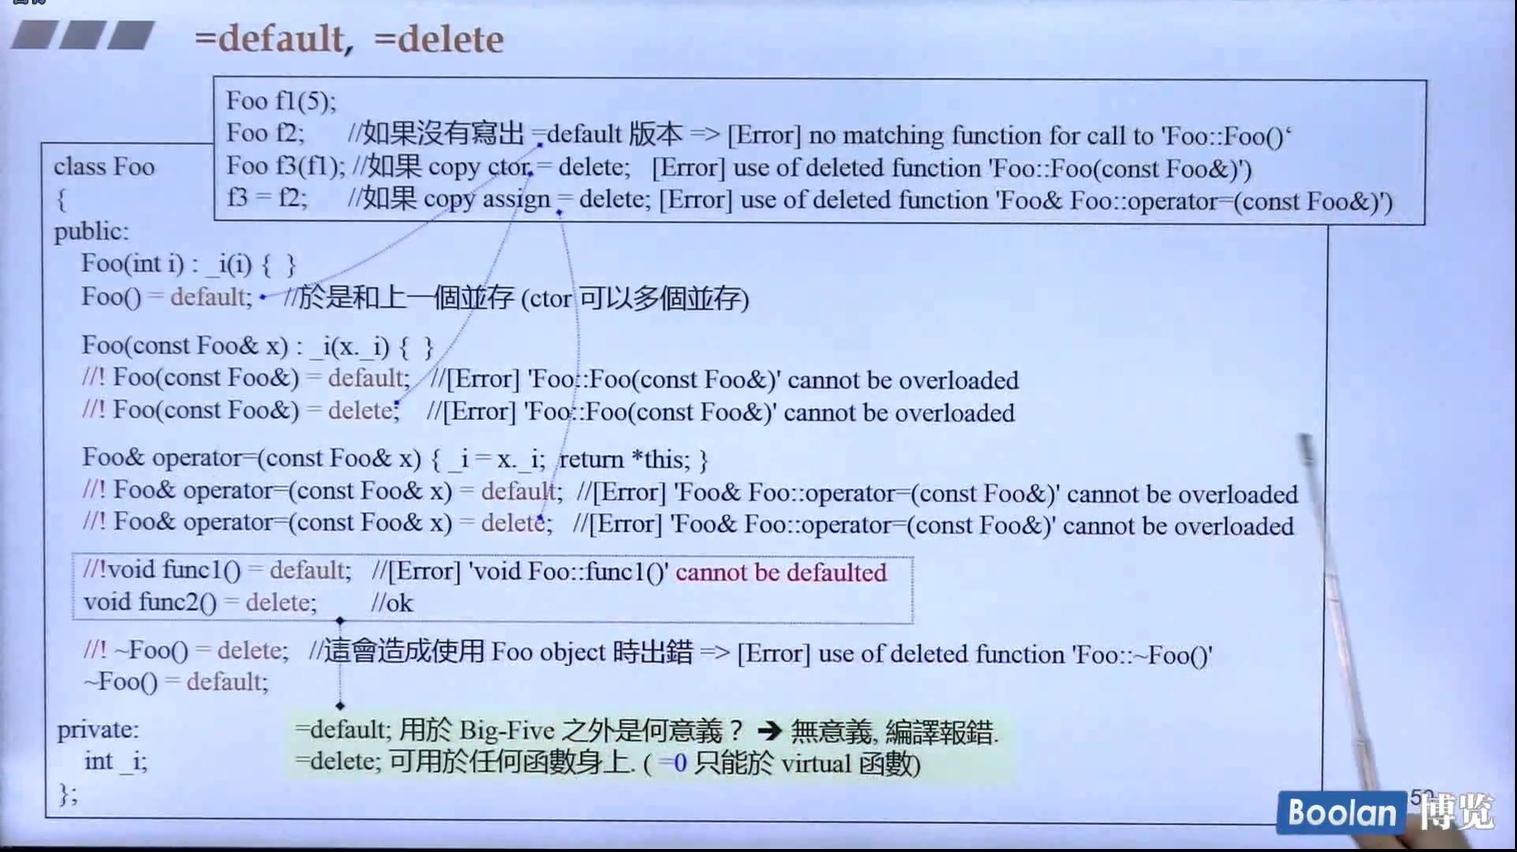
1 2 3 4 5 6 7 8 9 10 11 12 13 14 15 16 17 18 19 20 21 22 23 24 25 26 27 28 29 30 31 32 33 34 35 36 37 38 39 40 41 42 43 44 #include <iostream> using namespace std;class Foo { public : Foo (int i) : _i(i) {} Foo () = default ; Foo (const Foo &x) : _i(x._i) {} Foo &operator =(const Foo &x) { _i = x._i; return *this ; } void func2 () delete ; ~Foo () = default ; private : int _i; }; int main () Foo f1; Foo f2 (5 ) ; Foo f3 (f1) ; f3 = f2; return 0 ; }
对于一个空的类,编译器在处理的时候会提供默认的big 3,即 构造函数,拷贝构造,拷贝赋值,析构函数
1 2 3 4 5 6 7 8 9 10 11 12 13 14 15 16 17 18 19 20 21 class Empty { };class Empty {public : Empty (){ ... } Empty (const Empty& rhs){ ... } Empty& operator =(const Empty& rhs){ ... } ~Empty (){ ... } } { Empty e1; Empty e2 (e1) ; e2=e1; }
那么我们怎么确认是用默认的还是自己写的呢?
classes with or without pointer members!!!!
带有指针的类基本上都需要重写 big 3;不带指针的基本都不需要写!!!!!
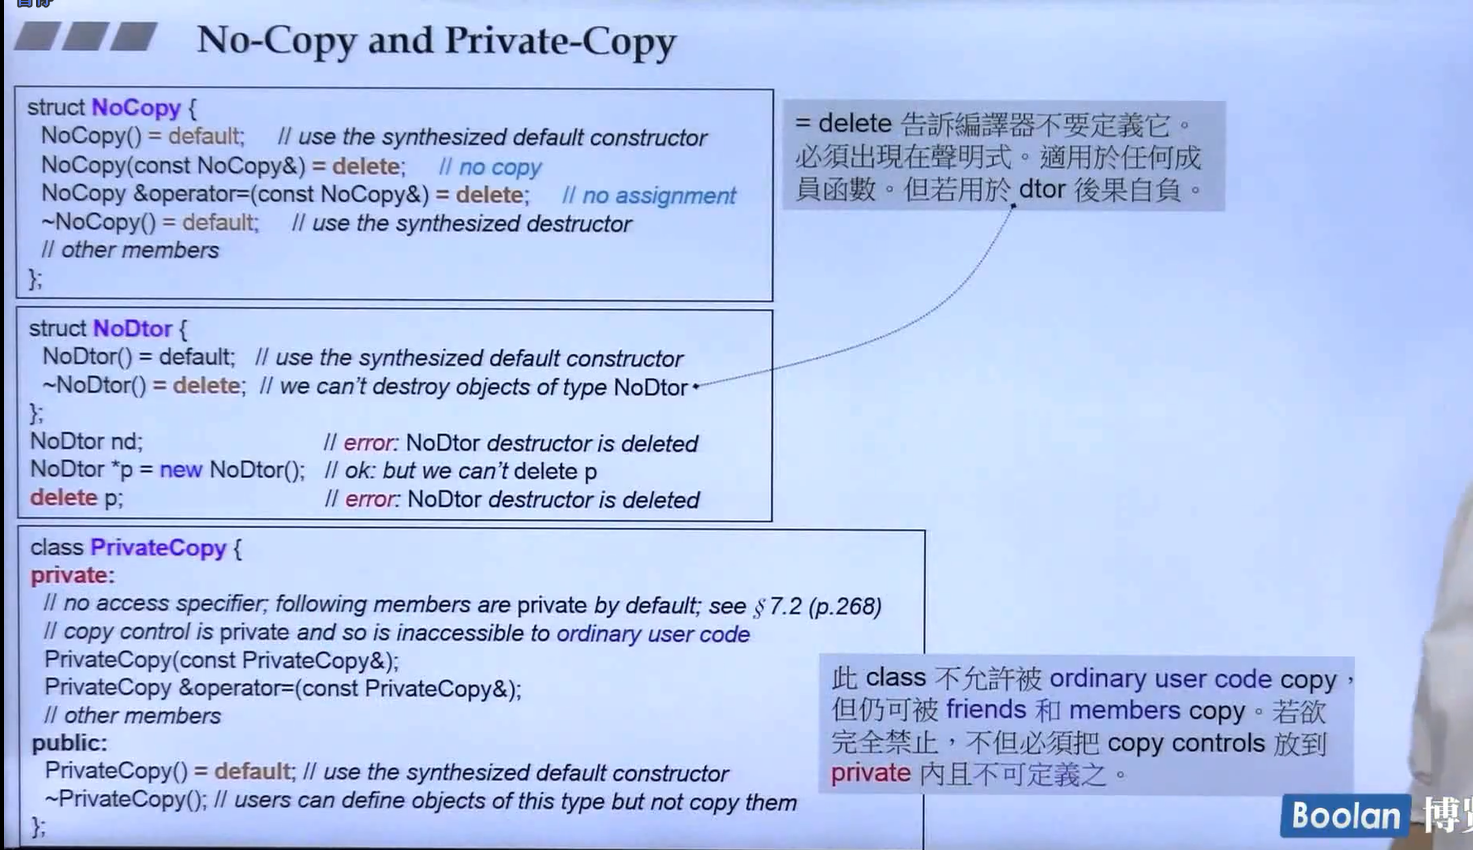
1 2 3 4 5 6 7 8 9 10 11 12 13 14 15 16 17 18 19 20 21 22 23 24 25 26 27 28 29 30 31 32 33 34 35 36 37 38 39 40 41 42 43 #include <iostream> using namespace std;struct Nocopy { Nocopy () = default ; Nocopy (const Nocopy &) = delete ; Nocopy &operator =(const Nocopy &) = delete ; ~Nocopy () = default ; }; struct NoDtor { NoDtor () = default ; ~NoDtor () = delete ; }; void testNoDtor () NoDtor *p = new NoDtor; } class PrivateCopy { private : PrivateCopy (const PrivateCopy &); PrivateCopy &operator =(const PrivateCopy &); public : PrivateCopy () = default ; ~PrivateCopy (); }; int main () testNoDtor (); return 0 ; }
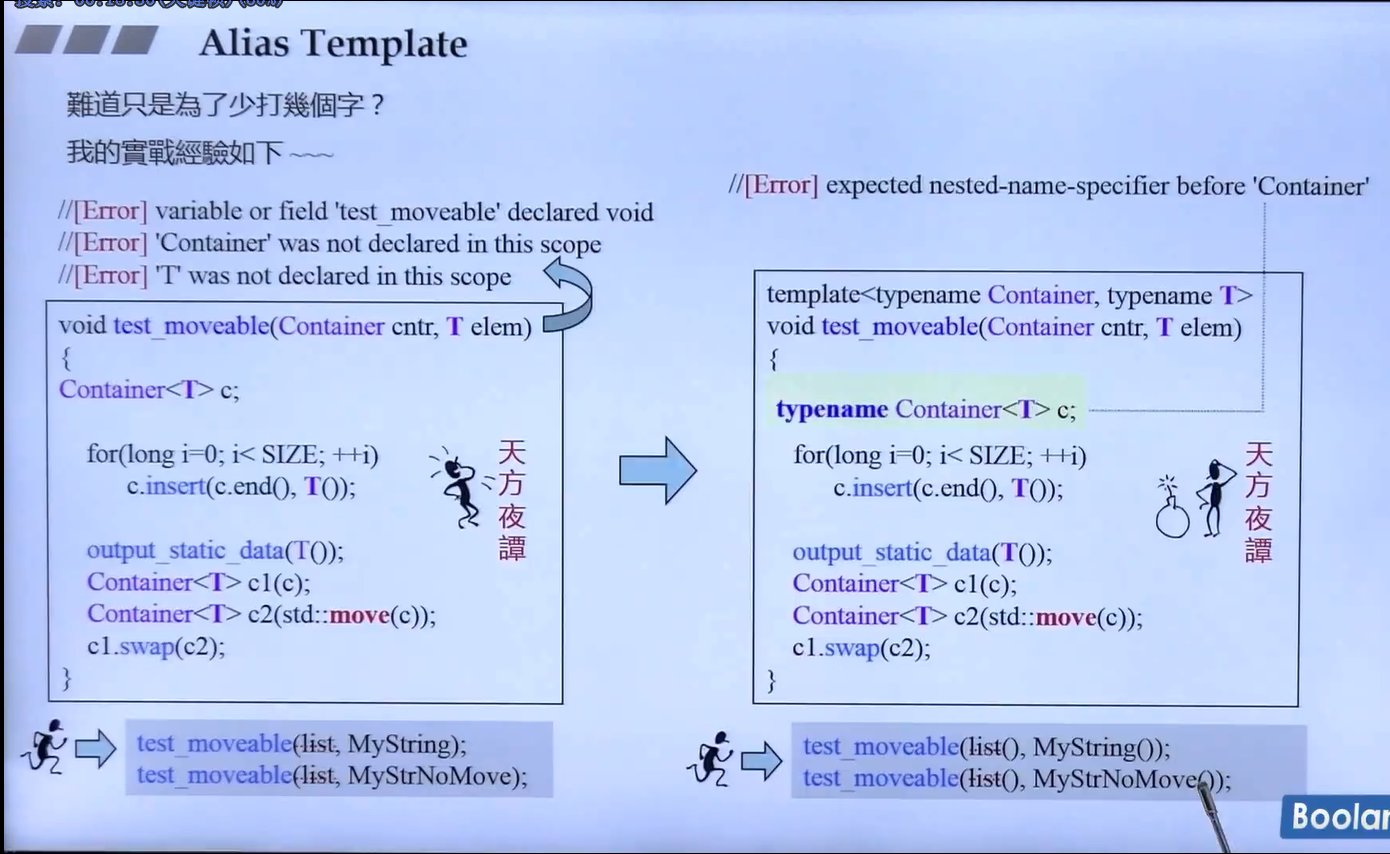
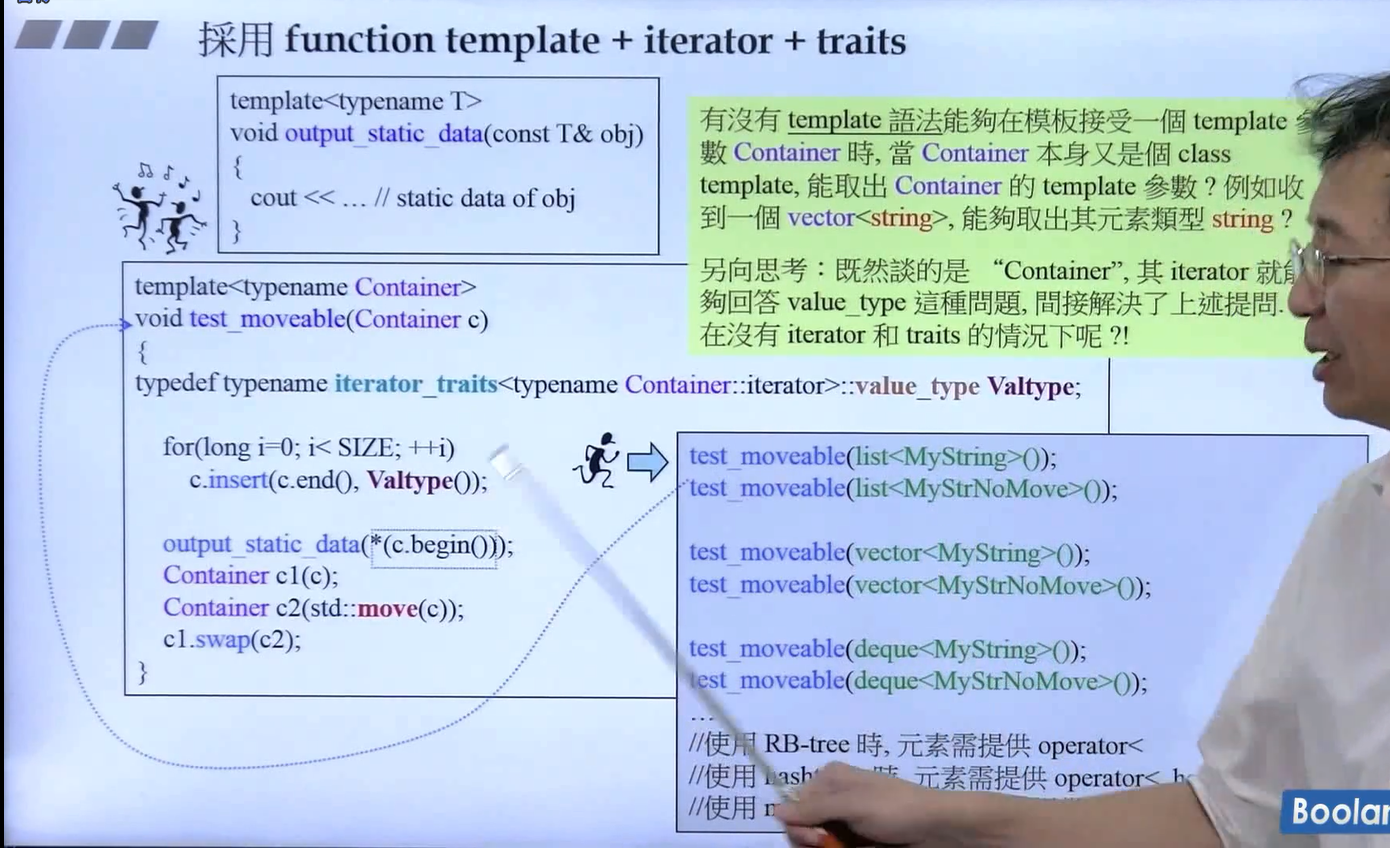
值得注意的是下面两个没办法实现我们想要的结果!!!!
这么写始终会报错,看起来是没有办法把容器和容器模板的类型分开来进行传入的
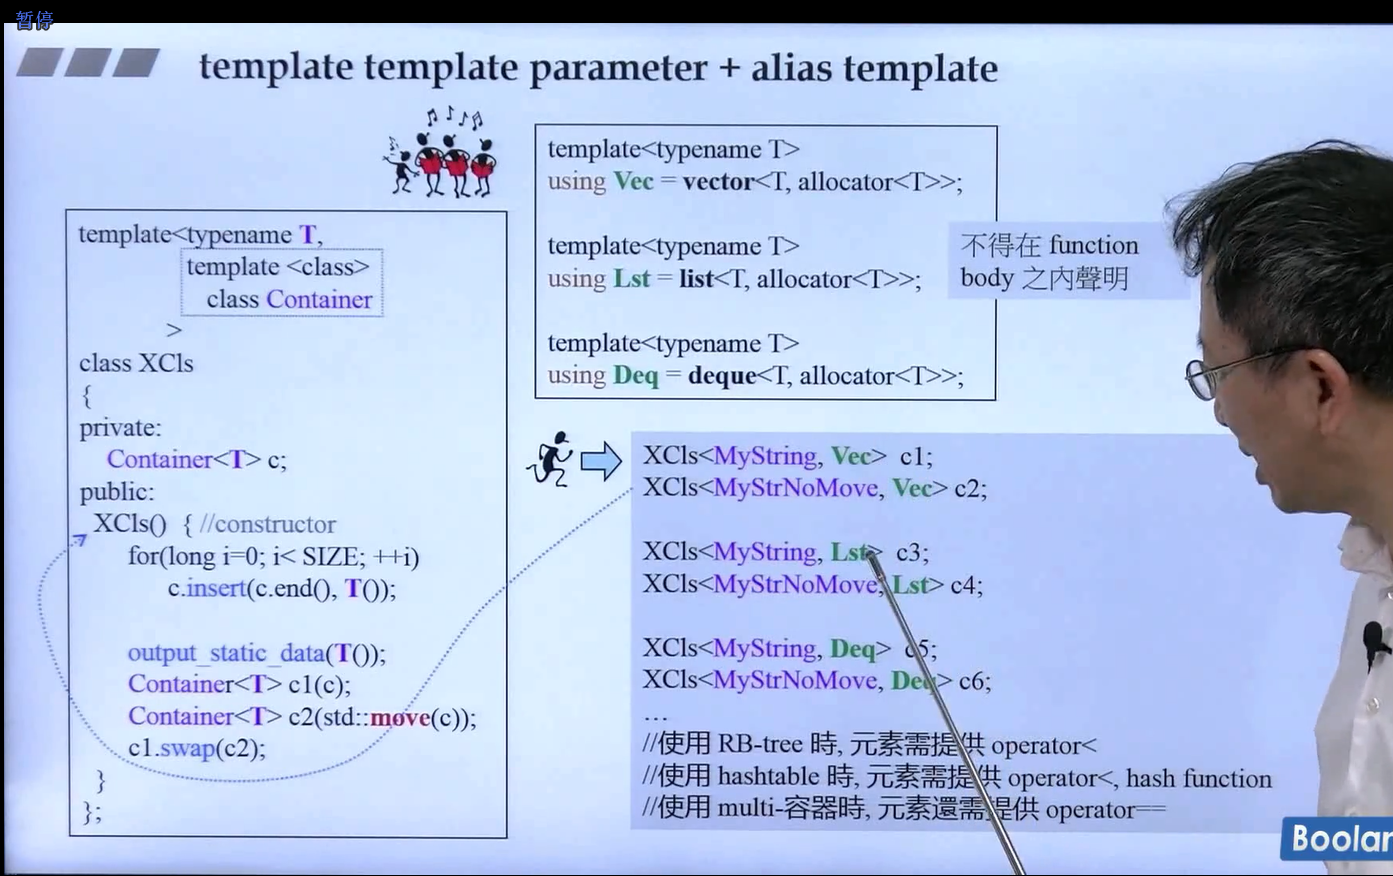
所以可以这么写:
1 2 3 4 5 6 7 8 9 10 11 12 13 14 15 16 17 18 19 20 21 22 23 24 25 26 27 28 29 30 31 32 33 34 35 36 37 38 39 40 41 42 43 44 45 46 47 48 49 50 51 52 53 54 55 56 57 58 59 60 #include <iostream> using namespace std;#define SIZE 1e6 #include <string> #include <vector> #include <list> #include <deque> template <typename Type>inline void output_static_data (const Type &obj) cout << "static_data: " << endl; } template <class Value_Type , template <class > class Container > class XCls { private : Container<Value_Type> c; public : XCls () { for (long i = 0 ; i < SIZE; ++i) c.insert (c.end (), Value_Type ()); output_static_data (Value_Type ()); Container<Value_Type> c1 (c) ; Container<Value_Type> c2 (std::move(c)) ; c1. swap (c2); } }; #include <ext/pool_allocator.h> namespace Alias{ template <typename Value_Type> using Vec = vector<Value_Type, __gnu_cxx::__pool_alloc<Value_Type>>; template <typename Value_Type> using Lst = list<Value_Type, __gnu_cxx::__pool_alloc<Value_Type>>; template <typename Value_Type> using Deq = deque<Value_Type, __gnu_cxx::__pool_alloc<Value_Type>>; } using namespace Alias;int main () XCls<string, Vec> c; XCls<string, Lst> c2; XCls<string, Deq> c3; return 0 ; }
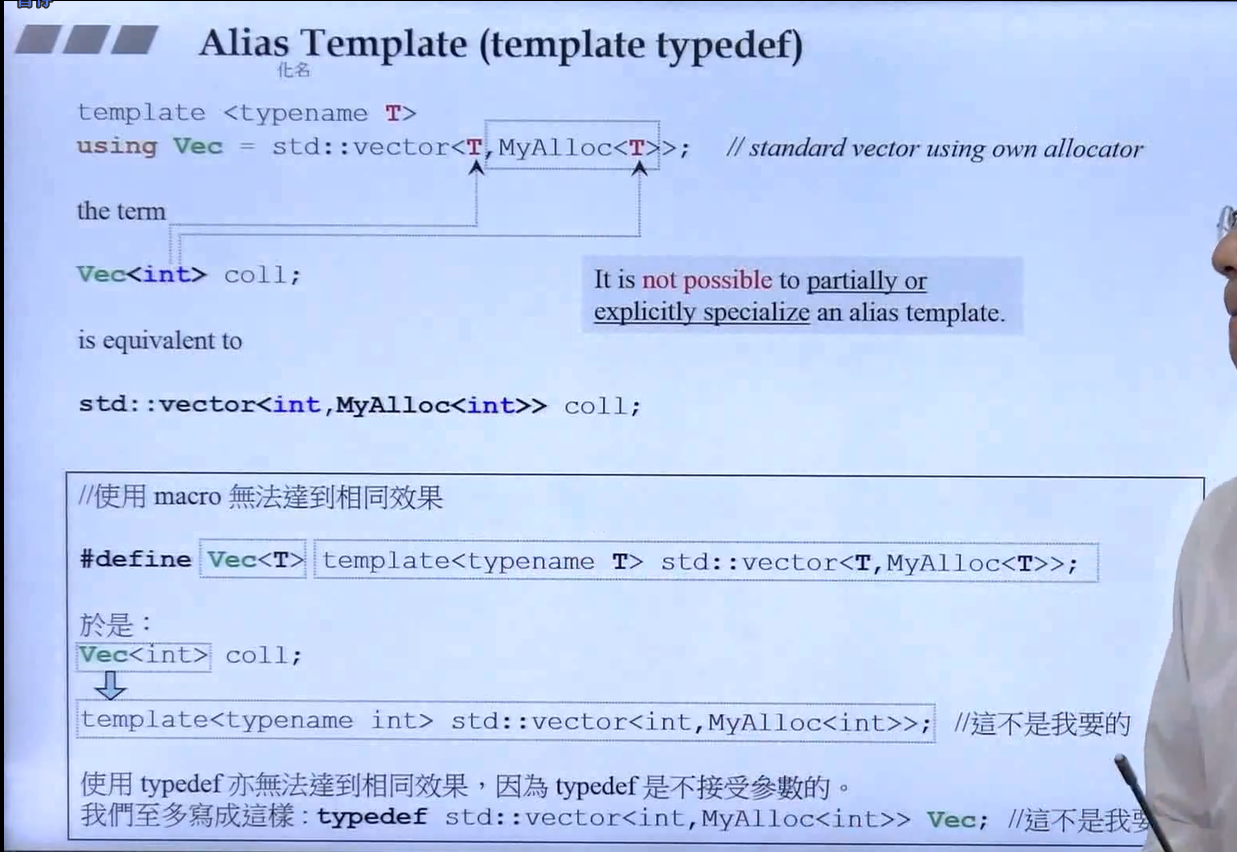
type alias 和 typedef 没有任何的不同
1 2 3 4 5 6 7 8 9 10 11 12 13 14 15 16 17 18 19 20 21 22 23 24 25 26 27 28 29 30 31 32 33 34 35 36 37 38 39 40 41 42 43 #include <iostream> using namespace std;#include <vector> namespace Test{ void test01 (int , int ) { cout << "test01" << endl; } template <typename T> struct Container { using Value_Type = T; }; template <class CharT > using mystring = std::basic_string<CharT, std::char_traits<CharT>>; template <class Container > void fn2 (const Container &con) { using Value_Type = typename iterator_traits<typename Container::iterator>::value_type; cout << "fn2" << endl; } } using namespace Test;int main () using func = void (*)(int , int ); func f1 = test01; f1 (1 , 1 ); mystring<char > str; fn2 (vector <int >()); return 0 ; }
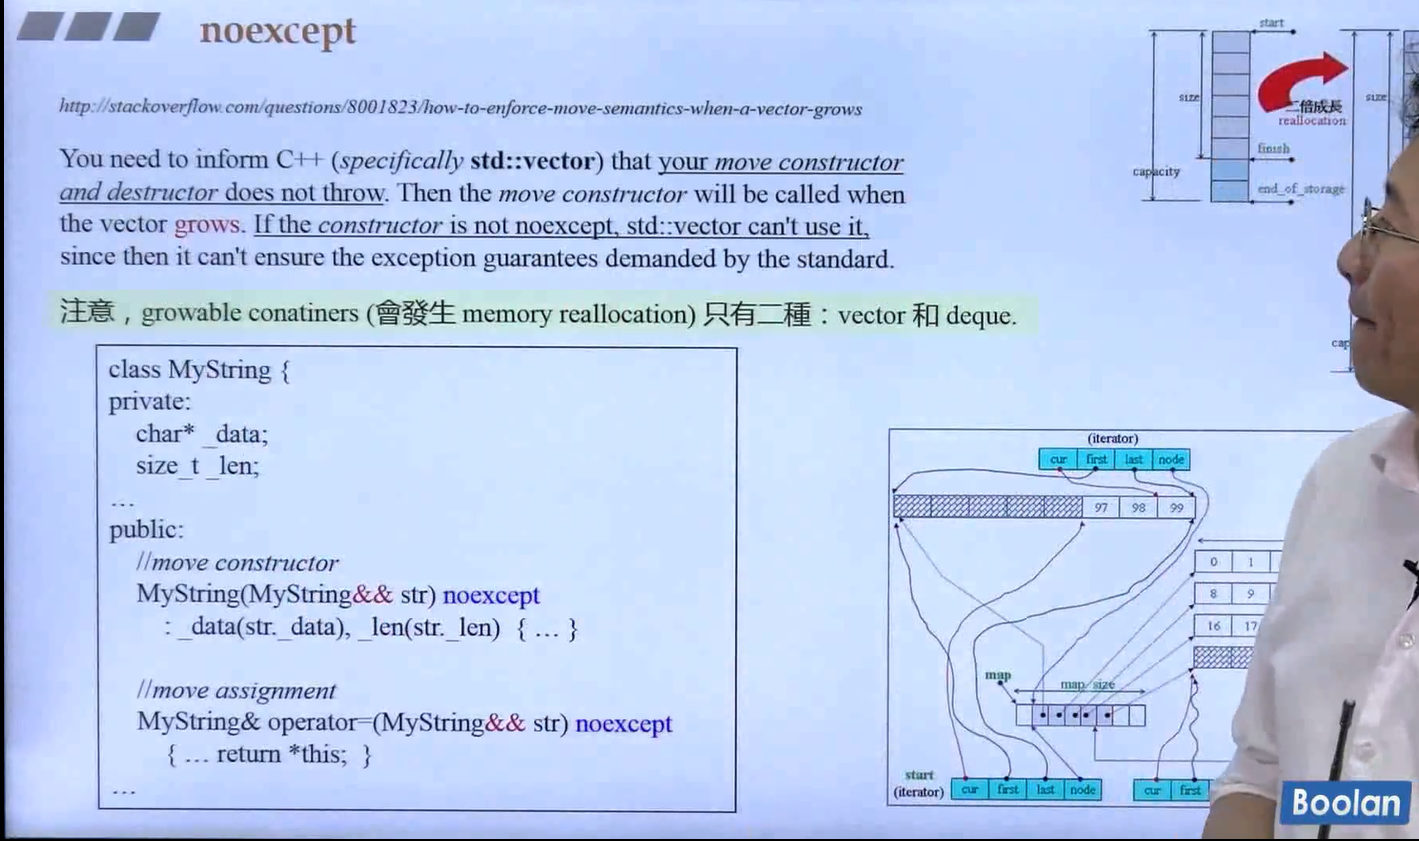
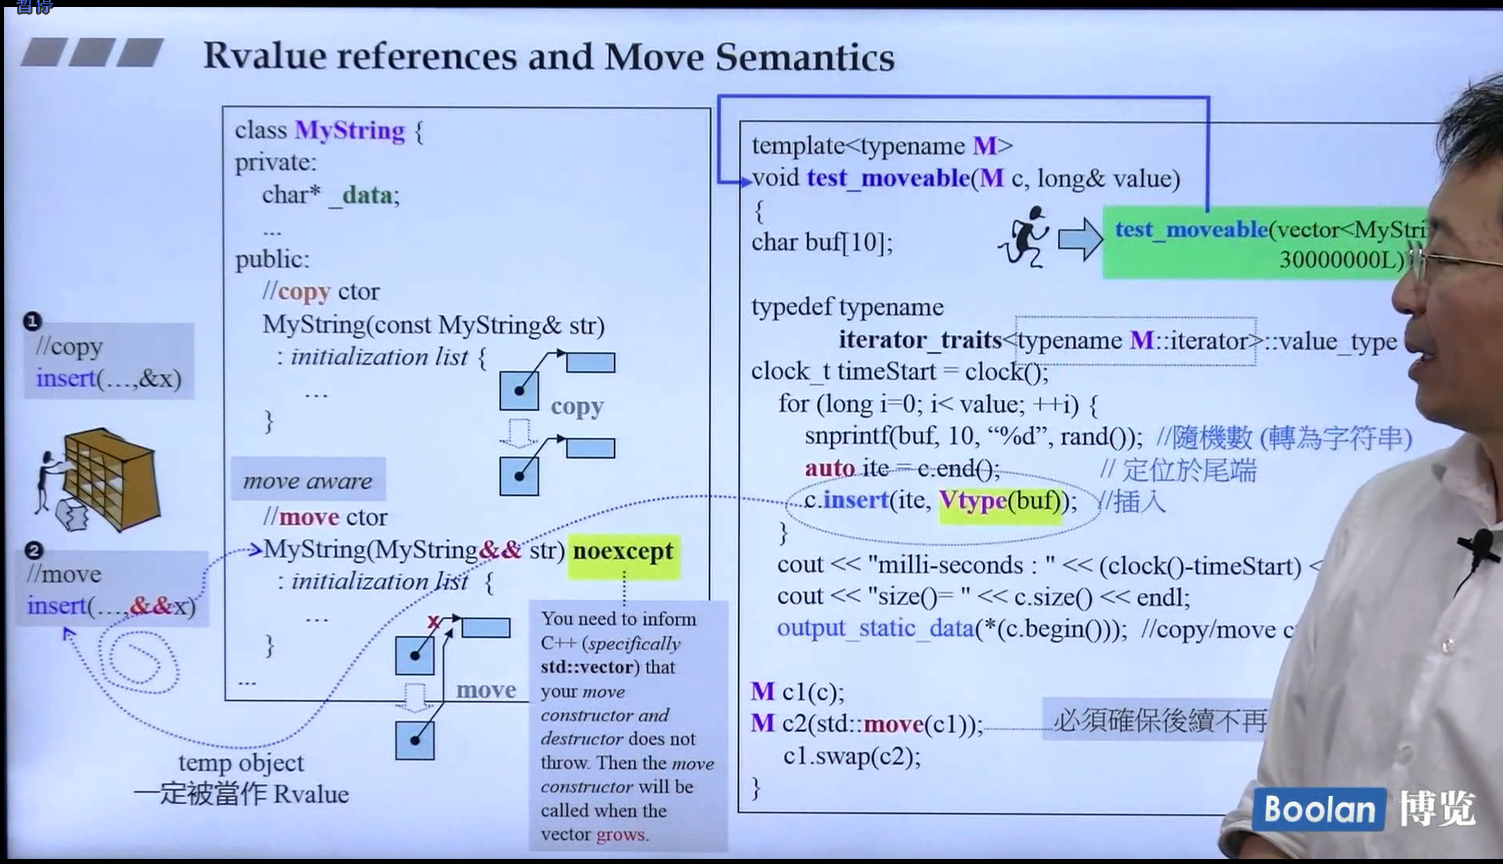
我们必须通知C++(特别是 std::vector),move ctor 和 move assignment 和 dtor不会抛出异常,前两个都是右值引用
以vector为例,vector容器在扩充空间的时候,是以2倍空间扩充,需要新找一块内存将当前的数据移动到新数据块中,这就需要用到 move ctor,并且如果不是noexcept,vector不敢调用它,只有是noexcept的时候vector才会调用它
注意:growable containers只有两种:vector和deque
至于move ctor和move assignment,到后面再说
这个需要保证子类和父类这个虚函数的名称,返回值,参数类型,个数,位置完全相同!!!!!
1 2 3 4 5 6 7 8 9 10 11 12 13 14 15 16 17 18 19 20 21 22 #include <iostream> using namespace std;struct Base { virtual void func (float ) "Base func float" << endl; } }; struct Derived1 : public Base{ virtual void func (int ) "Derived1 func int" << endl; } virtual void func (float ) override "Derived1 func float" << endl; } }; int main () Derived1 ().func (1.1 ); return 0 ; }
用来修饰class表示不允许类继承自己;用来修饰虚函数virtual表示不允许子类override这个函数
1 2 3 4 5 6 7 8 9 10 11 12 13 14 15 16 17 18 19 20 21 22 23 24 25 26 27 #include <iostream> using namespace std;struct Base1 final { }; struct Base2 { virtual void f () final }; struct Derived2 : Base2{ }; int main () return 0 ; }
用来得到一个表达式的类型,有三大应用:
1.declare return types
1 2 3 4 5 6 7 8 9 10 11 12 13 14 15 16 17 18 #include <iostream> using namespace std;namespace Test {template <typename Value_Type1, typename Value_Type2>auto add (const Value_Type1& x, const Value_Type2& y) -> decltype (x + y) { return x + y; } } using namespace Test;int main () cout << add (1 , 2 ) << endl; cout << add (1.1 , 2 ) << endl; return 0 ; }
2.in metaprogramming 元编程 就是用在泛型里面
3.lambdas
一个应用:
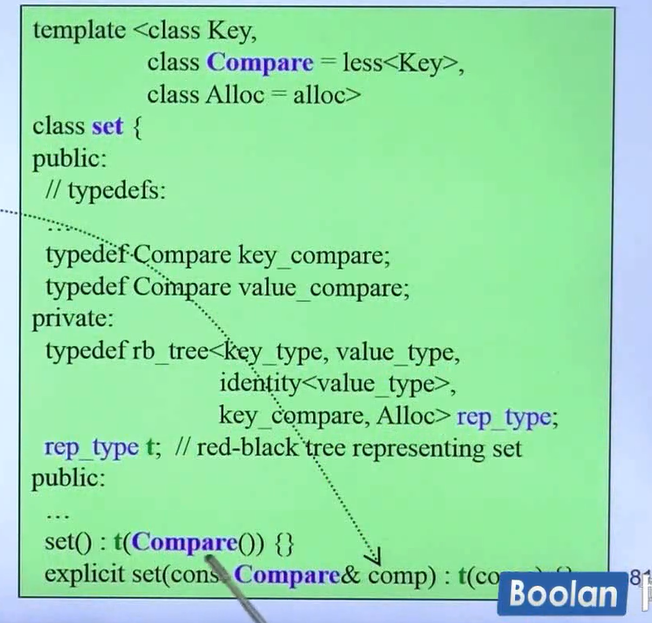
1 2 3 4 5 6 7 8 9 10 11 12 13 14 15 16 17 18 19 20 21 22 23 24 25 26 27 28 29 30 31 32 33 34 35 36 37 38 39 40 41 42 43 44 45 46 47 48 49 50 51 52 53 54 55 56 57 58 #include <iostream> using namespace std;#include <set> #include <string> namespace Test {class Person {public : Person () = default ; Person (string firstname, string lastname) : _firstname(firstname), _lastname(lastname) {} public : string _firstname; string _lastname; }; ostream& operator <<(ostream& os, const Person& p) { os << '(' << p._firstname << ',' << p._lastname << ')' ; return os; } auto CmpPerson = [](const Person& p1, const Person& p2) { return (p1. _lastname < p2. _lastname) || (p1. _lastname == p2. _lastname) && (p1. _firstname < p2. _firstname); }; struct Cmp : binary_function<Person, Person, bool > { bool operator () (const Person& p1, const Person& p2) const return (p1. _lastname < p2. _lastname) || (p1. _lastname == p2. _lastname) && (p1. _firstname < p2. _firstname); } } cmps; template <typename Container>inline void print (const Container& con) for (auto val : con) cout << val << ' ' ; cout << endl; } } using namespace Test;int main () Person p1 ("John" , "Wall" ) ; Person p2 ("David" , "Paul" ) ; Person p3 ("Steve" , "Paul" ) ; set<Person, decltype (CmpPerson) > s ({p1, p2, p3}, CmpPerson) ; print (s); return 0 ; }
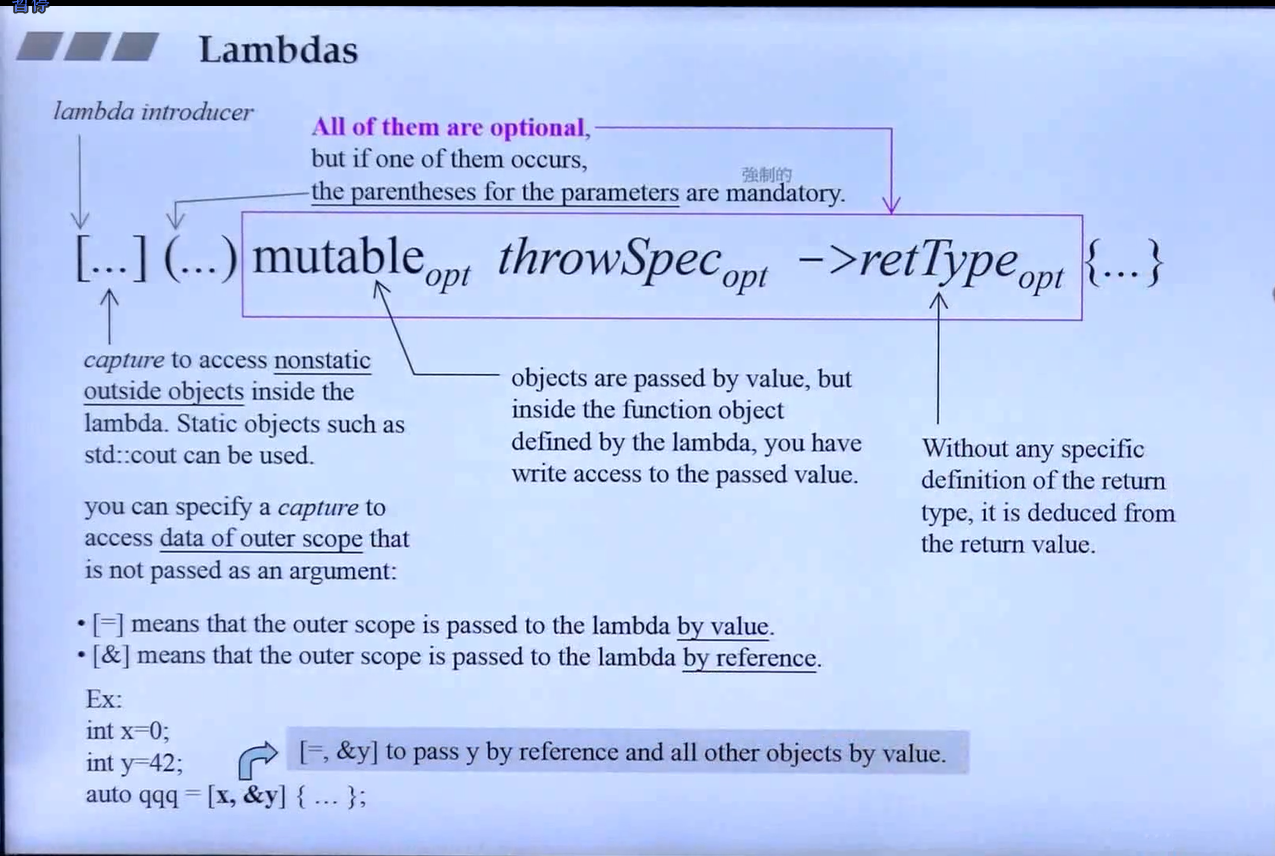
[ ]里可以指定是以 value 还是以 reference 的形式传入,( )后面那三个东西是可选的,但是只要有一个出现那么( )就必须写出来,所以建议都写上( )
1 2 3 4 5 6 7 8 9 10 11 12 13 14 15 16 17 18 19 20 21 22 23 24 25 26 27 28 29 30 31 32 33 34 35 36 37 38 39 40 41 42 43 44 45 46 47 #include <iostream> using namespace std;int main () []() -> void { cout << "hello lambda" << endl; }(); auto I = []() -> void { cout << "hello lambda" << endl; }; I (); int id1 = 0 , id2 = 0 ; auto f = [id1, &id2]() mutable { cout << "id1: " << id1 << ',' << "id2: " << id2 << endl; ++id1; ++id2; }; id1 = 42 , id2 = 42 ; f (); f (); f (); cout << id1 << ' ' << id2 << endl; return 0 ; }
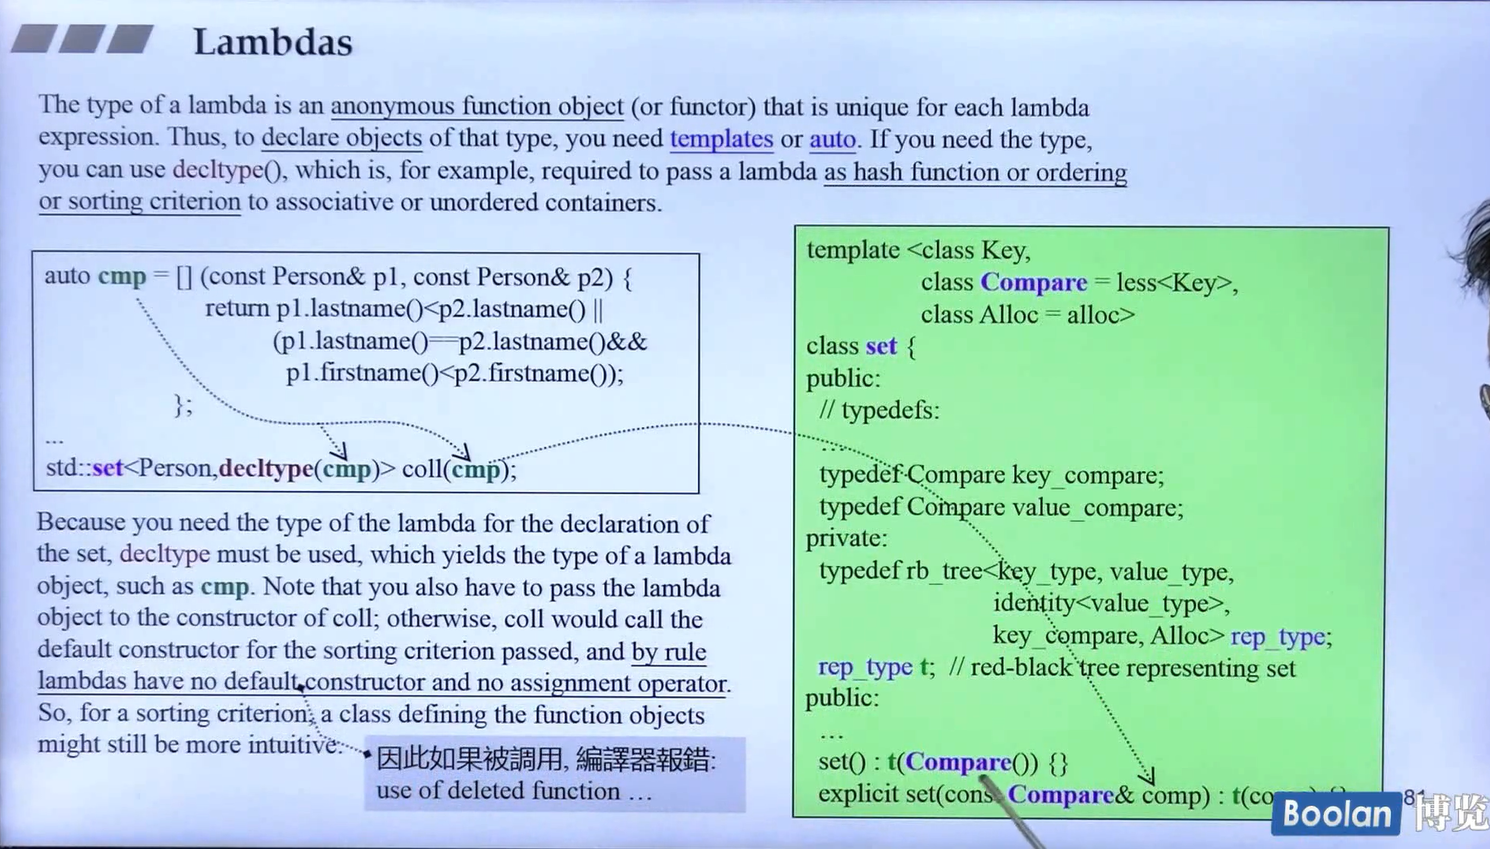
与上一个的例子联系起来,也让我们对set的底层实现有了更多的理解
这也解释了为什么在传入lambda的时候需要在括号里面指定这个函数变量,看他的构造就行了
所以在functor和lambda之后,选择functor显然会稍微好一点
另一个例子:
1 2 3 4 5 6 7 8 9 10 11 12 13 14 15 16 17 18 19 20 21 22 23 24 25 26 27 28 29 30 31 32 33 34 35 36 37 38 39 40 41 42 43 44 45 #include <iostream> using namespace std;#include <algorithm> #include <vector> class LambdaFunctor {public : LambdaFunctor (int x, int y) : _x(x), _y(y) {} bool operator () (int val) return val > _x && val < _y; } private : int _x; int _y; }; template <typename Value_Type>inline void printVector (const vector<Value_Type>& vec) for (auto val : vec) cout << val << ' ' ; cout << endl; } int main () int x = 30 , y = 100 ; vector<int > v1{5 , 28 , 50 , 83 , 70 , 590 , 245 , 59 , 24 }; vector<int > v2{5 , 28 , 50 , 83 , 70 , 590 , 245 , 59 , 24 }; auto newEnd1 = remove_if (v1. begin (), v1. end (), [x, y](int val) { return val > x && val < y; }); v1. erase (newEnd1, v1. end ()); v2. erase (remove_if (v1. begin (), v1. end (), LambdaFunctor (x, y)), v2. end ()); printVector (v1); printVector (v2); return 0 ; }
之前已经提到过很多次了,举一些例子:
1 2 3 4 5 6 7 8 9 10 11 12 13 14 15 16 17 18 19 20 21 22 23 24 25 26 27 28 29 30 #include <iostream> using namespace std;static int value = 0 ;namespace Test {inline void _func() {}template <typename Value_Type, typename ... Types>inline void _func(const Value_Type& firstArg, const Types&... args) { ++value; _func(args...); } template <typename ... Types>inline void func (const Types&... args) _func(args...); cout << "value: " << value << endl; } } using namespace Test;int main () func (1 , 2 , 3 , 4 , 5 ); func ("string" , "fuck" , 2 , 1.2 ); return 0 ; }
第二个例子:用c++模拟printf函数(简易版)
1 2 3 4 5 6 7 8 9 10 11 12 13 14 15 16 17 18 19 20 21 22 23 24 25 26 27 28 29 30 31 32 33 34 35 36 37 38 39 #include <iostream> using namespace std;namespace Print {inline void myprintf (const char * str) while (*str) { if (*str == '%' && *(++str) != '%' ) throw runtime_error ("invalid format string: missing arguments." ); cout << *str++; } } template <typename Value_Type, typename ... Types>inline void myprintf (const char * str, const Value_Type& val, const Types&... args) while (*str) { if (*str == '%' && *(++str) != '%' ) { cout << val; myprintf (++str, args...); return ; } cout << *str++; } throw logic_error ("extra arguments provided to myprintf" ); } } using namespace Print;int main () myprintf ("hello\n" ); int * pi = new int ; myprintf ("%d %s %p %f\n" , 15 , "This is Ace." , pi, 3.1415926535 ); delete pi; return 0 ; }
1 2 3 4 5 6 7 8 9 10 11 12 13 14 15 16 17 18 19 20 21 22 23 24 25 26 27 28 29 30 31 32 33 34 35 36 37 #include <iostream> using namespace std;#include <bitset> #include <string> #include <tuple> namespace PRINT {template <int index, int max, typename ... Args>struct Tuple_Print { inline static void print (ostream& os, const tuple<Args...>& t) os << get <index>(t) << (index + 1 != max ? "," : "" ); Tuple_Print<index + 1 , max, Args...>::print (os, t); } }; template <int max, typename ... Args>struct Tuple_Print <max, max, Args...> { inline static void print (ostream& os, const tuple<Args...>& t) }; } template <typename ... Args>inline ostream&operator <<(ostream& os, const tuple<Args...>& t) { os << "[" ; PRINT::Tuple_Print<0 , sizeof ...(Args), Args...>::print (os, t); return os << "]" ; } int main () cout << make_tuple (7.5 , string ("hello" ), bitset <16 >(377 ), 42 ) << endl; return 0 ; }
记住:
Lvalue:只能出现在operator = 左边
Rvalue:只能出现再operator = 右边
临时对象是一个右值,右值不能出现在 = 号的左边,临时对象tmp一定被当作右值!!!!!
注意copy ctor和move ctor之间的区别:
move():标准库提供的可以把左值变为右值的函数
Perfect Forwarding:在途中把Vtype(buf)(右值)交给Mystring的move ctor的时候会先经过insert函数在调用move ctor,这就有一个中间传递的过程,所以如何做到Perfect Forwarding是一个非常重要的事情,确保该传递的信息不能丢失
Unperfect Forwarding
Perfect Forwarding的具体实现:
写一个 move aware class
在 move ctor 当中,为什么要把原来的指针设为nullptr呢?(打断)
这是因为假如传入的右值对象是临时对象,临时对象的生命周期就只有这一句代码,执行完过后就会被释放,如果不打断,对于这里的string而言,就会调用析构函数把这个临时对象以及临时对象指向的区域给释放掉,因此就影响到了_data的部分,虽然这个临时对象今后不再用了,但是我们还是要把它与我们偷来的数据进行打断,并且配套的在析构函数的部分将其释放,否则会出现上面的问题
move ctor和move asgn的测试
MyString.h
1 2 3 4 5 6 7 8 9 10 11 12 13 14 15 16 17 18 19 20 21 22 23 24 25 26 27 28 29 30 31 32 33 34 35 36 37 38 39 40 41 42 43 44 45 46 47 48 49 50 51 52 53 54 55 56 57 58 59 60 61 62 63 64 65 66 67 68 69 70 71 72 73 74 75 76 77 78 79 80 81 82 83 84 85 86 87 88 89 90 91 92 93 94 95 96 97 98 99 100 101 102 103 104 105 106 107 108 109 110 111 112 113 114 115 116 117 118 #ifndef _MYSTRING_H_ #define _MYSTRING_H_ using namespace std;#include <cstring> #include <iostream> #include <string> class Mystring {public : static size_t DCtor; static size_t Ctor; static size_t CCtor; static size_t CAsgn; static size_t MCtor; static size_t MAsgn; static size_t Dtor; private : char * _data; size_t _len; void _init_data(const char * s) { _data = new char [_len + 1 ]; memcpy (_data, s, _len); _data[_len] = '\0' ; } public : Mystring () : _data(nullptr ), _len(0 ) { ++DCtor; } Mystring (const char * p) : _len(strlen (p)) { ++Ctor; _init_data(p); } Mystring (const Mystring& str) : _len(str._len) { ++CCtor; _init_data(str._data); } Mystring& operator =(const Mystring& str) { ++CAsgn; if (this != &str) { _len = str._len; _init_data(str._data); } else throw invalid_argument ("cannot assign yourself." ); return *this ; } Mystring (Mystring&& str) noexcept : _data(str._data), _len(str._len) { ++MCtor; str._len = 0 ; str._data = nullptr ; } Mystring& operator =(Mystring&& str) { ++MAsgn; if (this != &str) { _data = str._data; _len = str._len; str._len = 0 ; str._data = nullptr ; } return *this ; } virtual ~Mystring () { ++DCtor; if (_data) delete _data; } bool operator <(const Mystring& rhs) const { return string (this ->_data) < string (rhs._data); } bool operator ==(const Mystring& rhs) const { return string (this ->_data) == string (rhs._data); } char * get () const return _data; } }; size_t Mystring::DCtor = 0 ; size_t Mystring::Ctor = 0 ; size_t Mystring::CCtor = 0 ; size_t Mystring::CAsgn = 0 ; size_t Mystring::MCtor = 0 ; size_t Mystring::MAsgn = 0 ; size_t Mystring::Dtor = 0 ; namespace std {template <>struct hash <Mystring> { size_t operator () (const Mystring& s) return hash <string>()(string (s.get ())); } }; } #endif
MyStrNoMove.h
1 2 3 4 5 6 7 8 9 10 11 12 13 14 15 16 17 18 19 20 21 22 23 24 25 26 27 28 29 30 31 32 33 34 35 36 37 38 39 40 41 42 43 44 45 46 47 48 49 50 51 52 53 54 55 56 57 58 59 60 61 62 63 64 65 66 67 68 69 70 71 72 73 74 75 76 77 78 79 80 81 82 83 84 85 86 87 88 89 90 91 92 93 94 95 96 #ifndef _MYSTRNOMOVE_H_ #define _MYSTRNOMOVE_H_ using namespace std;#include <cstring> #include <iostream> #include <string> class MyStrNoMove { public : static size_t DCtor; static size_t Ctor; static size_t CCtor; static size_t CAsgn; static size_t MCtor; static size_t MAsgn; static size_t Dtor; private : char * _data; size_t _len; void _init_data(const char * s) { _data = new char [_len + 1 ]; memcpy (_data, s, _len); _data[_len] = '\0' ; } public : MyStrNoMove () : _data(nullptr ), _len(0 ) { ++DCtor; } MyStrNoMove (const char * p) : _len(strlen (p)) { ++Ctor; _init_data(p); } MyStrNoMove (const MyStrNoMove& str) : _len(str._len) { ++CCtor; _init_data(str._data); } MyStrNoMove& operator =(const MyStrNoMove& str) { ++CAsgn; if (this != &str) { _len = str._len; _init_data(str._data); } else throw invalid_argument ("cannot assign yourself." ); return *this ; } virtual ~MyStrNoMove () { ++DCtor; if (_data) delete _data; } bool operator <(const MyStrNoMove& rhs) const { return string (this ->_data) < string (rhs._data); } bool operator ==(const MyStrNoMove& rhs) const { return string (this ->_data) == string (rhs._data); } char * get () const return _data; } }; size_t MyStrNoMove::DCtor = 0 ; size_t MyStrNoMove::Ctor = 0 ; size_t MyStrNoMove::CCtor = 0 ; size_t MyStrNoMove::CAsgn = 0 ; size_t MyStrNoMove::MCtor = 0 ; size_t MyStrNoMove::MAsgn = 0 ; size_t MyStrNoMove::Dtor = 0 ; namespace std {template <>struct hash <MyStrNoMove> { size_t operator () (const MyStrNoMove& s) return hash <string>()(string (s.get ())); } }; } #endif
test.h
1 2 3 4 5 6 7 8 9 10 11 12 13 14 15 16 17 18 19 20 21 22 23 24 25 26 27 28 29 30 31 32 33 34 35 36 37 38 39 40 41 42 43 44 45 46 47 48 49 50 51 52 53 54 55 56 57 58 59 60 61 62 63 64 65 66 67 68 69 70 71 72 73 74 75 76 77 78 79 80 81 82 83 84 85 86 87 88 89 90 91 92 93 94 95 96 97 98 99 100 101 102 103 104 105 106 107 108 109 110 111 112 113 114 115 116 117 118 119 120 121 122 123 124 125 126 127 128 129 130 131 132 133 134 135 136 137 138 139 140 141 142 143 #ifndef _TEST_H_ #define _TEST_H_ #include <ctime> #include <deque> #include <iostream> #include <list> #include <set> #include <unordered_set> #include <vector> using namespace std;#include "25_MyStrNoMove.h" #include "25_Mystring.h" namespace Test {template <typename MyString>void output_static_data (const MyString &str) cout << typeid (str).name () << "--" << endl; cout << "CCtor= " << MyString::CCtor << " MCtor= " << MyString::MCtor << " CAsgn= " << MyString::CAsgn << " MAsgn= " << MyString::MAsgn << " Dtor= " << MyString::Dtor << " Ctor= " << MyString::Ctor << " DCtor= " << MyString::DCtor << endl; } template <typename M, typename NM>void test_moveable (M c1, NM c2, long &value) char buf[10 ]; cout << "\ntest, with moveable elements" << endl; typedef typename iterator_traits<typename M::iterator>::value_type V1type; clock_t timeStart = clock (); for (long i = 0 ; i < value; ++i) { snprintf (buf, 10 , "%d" , rand ()); auto ite = c1. end (); c1. insert (ite, V1type (buf)); } cout << "construction, milli-seconds : " << double (clock () - timeStart) / 1000 << endl; cout << "size()= " << c1. size () << endl; output_static_data (*(c1. begin ())); timeStart = clock (); M c11 (c1) ; cout << "copy, milli-seconds : " << double (clock () - timeStart) / 1000 << endl; timeStart = clock (); M c12 (std::move(c1)) ; cout << "move copy, milli-seconds : " << double (clock () - timeStart) / 1000 << endl; timeStart = clock (); c11. swap (c12); cout << "swap, milli-seconds : " << double (clock () - timeStart) / 1000 << endl; cout << "\ntest, with non-moveable elements" << endl; typedef typename iterator_traits<typename NM::iterator>::value_type V2type; timeStart = clock (); for (long i = 0 ; i < value; ++i) { snprintf (buf, 10 , "%d" , rand ()); auto ite = c2. end (); c2. insert (ite, V2type (buf)); } cout << "construction, milli-seconds : " << double (clock () - timeStart) / 1000 << endl; cout << "size()= " << c2. size () << endl; output_static_data (*(c2. begin ())); timeStart = clock (); NM c21 (c2) ; cout << "copy, milli-seconds : " << double (clock () - timeStart) / 1000 << endl; timeStart = clock (); NM c22 (std::move(c2)) ; cout << "move copy, milli-seconds : " << double (clock () - timeStart) / 1000 << endl; timeStart = clock (); c21. swap (c22); cout << "swap, milli-seconds : " << double (clock () - timeStart) / 1000 << endl; } void clear () Mystring::DCtor = 0 ; Mystring::Ctor = 0 ; Mystring::CCtor = 0 ; Mystring::CAsgn = 0 ; Mystring::MCtor = 0 ; Mystring::MAsgn = 0 ; Mystring::Dtor = 0 ; MyStrNoMove::DCtor = 0 ; MyStrNoMove::Ctor = 0 ; MyStrNoMove::CCtor = 0 ; MyStrNoMove::CAsgn = 0 ; MyStrNoMove::MCtor = 0 ; MyStrNoMove::MAsgn = 0 ; MyStrNoMove::Dtor = 0 ; } void test_vector (long &value) cout << "\ntest_vector().......... \n" ; test_moveable (vector <Mystring>(), vector <MyStrNoMove>(), value); cout << endl; } void test_list (long &value) cout << "\ntest_list().......... \n" ; test_moveable (list <Mystring>(), list <MyStrNoMove>(), value); cout << endl; } void test_deque (long &value) cout << "\ntest_deque().......... \n" ; test_moveable (deque <Mystring>(), deque <MyStrNoMove>(), value); cout << endl; } void test_multiset (long &value) cout << "\ntest_multiset().......... \n" ; test_moveable (multiset <Mystring>(), multiset <MyStrNoMove>(), value); cout << endl; } } #endif
main.cpp
1 2 3 4 5 6 7 8 9 10 11 12 13 14 15 16 17 18 19 20 21 22 23 24 25 26 #include <iostream> using namespace std;#include "25_MyStrNoMove.h" #include "25_Mystring.h" #include "25_test.h" int main () long value = 3 * 10e5 ; Test::test_vector (value); Test::clear (); Test::test_list (value); Test::clear (); Test::test_deque (value); Test::clear (); Test::test_multiset (value); Test::clear (); return 0 ; }
执行结果:
可以用来连接 cout
1 2 3 4 5 6 7 8 9 10 11 12 13 14 15 #include <algorithm> #include <iostream> #include <iterator> #include <vector> int main () std::vector<int > v; for (int i = 0 ; i < 10 ; ++i) v.push_back (i * 10 ); std::ostream_iterator<int > out_it (std::cout, "," ) ; std::copy (v.begin (), v.end (), out_it); std::cout << std::endl; return 0 ; }
可以用来连接 cin
1 2 3 4 5 6 7 8 9 10 11 12 13 14 15 16 17 18 19 #include <iostream> #include <iterator> int main () double value1, value2; std::cout << "Please,insert two values: " ; std::istream_iterator<double > eos; std::istream_iterator<double > iter (std::cin) ; if (iter != eos) value1 = *iter; ++iter; if (iter != eos) value2 = *iter; std::cout << value1 << " * " << value2 << " == " << value1 * value2 << std::endl; return 0 ; }
以前的版本由于标准的限制,最好写自定义类的时候也要带上这个 __type_traits<>
C++2.0 新版本
trivial 不重要的 POD plain old data 平淡的旧风格的,指的就是C风格的,也就是只有成员变量没有成员方法
type traits 测试
type_traits 实现 is_void(了解)
1 2 3 4 5 6 7 8 9 10 11 12 13 14 15 16 17 18 #include <iostream> using namespace std;#include <type_traits> template <class Value_Type >struct my_isVoid : public false_type {};template <>struct my_isVoid <void > : public true_type {};int main () cout << my_isVoid<int >::value << endl; cout << my_isVoid<void >::value << endl; return 0 ; }
测试程序:
1 2 3 4 5 6 7 8 9 10 11 12 13 14 15 16 17 18 19 20 21 22 23 24 25 26 27 28 29 30 31 32 33 34 35 36 37 38 39 40 41 42 43 44 45 46 47 48 49 50 51 52 #include <iostream> using namespace std;#include <complex> #include <ext/pool_allocator.h> int main () void * p1 = malloc (512 ); cout << p1 << endl; free (p1); complex<int >* p2 = new complex<int >; cout << p2 << endl; delete p2; void * p3 = ::operator new (512 ); cout << p3 << endl; ::operator delete (p3) #ifdef _MSC_VER int * p4 = allocator <int >().allocate (3 , (int *)0 ); allocator <int >().deallocate (p4, 3 ); #endif #ifdef __BORLANDC__ int * p4 = allocator <int >().allocate (5 ); allocator <int >().deallocate (p4, 5 ); #endif #ifdef __GNUC__ void * p4 = allocator <int >().allocate (7 ); cout << p4 << endl; allocator <int >().deallocate ((int *)p4, 7 ); void * p5 = __gnu_cxx::__pool_alloc<int >().allocate (9 ); cout << p5 << endl; __gnu_cxx::__pool_alloc<int >().deallocate ((int *)p5, 9 ); #endif return 0 ; }
使用new关键字之后编译器会把这串代码翻译为如下:
new关键字使用之后重要的就执行了两步,第一步是分配内存,第二步是调用构造函数
与new相对应的就有delete关键字
delete关键字使用的时候执行了两步,第一步是调用析构函数,第二步是释放内存
上面两副图片当中,通过指针,构造函数不能被直接调用,而析构函数可以被直接调用
如果非要调用的话,可以用 placement new (现在不理解什么意思)
以下是一个测试程序:
1 2 3 4 5 6 7 8 9 10 11 12 13 14 15 16 17 18 19 20 21 22 23 24 25 26 27 28 29 30 31 32 33 34 #include <iostream> using namespace std;#include <string> class A {public : A () = default ; A (int id) : _id(id) { cout << "ctor. this = " << this << " id = " << id << endl; } ~A () { cout << "dtor. this = " << this << endl; } int _id; }; int main () string* pstr = new string; cout << "str= " << *pstr << endl; cout << "str= " << *pstr << endl; A* pA = new A (1 ); cout << pA->_id << endl; cout << pA->_id << endl; delete pA; return 0 ; }
注意:array new 一定要搭配 array delete,否则就极容易发生内存泄漏
这个内存泄露对于尤其是class with pointers,通常带有影响
因为对于没有指针的类,只需要释放这个类对象的指针就可以了,因此调用一次和三次的dtor没有明显的区别,换句话说就是这个类的dtor是trivial(不重要的),但是带有指针的类就不一样了
比如下面string那个例子,只换起一次dtor,那么三个string指向的东西只被释放了一个,然后整体就被释放了,剩余的两块内存怎么办呢?因此会导致内存泄漏
1 2 3 4 5 6 7 8 9 10 11 12 13 14 15 16 17 18 19 20 21 22 23 24 25 26 27 28 29 #include <iostream> using namespace std;#define size 3 class A {public : A () : _id(0 ) { cout << "default ctor. this = " << this << " id = " << _id << endl; } A (int id) : _id(id) { cout << "ctor. this = " << this << " id = " << _id << endl; } ~A () { cout << "dtor. this = " << this << " id = " << _id << endl; } public : int _id; }; int main () A* buf = new A[size]; A* tmp = buf; cout << "buf= " << buf << " tmp= " << tmp << endl; for (int i = 0 ; i < size; ++i) new (tmp++) A (i); cout << "buf= " << buf << " tmp= " << tmp << endl; delete [] buf; return 0 ; }
执行结果
内存的底层开辟和释放都是调用的malloc和free,那么调用了malloc之后会给我们的内存分布就如下所示:
可以浅谈一下这个内存是怎么分配的(后面都会进行深入的探究,以及每一块的作用)
Demo对象:3个int,占据12个字节,3个总共36个字节;
由于他带有指针,所以需要额外记录这个数组对象包含Demo的个数,4个字节;
这个真正有效的数据区域上下(黄色的部分),分别占据32 + 4 个字节;
内存块上下的两个cookie,各自4个字节,总共8个字节;
上面一共加起来84个字节,需要调整到16个字节的倍数,也就是96个字节,多出的12个字节存放在Pad中
placement new允许我们将对象建造在已经分配好的内存当中!!
编译器翻译成为的那三个操作,在 placement new 下面,第一条由于传入了一个指针,那么会调用重载的版本,其实就是表示不用新开内存,把原来的给我就行;然后第三条编译器就调用构造函数在已有的内存上进行创建对象初始化!!!!
1 2 3 4 5 6 7 8 9 10 11 12 13 14 15 16 17 18 19 20 21 #include <iostream> using namespace std;class Complex {public : Complex () : _re(0 ), _im(0 ) {} Complex (double re, double im) : _re(re), _im(im) {} public : double _re, _im; }; int main () char * buf = new char [sizeof (Complex) * 3 ]; Complex* pc = new (buf) Complex (1 , 2 ); delete []buf; return 0 ; }
重载比较多的就是在类中去重载 operator new和 operator delete,这样编译器在调用new或者delete关键字解析到那两步的时候就会优先调用我们重载的版本,在我们重载的版本当中可以设计一些专用于这个类的设计,这样或许能够提高效率和节省开销
在类里面重载
delete中的第二参数是optional的,可以写也可以不写
在类当中进行简单的重载,和全局的输出做对比
1 2 3 4 5 6 7 8 9 10 11 12 13 14 15 16 17 18 19 20 21 22 23 24 25 26 27 28 29 30 31 32 33 34 35 36 37 38 39 40 41 42 43 44 45 46 47 48 49 50 51 52 53 54 55 56 57 58 59 60 61 62 63 64 65 66 67 68 69 70 71 72 73 74 75 76 #include <iostream> using namespace std;#include <string> class Foo { public : int _id; public : Foo () : _id(0 ) { cout << "default ctor.this = " << this << " id = " << _id << endl; } Foo (int id) : _id(id) { cout << "ctor.this = " << this << " id = " << _id << endl; } virtual ~Foo () { cout << "dtor.this = " << this << " id = " << _id << endl; } static void *operator new (size_t size) static void operator delete (void *ptr, size_t size) static void *operator new [](size_t size); static void operator delete [](void *ptr, size_t size); }; void *Foo::operator new (size_t size) Foo *p = static_cast <Foo *>(malloc (size)); cout << "Foo::operator new(), size = " << size << "\treturn : " << p << endl; return p; } void Foo::operator delete (void *ptr, size_t size) cout << "Foo::operator delete(), ptr = " << ptr << "\tsize = " << size << endl; free (ptr); } void *Foo::operator new [](size_t size){ Foo *p = static_cast <Foo *>(malloc (size)); cout << "Foo::operator new[](), size = " << size << "\treturn : " << p << endl; return p; } void Foo::operator delete [](void *ptr, size_t size){ cout << "Foo::operator delete[](), ptr = " << ptr << "\tsize = " << size << endl; free (ptr); } int main () cout << "sizeof(Foo) = " << sizeof (Foo) << endl << endl; cout << "Foo------------------------------------------------------------" << endl; Foo *p = new Foo; delete p; cout << endl; Foo *pArray = new Foo[5 ]{1 , 2 , 3 , 4 , 5 }; delete [] pArray; cout << endl << "Global------------------------------------------------------------" << endl; Foo *p2 = ::new Foo; ::delete p2; cout << endl; Foo *pArray2 = ::new Foo[5 ]{1 , 2 , 3 , 4 , 5 }; ::delete [] pArray2; return 0 ; }
输出结果:
注意:
我们可以重载class member operator new(),可以写出多个版本,前提是每一个版本都必须声明独特的参数列,并且第一个参数是size_t,其余参数以new指定的placement arguments为初值,出现在new(…)当中的就是所谓的placement arguments.
这样就可以写出很多的placement new.
例如:
1 2 3 void * Foo::operator new (size_t size,long extra,char ch) Foo* pf=new (300 ,'c' ) Foo;
测试代码:
1 2 3 4 5 6 7 8 9 10 11 12 13 14 15 16 17 18 19 20 21 22 23 24 25 26 27 28 29 30 31 32 33 34 35 36 37 38 39 40 41 42 43 44 45 46 47 48 49 50 51 52 53 54 55 56 57 58 59 60 61 62 63 64 65 66 67 68 69 70 71 72 73 74 75 76 77 78 79 80 81 82 83 84 85 86 87 88 89 90 91 92 93 94 95 96 97 98 99 100 101 102 103 104 105 106 107 108 109 110 111 112 113 114 115 #include <iostream> using namespace std;#include <string> class Bad { }; class Foo { public : Foo () { cout << "Foo::Foo()" << endl; } Foo (int ) { cout << "Foo::Foo(int)" << endl; throw Bad (); } void *operator new (size_t size) { cout << "operator new(size_t size), size= " << size << endl; return malloc (size); } void *operator new (size_t size, void *start) { cout << "operator new(size_t size, void* start), size= " << size << " start= " << start << endl; return start; } void *operator new (size_t size, long extra) { cout << "operator new(size_t size, long extra) " << size << ' ' << extra << endl; return malloc (size + extra); } void *operator new (size_t size, long extra, char init) { cout << "operator new(size_t size, long extra, char init) " << size << ' ' << extra << ' ' << init << endl; return malloc (size + extra); } void operator delete (void *, size_t ) { cout << "operator delete(void*,size_t) " << endl; } void operator delete (void *, void *) { cout << "operator delete(void*,void*) " << endl; } void operator delete (void *, long ) { cout << "operator delete(void*,long) " << endl; } void operator delete (void *, long , char ) { cout << "operator delete(void*,long,char) " << endl; } private : int m_i; }; void test_overload_placement_new () cout << "test_overload_placement_new().........." << endl; Foo start; Foo *p1 = new Foo; Foo *p2 = new (&start) Foo; Foo *p3 = new (100 ) Foo; Foo *p4 = new (100 , 'a' ) Foo; Foo *p5 = new (100 ) Foo (1 ); Foo *p6 = new (100 , 'a' ) Foo (1 ); Foo *p7 = new (&start) Foo (1 ); Foo *p8 = new Foo (1 ); } int main () test_overload_placement_new (); return 0 ; }
注意这里:
1 2 3 4 Foo *p5 = new (100 ) Foo (1 );
只有这种情况下,ctor中抛出异常,对应的operator delete才会被调用起来;如果不写,那就是放心这个构造函数并且不去处理这个异常
设计一个小型的内存池,小型的内存分配器,目前是第一版本
1 2 3 4 5 6 7 8 9 10 11 12 13 14 15 16 17 18 19 20 21 22 23 24 25 26 27 28 29 30 31 32 33 34 35 36 37 38 39 40 41 42 43 44 45 46 47 48 49 50 51 52 53 54 55 56 57 58 59 60 61 62 63 64 65 66 67 68 69 70 71 72 73 74 75 76 77 78 79 80 81 82 83 84 85 86 87 88 89 90 91 92 93 94 95 96 97 98 99 100 101 102 #include <iostream> using namespace std;class Screen { public : Screen () = default ; Screen (int x) : _i(x){}; int get () const return _i; } inline void *operator new (size_t ) inline void operator delete (void *, size_t ) private : Screen *next; static Screen *freeStore; static const int screenChunk; private : int _i; }; Screen *Screen::freeStore = nullptr ; const int Screen::screenChunk = 24 ;void *Screen::operator new (size_t size) Screen *p; if (!freeStore) { size_t chunk = screenChunk * size; freeStore = p = reinterpret_cast <Screen *>(new char [chunk]); for (; p != &freeStore[screenChunk - 1 ]; ++p) p->next = p + 1 ; p->next = 0 ; } p = freeStore; freeStore = freeStore->next; return p; } void Screen::operator delete (void *p, size_t ) (static_cast <Screen *>(p))->next = freeStore; freeStore = static_cast <Screen *>(p); } void test_per_class_allocator_1 () cout << "test_per_class_allocator_1().......... \n" ; cout << sizeof (Screen) << endl; size_t const N = 100 ; Screen *p[N]; for (int i = 0 ; i < N; ++i) p[i] = new Screen (i); for (int i = 0 ; i < 10 ; ++i) cout << p[i] << endl; for (int i = 0 ; i < N; ++i) delete p[i]; } void test_global_allocator () cout << "test_global_allocator().......... \n" ; cout << sizeof (Screen) << endl; size_t const N = 100 ; Screen *p[N]; for (int i = 0 ; i < N; ++i) p[i] = ::new Screen (i); for (int i = 0 ; i < 10 ; ++i) cout << p[i] << endl; for (int i = 0 ; i < N; ++i) ::delete p[i]; } int main () test_per_class_allocator_1 (); cout << endl << endl; test_global_allocator (); return 0 ; }
执行结果:
可以看出,设计之后的内存之间没有了cookie,节省了空间,这就是我们自己的一个小型内存池
和前面的思路基本一样:就是要一大块内存,当数组形式要进来分配内存的时候,如果这一大块内存还有空间,就链在后面就行;如果没有了,就要再要一大块空间进行同样的操作就可以了,最后在前后加上cookie就可以了。而这一切的发生都必须依赖于静态变量static headOfFreeList!!!!他在整个程序中只有一份,当然可以标识。
1 2 3 4 5 6 7 8 9 10 11 12 13 14 15 16 17 18 19 20 21 22 23 24 25 26 27 28 29 30 31 32 33 34 35 36 37 38 39 40 41 42 43 44 45 46 47 48 49 50 51 52 53 54 55 56 57 58 59 60 61 62 63 64 65 66 67 68 69 70 71 72 73 74 75 76 77 78 79 80 81 82 83 84 85 86 87 88 89 90 91 92 93 94 95 96 97 98 99 100 101 102 103 104 105 106 107 108 109 110 111 112 113 114 115 116 117 118 119 120 121 122 123 124 125 126 127 128 129 130 131 132 133 134 135 136 137 138 139 140 141 142 143 144 145 #include <iostream> using namespace std;class Airplane { private : struct AirplaneRep { unsigned long miles; char type; }; private : union { AirplaneRep rep; Airplane *next; }; public : unsigned long getMiles () return rep.miles; } char getType () return rep.type; } void set (unsigned long m, char t) rep.miles = m; rep.type = t; } public : static void *operator new (size_t size) static void operator delete (void *deadObject, size_t size) private : static const int BLOCK_SIZE; static Airplane *headOfFreeList; }; Airplane *Airplane::headOfFreeList; const int Airplane::BLOCK_SIZE = 512 ;void *Airplane::operator new (size_t size) if (size != sizeof (Airplane)) return ::operator new (size); Airplane *p = headOfFreeList; if (p) headOfFreeList = p->next; else { Airplane *newBlock = static_cast <Airplane *>(::operator new (BLOCK_SIZE * sizeof (Airplane))); for (int i = 1 ; i < BLOCK_SIZE - 1 ; ++i) newBlock[i].next = &newBlock[i + 1 ]; newBlock[BLOCK_SIZE - 1 ].next = 0 ; p = newBlock; headOfFreeList = &newBlock[1 ]; } return p; } void Airplane::operator delete (void *deadObject, size_t size) if (deadObject == 0 ) return ; if (size != sizeof (Airplane)) { ::operator delete (deadObject) return ; } Airplane *carcass = static_cast <Airplane *>(deadObject); carcass->next = headOfFreeList; headOfFreeList = carcass; } void test_per_class_allocator_2 () cout << "test_per_class_allocator_2().......... \n" ; cout << sizeof (Airplane) << endl; size_t const N = 100 ; Airplane *p[N]; for (int i = 0 ; i < N; ++i) p[i] = new Airplane; p[1 ]->set (1000 , 'A' ); p[5 ]->set (2000 , 'B' ); p[9 ]->set (500000 , 'C' ); cout << p[1 ] << ' ' << p[1 ]->getType () << ' ' << p[1 ]->getMiles () << endl; cout << p[5 ] << ' ' << p[5 ]->getType () << ' ' << p[5 ]->getMiles () << endl; cout << p[9 ] << ' ' << p[9 ]->getType () << ' ' << p[9 ]->getMiles () << endl; for (int i = 0 ; i < 10 ; ++i) cout << p[i] << endl; for (int i = 0 ; i < N; ++i) delete p[i]; } void test_global_allocator () cout << "test_global_allocator().......... \n" ; cout << sizeof (Airplane) << endl; size_t const N = 100 ; Airplane *p[N]; for (int i = 0 ; i < N; ++i) p[i] = ::new Airplane; p[1 ]->set (1000 , 'A' ); p[5 ]->set (2000 , 'B' ); p[9 ]->set (500000 , 'C' ); cout << p[1 ] << ' ' << p[1 ]->getType () << ' ' << p[1 ]->getMiles () << endl; cout << p[5 ] << ' ' << p[5 ]->getType () << ' ' << p[5 ]->getMiles () << endl; cout << p[9 ] << ' ' << p[9 ]->getType () << ' ' << p[9 ]->getMiles () << endl; for (int i = 0 ; i < 10 ; ++i) cout << p[i] << endl; for (int i = 0 ; i < N; ++i) ::delete p[i]; } int main () test_per_class_allocator_2 (); cout << endl << endl; test_global_allocator (); return 0 ; }
执行结果:
但是这个设计有一个问题,就是你一次性拿了很多的内存,假如剩下的空白内存还很多的话,在释放的时候理应将他们还给内存,但是在上面的operator delete当中并没有将其归还给操作系统,这样不能说好也不能说不好。首先就是归还这个技术操作太难了,其次就是虽然我没有归还,但是我也没有发生内存泄漏啊,这一段内存还是在我的手上,只是被归入了freeList当中而已。
上面的内存分配的设计对于某个指定的类是非常有效果的,但是我们不可能对于每一个类都这么干吧,所以我们需要找到一个普遍的设计方法来解决这个问题。
所以我们把上面的操作(挖一大块内存……)封装成为一个类,这个类就叫做allocator
static allocator具体可以在类里面就这么用,内存管理复杂的方面就交给这个类去管理了,不用我们对每一个类都特殊处理
注意一点就是,static变量需要在类外初始化或者定义,如图就是类外的定义。
那么allocator里面具体干什么呢?回顾一下
测试代码:
1 2 3 4 5 6 7 8 9 10 11 12 13 14 15 16 17 18 19 20 21 22 23 24 25 26 27 28 29 30 31 32 33 34 35 36 37 38 39 40 41 42 43 44 45 46 47 48 49 50 51 52 53 54 55 56 57 58 59 60 61 62 63 64 65 66 67 68 69 70 71 72 73 74 75 76 77 78 79 80 81 82 83 84 85 86 87 88 89 90 #include <complex> #include <iostream> using namespace std;#include "__allocator.h" #define DECLARE_POOL_ALLOC() \ public: \ void *operator new(size_t size) { return myAlloc.allocate(size); } \ void operator delete(void *p) { myAlloc.deallocate(p, 0); } \ \ protected: \ static __allocator myAlloc; #define IMPLEMENT_POOL_ALLOC(class_name) \ __allocator class_name::myAlloc; class Foo { DECLARE_POOL_ALLOC () public : long L; string str; public : Foo (long l) : L (l) {} }; IMPLEMENT_POOL_ALLOC (Foo)class Goo { DECLARE_POOL_ALLOC () public : complex<double > c; string str; public : Goo (const complex<double > &x) : c (x) {} }; IMPLEMENT_POOL_ALLOC (Goo)void test_static_allocator () cout << "test_static_allocator().......... \n" ; { cout << endl; Foo *p[100 ]; cout << "sizeof(Foo)= " << sizeof (Foo) << endl; for (int i = 0 ; i < 23 ; ++i) { p[i] = new Foo (i); cout << p[i] << ' ' << p[i]->L << endl; } for (int i = 0 ; i < 23 ; ++i) { delete p[i]; } cout << endl; } { cout << endl; Goo *p[100 ]; cout << "sizeof(Goo)= " << sizeof (Goo) << endl; for (int i = 0 ; i < 17 ; ++i) { p[i] = new Goo (complex <double >(i, i)); cout << p[i] << ' ' << p[i]->c << endl; } for (int i = 0 ; i < 17 ; ++i) { delete p[i]; } cout << endl; } } int main () test_static_allocator (); return 0 ; }
执行结果:
因为上面的static allocator的格式写的非常固定,所以我们可以想办法给他简化一下,偷偷懒
用C++中的宏来替代,可以得出很多有趣的东西
改进后的代码:
1 2 3 4 5 6 7 8 9 10 11 12 13 14 15 16 17 18 19 20 21 22 23 24 25 26 27 28 29 30 31 32 33 34 35 36 #define DECLARE_POOL_ALLOC() \ public: \ void *operator new(size_t size) { return myAlloc.allocate(size); } \ void operator delete(void *p) { myAlloc.deallocate(p, 0); } \ \ protected: \ static __allocator myAlloc; #define IMPLEMENT_POOL_ALLOC(class_name) \ __allocator class_name::myAlloc; class Foo { DECLARE_POOL_ALLOC () public : long L; string str; public : Foo (long l) : L (l) {} }; IMPLEMENT_POOL_ALLOC (Foo)class Goo { DECLARE_POOL_ALLOC () public : complex<double > c; string str; public : Goo (const complex<double > &x) : c (x) {} }; IMPLEMENT_POOL_ALLOC (Goo)
当operator new没有能力为我们分配成功我们所申请的memory的时候,会抛出异常 std::bad_alloc,我们应该要采取一些措施来应对这个
如果想要编译器一定要返回0而不是抛出异常的话可以这么做:
当然标准库在抛出异常之前会调用依次可以由用户指定的handler,如何设计如下所示:
这样就可以在抛出异常之前自定义一些处理操作,例如Abort()或者exit()等等
设计良好的new handler有两个作用:
让更多的内存可用 调用abort()或者exit() 注意:new handler必须return void,然后没有参数
1 2 3 4 5 6 7 8 9 10 11 12 13 14 15 16 17 18 19 20 21 22 23 24 25 26 27 #include <assert.h> using namespace std;#include <iostream> void noMoreMemory () cerr << "out of memory\n" ; abort (); } void test_set_new_handler () cout << "test_set_new_handler().......... \n" ; set_new_handler (noMoreMemory); int * p = new int [100000000000000 ]; assert (p); p = new int [100000000000000 ]; assert (p); } int main () test_set_new_handler (); return 0 ; }
在这个程序当中,如果不调用abort()函数,那么程序就会卡在这一行,
1 int * p = new int [100000000000000 ];
会一直输出自定义的错误信息 out of memory
注意:
=default 只能用default只能用在big three中,即default ctor(默认构造),copy/move asgn(拷贝/移动赋值),copy/move ctor(拷贝/移动构造),dtor(析构函数)当中,因为其他的函数编译器没有提供默认的版本
=delete 则不限
1 2 3 4 5 6 7 8 9 10 11 12 13 14 15 16 17 18 19 20 21 22 23 24 25 26 27 28 29 30 31 32 33 34 35 36 37 38 39 40 41 42 43 44 45 46 47 #include <iostream> using namespace std;class Foo {public : long _x; public : Foo (long x = 0 ) : _x(x) {} static void *operator new [](size_t size) = delete ; static void operator delete [](void *pdead, size_t size) = delete ; }; class Goo {public : long _x; public : Goo (long x = 0 ) : _x(x) {} static void *operator new (size_t size) delete ; static void operator delete (void *pdead, size_t size) delete ; }; void test_delete_and_default_for_new () cout << "test_delete_and_default_for_new().......... \n" ; Foo *p1 = new Foo (5 ); delete p1; Goo *pG = new Goo[10 ]; delete [] pG; } int main () test_delete_and_default_for_new (); return 0 ; }
当我们调用malloc函数的时候,图当中block size的部分是真实的存放我们的数据的地方,除此之外还会有其他的东西,在上下会有两包东西分别叫debug header和debug tail(这个是什么现在不去管),在整个部分的上下会有固定两个大小的cookie,记录这一段区块的大小(只有区块大小相同才可以去除cookie),也就是类似于前面per-class allocator的设计,VC6是上下各四个字节共八个字节;然后他要求这个内存块必须要满足字节数是16的倍数(不同的设计可能不同),需要有一个pad块来进行调整,整个就是malloc分配给我们的内存
不同的编译器对于分配器allocator的实现都是不一样的,下面将举几个版本的例子:
VC6的版本里面没有做特殊设计,就是调用operator new/delete,进而调用malloc,free,没有对内存进行特殊管理
同样BC5的版本也没有做特殊设计
Gc2.9的分配器allocator也没有做特殊设计
但是Gc2.9的容器使用的分配器却不是这个allocator,而是一个设计的非常好的alloc
下面将会介绍
以下是Gc2.9和Gc4.9对这个的实现
Gc4.9有很多扩充的alloctors,其中 __gnu_cxx::__pool_alloc<> 就是这个非常好的分配器
调用这个非常好的分配器的时候还要引入头文件
1 #include <ext/pool_allocator.h>
注意:Gc4.9当中标准库使用的分配器并不是这个很好的alloc,而是上面提到的allocator!!!
这个分配器就是一般的调用malloc和free,不做特殊设计
那么使用alloc不适用allocator的好处是什么呢?
答案是去除了cookie,比如放入一百万个元素,使用cookie就节省了八百万个字节的空间,这样减少了内存开销
这个东西的基本原理和我们设计的per-class allocator是一样的,但是现在他设计了16条free_list,分别管理不同大小的内存,大小从小到大,8个字节,16个字节等等等;如果用户需要的大小不是8的倍数会被调整到8的倍数,然后进入对应的链表中;在该链表中一次性去取一大块的内存,在图中的设计中是20为标准量,比如可以取20*32字节的内存,这样相邻的之间就没有cookie,新的需求进来之后如果还有空间就移动指针存储就好了,没有就继续挖一大块,这样就形成了去除cookie,也是一个非常好的内存池的设计;现在如果需要的内存大小超过这个链表可以维护的最大大小,这个分配器就不用这么精妙的设计去做了,因为数据块的大小比cookie大多了,浪费是可以接受的,这个时候就调用一般的malloc就可以了
关于挖内存,这个设计还有一些细节:
当挖内存的时候,比如就32字节的那块,如果设计者设计的是20*32,但是实际上挖出来的是2个20块,每一块32个字节;其中前20块就给32字节的区块去用,后20块作为备用区块(战备池),暂时不处理,可以给负责其他大小的区块取用以此节省空间。比如这时候要64个字节,按理来说应该7号链表去挖,但是他观察到3号链表的后备区块有空间,他的指针就指向这一块,所以图中这两块是连续的,也就是说这个后备区块可以存放10个64字节的空间
所以每次要的时候都是要两倍的空间,留相同大小(这里是20个)的空间作为战备池(memory pool)
关于free_list的指针:
这个设计非常巧妙,由于分配的次序和归还的次序在实际操作的过程中可能并不是完全符合逆向,所以对于free_list他们的内存可能不是完全连续的,这很正常
但是呢,free_list之间是用指针传递的,本身是一个链表,也就不存在连续不连续的问题了
因此,free_list指向的每一个区块都是提前挖出来的内存块,为了存放下一个free块的指针,这里借用了这一个区块的前4个字节(64位电脑是8个字节)作为指针,指向下一块free内存,当这一块内存被分配给用户的时候,数据值会覆盖掉这个指针,但是没有关系,这个时候我的free_list已经通过这个指针指向下一块free内存了,这一块内存也就不属于free_list的范畴了,属于用户持有的内存了
那么为什么要这么设计呢?如果额外拿出4或者8个字节来分配给指针,一个cookie上下加起来才8个字节,那不是相当于消除了原来的cookie增添了新的指针负担吗?所以需要使用embedded pointers
那么这里考虑到一个问题,就是如果客户需要的空间本来就小于4或者8个即一个指针的大小,那这个时候指针是不是就不能借用了呢?这是正确的,但是对于工业级别的绝大多数情况,客户需要的大小肯定都是大于一根指针的大小的,所以不太需要担心这个问题
01
02
注意:这些链表都是指向的是free_list,而不是用户分配到的内存块
在申请内存的时候,比如申请32字节,free_list上没有,首先去找战备池有没有合适的,没有的话就在#3(对应32字节)下面申请 32 * 20 * 2 + RoundUp(0>>4) = 1280的空间
注意:
1.在实作的时候,总是优先先把分配好的内存放到战备池当中,然后再分配出去内存,比如给一块给用户,剩余19块挂在free_list[3]上面 ,不这么实现其实问题也不大,但是标准库这么实现了代码会漂亮很多
2.RoundUp(0>>4)是一个函数,表示一个追加量 ,是实现这个的这个公司设计的,具体原因不清楚,表示把一个数字调整到一定的边界,后面再说,一开始(目前)是0
然后对于cookie,在我们这样的设计之后,这一整块是用malloc拿到的,所以这一整块上下会有两个cookie
03
接上,现在我申请64字节,free_list上没有,肯定是优先查看战备池的空间,这里够用,所以把战备池当中的一块分给用户,剩余9块挂在free_list[7]上面,注意的是这两块空间在内存上是连续的!这时战备池用光了
规定:在后面在战备池上面取出空间去划分的时候,一次性划分的个数不能超过20个!!!!
04
现在继续申请96字节,free_list上没有,战备池为空,需要重新申请内存,申请96 * 20 * 2 + RoundUp(1280>>4) 的内存大小,其中一块给用户,19块放到free_list[11]上,剩余的2000就是战备池
注意:关于追加量的计算
RoundUp(x>>4):用目前的累计申请量(例如现在没申请前是1280)右移4位,即除以16,然后调到8的边界
可以看出这个追加量会越来越大,随着内存的开辟
05
现在申请88字节,即#10,free_list上没有,先看战备池,最多可以划出20块,20 * 88 < 2000 ,则划分20块出去,战备池剩余2000 - 88 * 20 = 240个字节的大小
划分出去的空间一块给用户,剩余19块传到free_list[10]上面去
06
连续申请三次88字节,由于free_list[10]上有空间,直接分配给用户即可,将free_list[10]指针后移
07
接着申请8字节,free_list上没有,先看战备池,由于8 * 20 < 240 ,分配出去,战备池空间还剩80,划分出一块给用户,剩余的挂在free_list[0]上面,战备池剩余80
08
碎片处理:
这时候申请104字节大小,free_list上没有,上一次的战备池剩余80,连一个都没有办法满足;这个时候会把这个80挂载到#9号的free_list[9]上面,这个时候战备池就为空了,然后重新用malloc申请内存 ,各项参数如上所示
09
申请112个字节,free_list上没有,先找战备池,由于112 * 20 = 2240 < 2408,所以分配出去,现在战备池剩余168
10
申请48个字节,free_list上没有,找战备池,168 / 48 = 3,分配3个出去,一个给用户,剩下两个挂在free_list[5]上,战备池剩余24
11
现在申请72,free_list上没有,先找战备池,24满足不了,那么会申请内存,但是现在为了观察系统边界,手动将系统堆的大小设置小,现在如果在索取内存就超出边界了,显然不行,所以满足不了这次申请,那么就找距离72最近的free_list,在这里就是80,即9号,上面有一个空白的区块,好,把他切成72 + 8 的形式,72分配给用户,8就是战备池,这个时候 #8 和 #9 都没有free_list,他们的链表都是空的!!!!
12
再申请72,没有free_list,,战备池不够,同时好的又malloc失败了,这个时候只有去找 #10 的空白区块了,先处理原来的战备池,将其挂到#0号free_list的首部,即如图所示, 然后把 #10 号的第一个空白区块分成72和16,72给用户,16作为战备池
13 山穷水尽
申请120,#14 没有free_list,战备池空间不够,malloc好的不出意外又失败了,这个时候就去找#15,哦豁没有,找不到,那么就g啦!!!战备池归0
针对目前的这个现状,可以做一些思考:
图中还有很多空白的区块未分配给用户,那么可不可以把白色的小区块合并成为大区块给用户呢?(难度太高了) system heap还剩余 10000 - 9688 = 312,可不可以把剩下的312继续用光呢? 第二级分配器:第二级分配器就是上面提到的alloc,当这个分配器分配不出内存的时候,实际上不会立即山穷水尽,会调用第一级分配器调用new_handler来对分配不出内存进行处理
模板参数 bool threads和int inst,在我们目前所研究的范围当中都没有派上用场
Round_Up():计算追加量
embedded pointers:嵌入式指针
在这个类里面最先定义这个指针成员,也就达到了我们需要的借用头部作为指针,后面容器进来之后覆盖并且移动指针到下一个位置就可以了
1 2 3 union obj { union obj * free_list_link; };
free_list[]:静态,全局只有一份,代表那16个链表
FREELIST_INDEX():计算数组下标,计算出由第几号链表提供服务
战备池相关
start_free:指向pool首部 end_free:指向pool尾部 head_size:统计累计分配量
还有两个函数目前尚不清楚怎么实现:
refill():从内存池中申请空间并构建free list,然后从free list中分配空间给用户
chunk_alloc():从内存池中分配空间
然后就是最重要的allocate()和deallocate()函数
allocate函数中:如果需要的空间太大超过范围就调用第一级分配器;然后去查询free_list当中是否可以分配,如果可以分配那么就分配就好了;如果没有就调用refill()函数,从内存池中申请空间并且构建free_list,然后分配一块给用户,至于是战备池还是战备池不够处理碎片然后malloc申请,或者是malloc失败去找后面的空白区块,这就是refill的事情了,现在尚不清楚
deallocate函数中:如果空间太大,调用第一级,与allocate配套;否则把free_list[]指针前移
那么问题来了,为什么这里不调用free()释放还给操作系统呢?
前面知道,由于各种原因,free_list[]的指向并不一定是连续的,但是他们之间是用链表实现的,给我们的感官是这样的;不连续的话贸然去free()就可能会出问题,所以他不还给操作系统 (个人感觉这里不是很合理)
另一个问题就是没有对这个p指针进行检查,如果他不是这个分配器给出来的指针,他指向空间的大小可能就不是8的倍数,这样如果执行这段代码可能就会造成不可逆转的结果了
refill()函数:
这个函数的作用就是在free_list没有空间的时候,内部调用chunk_alloc()申请内存池并且分配给用户和free_list,然后把申请到的free_list给串起来
然后拿一大块内存的事情就交给chunk_alloc()函数去实现
chunk_alloc()函数:
这里就是去要一大块内存,先去看战备池,他这里是先看能不能满足最大的需求,就是规定的战备池最多提供20块,不能的话看能切出几块,然后修改指针;
如果无法满足那么就代表战备池无法满足,那么就把这个碎片进行处理(给他放到对应的free_list的首部),然后准备计算接下来需要malloc拿到的空间,然后尝试去拿取;malloc拿到的空间前面提到是2 * 20 * 32 比如,先全部放到战备池当中,然后切出一半来给用户和free_list分配;失败了说明系统heap空间不够了,那么就尝试去这个大小的链表后面去找可用的空间,将其一块分为用户和战备池,如果这还找不到就山穷水尽,g!
然后就剩下一些类外的初始化和typedef的操作了
整合了一下代码:
1 2 3 4 5 6 7 8 9 10 11 12 13 14 15 16 17 18 19 20 21 22 23 24 25 26 27 28 29 30 31 32 33 34 35 36 37 38 39 40 41 42 43 44 45 46 47 48 49 50 51 52 53 54 55 56 57 58 59 60 61 62 63 64 65 66 67 68 69 70 71 72 73 74 75 76 77 78 79 80 81 82 83 84 85 86 87 88 89 90 91 92 93 94 95 96 97 98 99 #ifndef _STD_ALLOC_1ST_H_ #define _STD_ALLOC_1ST_H_ #define __THROW_BAD_ALLOC \ cerr << "out of memory" << endl; \ exit(1) template <int inst>class __malloc_alloc_template {private : static void *oom_malloc (size_t ) static void *oom_realloc (void *, size_t ) static void (*__malloc_alloc_oom_handler) () public : static void *allocate (size_t n) void *result = malloc (n); if (0 == result) result = oom_malloc (n); return result; } static void deallocate (void *p, size_t ) free (p); } static void *reallocate (void *p, size_t , size_t new_sz) void *result = realloc (p, new_sz); if (0 == result) result = oom_realloc (p, new_sz); return result; } static void (*set_malloc_handler(void (*f)())) () void (*old)() = __malloc_alloc_oom_handler; __malloc_alloc_oom_handler = f; return (old); } }; template <int inst>void (*__malloc_alloc_template<inst>::__malloc_alloc_oom_handler)() = 0 ;template <int inst>void *__malloc_alloc_template<inst>::oom_malloc (size_t n) { void (*my_malloc_handler)(); void *result; for (;;) { my_malloc_handler = __malloc_alloc_oom_handler; if (0 == my_malloc_handler) { __THROW_BAD_ALLOC; } (*my_malloc_handler)(); result = malloc (n); if (result) return (result); } } template <int inst>void *__malloc_alloc_template<inst>::oom_realloc (void *p, size_t n) { void (*my_malloc_handler)(); void *result; for (;;) { my_malloc_handler = __malloc_alloc_oom_handler; if (0 == my_malloc_handler) { __THROW_BAD_ALLOC; } (*my_malloc_handler)(); result = realloc (p, n); if (result) return (result); } } typedef __malloc_alloc_template<0 > malloc_alloc;template <class T , class Alloc >class simple_alloc {public : static T *allocate (size_t n) return 0 == n ? 0 : (T *)Alloc::allocate (n * sizeof (T)); } static T *allocate (void ) return (T *)Alloc::allocate (sizeof (T)); } static void deallocate (T *p, size_t n) if (0 != n) Alloc::deallocate (p, n * sizeof (T)); } static void deallocate (T *p) Alloc::deallocate (p, sizeof (T)); } }; #endif
1 2 3 4 5 6 7 8 9 10 11 12 13 14 15 16 17 18 19 20 21 22 23 24 25 26 27 28 29 30 31 32 33 34 35 36 37 38 39 40 41 42 43 44 45 46 47 48 49 50 51 52 53 54 55 56 57 58 59 60 61 62 63 64 65 66 67 68 69 70 71 72 73 74 75 76 77 78 79 80 81 82 83 84 85 86 87 88 89 90 91 92 93 94 95 96 97 98 99 100 101 102 103 104 105 106 107 108 109 110 111 112 113 114 115 116 117 118 119 120 121 122 123 124 125 126 127 128 129 130 131 132 133 134 135 136 137 138 139 140 141 142 143 144 145 146 147 148 149 150 151 152 153 154 155 156 157 158 159 160 161 162 163 164 165 166 167 168 169 170 171 172 173 174 175 176 177 178 179 180 181 182 183 184 185 186 187 188 189 190 191 192 193 194 195 196 197 198 199 200 201 202 203 204 205 206 207 208 209 210 211 212 213 214 215 216 217 218 219 220 221 222 223 224 225 226 227 #ifndef _STD_ALLOC_2ND_H_ #define _STD_ALLOC_2ND_H_ #include "std_alloc_1st.h" using namespace std;#include <iostream> enum { __ALIGN = 8 }; enum { __MAX_BYTES = 128 }; enum { __NFREELISTS = __MAX_BYTES / __ALIGN }; template <bool threads, int inst>class __default_alloc_template {private : static size_t ROUND_UP (size_t bytes) return (((bytes) + __ALIGN - 1 ) & ~(__ALIGN - 1 )); } private : union obj { union obj *free_list_link; }; private : static obj *volatile free_list[__NFREELISTS]; static size_t FREELIST_INDEX (size_t bytes) return (((bytes) + __ALIGN - 1 ) / __ALIGN - 1 ); } static void *refill (size_t n) static char *chunk_alloc (size_t size, int &nobjs) static char *start_free; static char *end_free; static size_t heap_size; public : static void *allocate (size_t n) { obj *volatile *my_free_list; obj *result; if (n > (size_t )__MAX_BYTES) { return (malloc_alloc::allocate (n)); } my_free_list = free_list + FREELIST_INDEX (n); result = *my_free_list; if (result == 0 ) { void *r = refill (ROUND_UP (n)); return r; } *my_free_list = result->free_list_link; return (result); } static void deallocate (void *p, size_t n) { obj *q = (obj *)p; obj *volatile *my_free_list; if (n > (size_t )__MAX_BYTES) { malloc_alloc::deallocate (p, n); return ; } my_free_list = free_list + FREELIST_INDEX (n); q->free_list_link = *my_free_list; *my_free_list = q; } static void *reallocate (void *p, size_t old_sz, size_t new_sz) }; template <bool threads, int inst>char *__default_alloc_template<threads, inst>:: chunk_alloc (size_t size, int &nobjs) { char *result; size_t total_bytes = size * nobjs; size_t bytes_left = end_free - start_free; if (bytes_left >= total_bytes) { result = start_free; start_free += total_bytes; return (result); } else if (bytes_left >= size) { nobjs = bytes_left / size; total_bytes = size * nobjs; result = start_free; start_free += total_bytes; return (result); } else { size_t bytes_to_get = 2 * total_bytes + ROUND_UP (heap_size >> 4 ); if (bytes_left > 0 ) { obj *volatile *my_free_list = free_list + FREELIST_INDEX (bytes_left); ((obj *)start_free)->free_list_link = *my_free_list; *my_free_list = (obj *)start_free; } start_free = (char *)malloc (bytes_to_get); if (0 == start_free) { int i; obj *volatile *my_free_list, *p; for (i = size; i <= __MAX_BYTES; i += __ALIGN) { my_free_list = free_list + FREELIST_INDEX (i); p = *my_free_list; if (0 != p) { *my_free_list = p->free_list_link; start_free = (char *)p; end_free = start_free + i; return (chunk_alloc (size, nobjs)); } } end_free = 0 ; start_free = (char *)malloc_alloc::allocate (bytes_to_get); } heap_size += bytes_to_get; end_free = start_free + bytes_to_get; return (chunk_alloc (size, nobjs)); } } template <bool threads, int inst>void *__default_alloc_template<threads, inst>:: refill (size_t n) { int nobjs = 20 ; char *chunk = chunk_alloc (n, nobjs); obj *volatile *my_free_list; obj *result; obj *current_obj; obj *next_obj; int i; if (1 == nobjs) return (chunk); my_free_list = free_list + FREELIST_INDEX (n); result = (obj *)chunk; *my_free_list = next_obj = (obj *)(chunk + n); for (i = 1 ;; ++i) { current_obj = next_obj; next_obj = (obj *)((char *)next_obj + n); if (nobjs - 1 == i) { current_obj->free_list_link = 0 ; break ; } else { current_obj->free_list_link = next_obj; } } return (result); } template <bool threads, int inst>char *__default_alloc_template<threads, inst>::start_free = 0 ;template <bool threads, int inst>char *__default_alloc_template<threads, inst>::end_free = 0 ;template <bool threads, int inst>size_t __default_alloc_template<threads, inst>::heap_size = 0 ;template <bool threads, int inst>typename __default_alloc_template<threads, inst>::obj *volatile __default_alloc_template<threads, inst>::free_list[__NFREELISTS] = { 0 , 0 , 0 , 0 , 0 , 0 , 0 , 0 , 0 , 0 , 0 , 0 , 0 , 0 , 0 , 0 , }; using alloc = __default_alloc_template<false , 0 >;#endif
1 2 3 4 5 6 7 8 9 10 11 12 13 14 15 16 17 18 19 20 21 22 23 24 25 26 27 28 29 30 31 32 33 34 35 36 #include <iostream> using namespace std;#include "std_alloc_2nd.h" void test_G29_alloc () cout << "test_global_allocator_with_16_freelist().......... \n" ; void *p1 = alloc::allocate (120 ); void *p2 = alloc::allocate (72 ); void *p3 = alloc::allocate (60 ); cout << p1 << endl << p2 << endl << p3 << endl; alloc::deallocate (p1, 120 ); alloc::deallocate (p2, 72 ); alloc::deallocate (p3, 60 ); } int main () test_G29_alloc (); return 0 ; }
执行结果:
假设这里list<>使用的分配器是std::alloc,list除了本身的Foo之外,还带有list的两根指针,如果sizeof(Foo) + 2 * 指针大小 < 128,那么可以调用alloc分配器;
第二行list<>容器调用push_back()插入操作,Foo(1)是临时对象,放在栈区,然后调用copy ctor,把他放到alloc创造的空间当中,这一段空间不带有cookie;
第二个操作把一个由malloc动态开辟出来带有cookie的空间copy到alloc创造的空间当中,同样也不带有cookie
注意等号判断的写法,这里推荐把右值放在等号左边,为什么呢?
这样的话,如果我不小心把 == 号写成了 = 号,那么 0 = start_free是没办法通过的,会报错,如果交换顺序则会通过,造成的后果是非常严重的,所以强烈建议判断 == 的时候把右值放在等号左边!!
当没有内存可以分配的时候,分配器会去找已有的内存,也就是上面往后找一块free_list下的内存块划分给用户和战备池,如果这都没有的话就g啦。但是当时我们提到过,可以把剩余的内存(比如9688到10000还有312),可以把剩余的内存减半再减半,直到可以被分配出来,这样不是可以更好的利用内存吗?想法是肯定的,但是上面说在多进程的机器上会带来大灾难,这里的理解不一了,一种理解是这不是更好的利用内存了嘛?另一种是你把内存尽可能的使用了,其他人怎么办呢?Gc2.9选择了后者,如果想实现前者,也不是不可以,只是难度比较大
另外一个问题就是他的deallocate()函数不进行内存的归还,这也是受限制于这个设计先天的缺陷吧,链表指来指去,内存不一定连续,这样就没有把握free内存
测试代码:
1 2 3 4 5 6 7 8 9 10 11 12 13 14 15 16 17 18 19 20 21 22 23 24 25 26 27 28 29 30 31 32 33 34 35 36 37 38 39 40 41 42 43 44 45 46 47 48 49 50 51 52 53 54 55 56 57 58 59 60 61 62 63 64 65 66 67 68 69 70 71 72 73 74 75 76 77 78 79 80 81 82 83 84 85 86 87 88 89 90 91 92 93 94 95 96 97 98 99 100 101 102 103 104 105 106 107 108 109 110 111 112 113 114 115 116 117 118 119 120 121 122 123 124 125 126 127 128 129 130 131 132 133 134 135 136 137 138 139 140 141 142 143 144 145 146 147 148 149 150 151 152 153 154 155 156 157 158 159 160 161 162 163 164 165 166 167 168 169 170 #include <iostream> using namespace std;#include <ext/pool_allocator.h> #include <list> #include <vector> template <typename Value_Type>using listPool = list<Value_Type, __gnu_cxx::__pool_alloc<Value_Type>>;static long long countNew = 0 ;static long long countDel = 0 ;static long long countArrayNew = 0 ;static long long countArrayDel = 0 ;static long long timesNew = 0 ;void * myAlloc (size_t size) return malloc (size); } void myFree (void * ptr) free (ptr); } inline void * operator new (size_t size) countNew += size; ++timesNew; return myAlloc (size); } inline void * operator new [](size_t size) { countArrayNew += size; void * p = myAlloc (size); cout << p << endl; return p; return myAlloc (size); } inline void operator delete (void * ptr, size_t size) countDel += size; myFree (ptr); } inline void operator delete (void * ptr) myFree (ptr); } inline void operator delete [](void * ptr, size_t size) { countArrayDel += size; myFree (ptr); } inline void operator delete [](void * ptr) { myFree (ptr); } void test_overload_global_new () cout << "test_overload_global_new().......... \n" << endl; { cout << "::countNew= " << ::countNew << endl; cout << "::countDel= " << ::countDel << endl; cout << "::timesNew= " << ::timesNew << endl; string* p = new string ("My name is Ace" ); delete p; cout << "::countNew= " << ::countNew << endl; cout << "::timesNew= " << ::timesNew << endl; cout << "::countDel= " << ::countDel << endl; p = new string[3 ]; delete [] p; cout << "::countNew= " << ::countNew << endl; cout << "::timesNew= " << ::timesNew << endl; cout << "::countArrayNew= " << ::countArrayNew << endl; vector<int > vec (10 ) ; vec.push_back (1 ); vec.push_back (1 ); vec.push_back (1 ); cout << "::countNew= " << ::countNew << endl; cout << "::timesNew= " << ::timesNew << endl; list<int > lst; lst.push_back (1 ); lst.push_back (1 ); lst.push_back (1 ); cout << "::countNew= " << ::countNew << endl; cout << "::timesNew= " << ::timesNew << endl; } cout << endl << endl; { countNew = 0 ; timesNew = 0 ; listPool<double > lst; for (int i = 0 ; i < 1000000 ; ++i) lst.push_back (i); cout << "::countNew= " << ::countNew << endl; cout << "::timesNew= " << ::timesNew << endl; } cout << endl << endl; { countNew = 0 ; timesNew = 0 ; list<double > lst; for (int i = 0 ; i < 1000000 ; ++i) lst.push_back (i); cout << "::countNew= " << ::countNew << endl; cout << "::timesNew= " << ::timesNew << endl; } } int main () test_overload_global_new (); return 0 ; }
执行结果:
第三讲将malloc和free,太难了,这部分暂时没听.
Loki分配器和std::alloc分配器的区别,std::alloc分配器的致命伤是他要到一大块内存之后进行设计,然后分配给用户之后,用户发出释放内存的操作的时候,分配器内部的实现是不归还给操作系统的,他很霸道,官方的解释是一是实现很难,二是归还这个操作可能在多任务进程中会影响其他进程的操作,而Loki分配器就解决了这个问题
如何设计?
三层结构如上:
最下层Chunk,存放这一块的指针,这一块的索引和目前还可以供应的区块
中间层FixedAllocator,存放vector< Chunk >和两根指向Chunk的指针
最上面的层SmallObjAllocator,也就是用户面对的层次 ,存放vector< FixedAllocator >和两根指向FixedAllocator的指针
至于为什么要指向某两个,这两个可能还有其他的特殊作用,这个后面再说
这些函数都是高层的类调用底层的类的,我们用户在实际操作的时候没有必要直接调用这个
Init()函数:挖出一大块内存用于操作,单位大小和区块个数都经过了调整
Reset()函数:对这大块内存进行分配,就是标出Chunk那三块, 其中用流水线的方式表示索引,把最前面一个字节的空间占据l来当作索引,概念类似于embedded pointer(嵌入式指针),只不过这里是嵌入式索引
重头戏:allocate()和deallocate()
allocate()函数:在初始化Init()函数之后调用allocate()函数,这个时候每一个block的大小都是blocksize,firstAvaliableBlock代表了这个时候第一块空白的内存,存放的是索引,就是从0开始按顺序去数,并且优先度最高,它里面存放的区块索引是之前设计好的,就是第二高的优先度,第一块内存分配给用户之后,第二块就上来了,变成了firstAvailableBlock的内容,然后blocksAvailable减减
deallocate()函数:给一个指针,当然需要先判断这跟指针位于哪个Chunk结构当中,这就一个一个去查询(查询指针的位置)就好了,找到之后把这一块内存free掉,做allocate()函数的逆操作,把目前状态的firstAvailable的区块索引填入该区块,然后该区块索引取代他成为firstAvailableBlock,然后blocksAvailable加加,这就保证了操作的严谨和自洽
FixedAllocator类的结构:
除了存放vector< Chunk >之外,还有两根指针,用来标识最近一次alloc的Chunk和dealloc的Chunk,这么做的含义是,可以从这个最近的区块当中看是否可以继续分配或者回收来提高效率
Allocate代码:
如果标识allocChunk为0(例如最开始的时候没有分配内存)或者allocChunk指向的blockAvailable为0代表没有课余空间,那么表明allocChunk不可用,需要从头重新开始查找
在查找过程中如果发现可用的,记下地址然后去分配,如果没有可用的(都用光了),这时候加一个新的chunk进去用于新的分配!!!
注意加了新的chunk之后记得更改allocChunk和deallocChunk的值,allocChunk就设置为改Chunk就可以,因为这是新生成的,可以进行分配;deallocChunk设置为头部
但是为什么要重设呢?因为vector在push_back操作中可能出现2倍扩张导致move的问题,这个时候原来的指针就失效了,显然需要重新设置!!!
deallocate代码:
拿到一个需要释放的指针,先找到需要释放的Chunk区块,通过VicinityFind()实现,然后通过DoDeallocate()进行释放
VicinityFind()函数:
他这种写法其实没有特别的数学依据,大致思想就是从上一个deallocChunk开始,将其分为上下两个部分,上面找一个,下面找一个,直到找到对应的区块,然后进行修改
但是如果给的p不是Chunk分配拿出的指针,那么显然是找不到的,所以会死循环
DoDeallocate()函数:
这里要注意如果回收之后这一块Chunk变为全空,需要把这一块进行回收嘛?这就不是内存分配的重点了
这几个版本实现不同,但是其实本质上没有进行额外的设计,就是对c runtime libirary里面malloc和free的调用
这个分配器的目的是分出一块静态内存array(C++数组),然后分配给用户,由于是静态,所以不需要进行回收,因此按道理来说不需要deallocate()。但是分配器都需要提供这些统一的接口,所以他do nothing.
注意第二个模板参数传入的参数必须是array<>!!!
例子:
静态数组充当分配单元
动态开辟的空间充当分配单元
用途:包裹其另一个分配器分配的空间,添加一个extra的空间用来记录分配的大小(类似于cookie,因为cookie当中也记录着整块的大小)
但是感觉没什么用,试想一下我刚好去除了cookie构造了一个不错的内存池,然后用这个debug_allocator又添加了一个类似于cookie的debug header,这不是很鸡肋嘛
太熟悉啦!
该分配器就allocate()和deallocate()函数做了两种;
就容器需要的元素种类个数为1和以上做了区分,但是实际上绝大多数情况下容器存放的东西都是一种类型,不同的类型很少
下面他的设计用图示实现
还是以内存池的形式,挖出一大块内存然后进行分配。在这里这个团队设计的是一开始挖出64个指定类型的区块,然后填上bitmap,use count和一个头部记录super block size,因此这一整块就叫做super block。
注意bitmap是怎么确定大小的,bitmap里面存的是16进制数,数组的形式,一个数组值4个字节,也就是可以放图中的4 * 16 = 64 个block的状态,1代表已存放,0代表未存放
整个super block大小的计算如上
对于整个bitmap_allocator的控制,使用的是自己设计的一个建议__mini_vector,因为标准库的vector底层还有分配器,用他的话就相当于套娃了,这里就是一个简单的版本,里面同样有三根指针,然后同样是2倍扩充,机制是一样的
当填充进数据:
记得修改use count;
修改bitmap数组的值,这里的顺序是反着来的,已分配设为0,未分配设为1,图中的1110代表 block的前四位 第一位0 分配出去了,所以就是E
当第一个super_block用尽,启动第二个super_block:
block的个数由64加倍,变为128;然后记得修改__mini_vector的值,记得vector是两倍成长的
继续:
当需要启动第三个super_block的时候,这个时候进行2倍扩张,就变成了4个区块
这个团队规定:如果不全回收,分配规模不断增大;如果全回收了下一次规模减半
这个vector的value_type并没有限制,因为他的每一个区块都是在自己的value_type之下构成的,我的vector只起了一个管理的作用!!!
从图中也可以看出我们的vector里面存放的只是两根指针,指向值的第一个block和最后一个block!!!
如果把第一个super block全回收了,那么第一个super block会被放入一个free_list当中(最多64个,多了会被归还给操作系统)用作下一个分配的备用空间,然后在__mini_vector当中,会把第一个元素给删除掉,做类似于erase()的操作,只不过erase()函数需要减少size的,但是这里并没有减少,只是看起来是将元素向前推了,多出的空间就是空白
整个过程大致就是这样
当成员函数的const和non-const版本同时存在,const对象只能调用const版本,non-const对象只能调用non-const版本
因此,const也是区分函数是否相同的标志,同一个函数加上const和不加就相当于是一个重载的版本了
1 2 3 4 5 6 7 8 9 10 11 12 13 14 15 16 17 18 19 20 21 22 23 24 25 26 27 #include <iostream> using namespace std;class Fuck {public : void fuck () const cout << "const version" << endl; } void fuck () cout << "non-const version" << endl; } }; void test () const Fuck f1; f1.f uck(); Fuck f2; f2.f uck(); } int main () test (); return 0 ; }